


I recently had my cousin take some decent photographs of my garage workshop so I could enter it in a magazine contest. ( I don't know if the moderators would allow me to post a lik to the contest or mention it) I thought some here might like to see the pics he took, since they're way better than anything I could take.
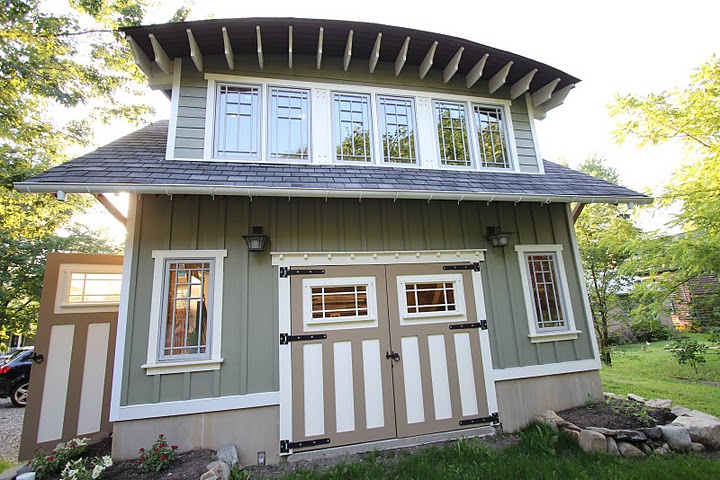
I think it's a pretty neat building and it's somewhat unique in that it has barn doors on two sides. The town wouldn't let me build anything bigger than 17x20, so I had to be creative and multi purposed about how I put the garage together for best effect, which necessitated the multiple doors. I put one set of doors on the short side to let cars drive all the way in, and those doors are 8'-3" tall, (since I used to have a healthy addiction building lifted jeeps), and I put one set of 6' doors on the long side to let cars partially into the garage and still have room on either side for engine cranes or axles for large item swap outs. I'm sure anyone who's dangled an AMC 360 with an iron manifold knows you want to give those beasts a lot of margin for swing. My back still aches thinking of moving around dressed front Dana 60's (but I digress) It's doesn't really matter, the shop is pretty much a dedicated wood shop now.
here's a shot of the "front" of the garage:
The upper dormer is curved like an old eyebrow window roof. Not really that big of a deal to make, all I really did was laminate three 2x10's together and trace a curve on them that I had drawn full scale on my basement floor. Once the header is built, everything else falls into place on it's own. The neat divided light windows I was able to scrounge on ebay. I still remember the winning bid of $1450. I had drive out to the middle of PA to get them in the dead of night, and it was a cash deal at a semi-abandoned self-storage yard. I paid the guy in front of my truck's headlights with my wife behind the wheel with explicit instructions to run me and the other guy down if she saw the guy pull a weapon. (It's not just me, most engnineers are paranoid.)
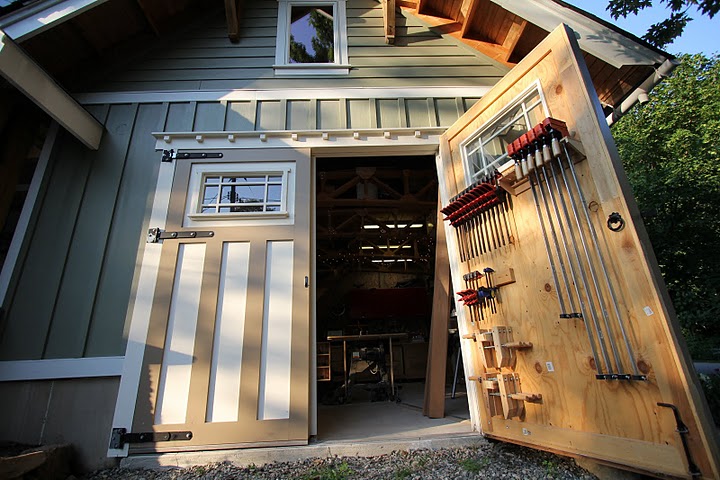
Here's a shot of the "end" of the garage:
The doors are HEAVY and fully insulated. Outside face is a full sheet of 3/4" plywood with 1x trim panels. The interior frame is flat 2x4's with ridigd foam infill. The interior face is just 1/2" rough plywood. The windows I made myself. They're just single pane glass in wood fixed panels. Interesting thing about these doors is that they (and the trusses) were built on faith before I ever had a building variance or a permit. It took me 14 months of working with the town to get the permit, so I had some time to kill. Still, storing 300 lb doors can be troublesome when you don't have a garage to put them inI really wanted carraige doors, but the pricing on them is beyond insane. I built these for about $300/pair, and that includes the massive strap hinges.
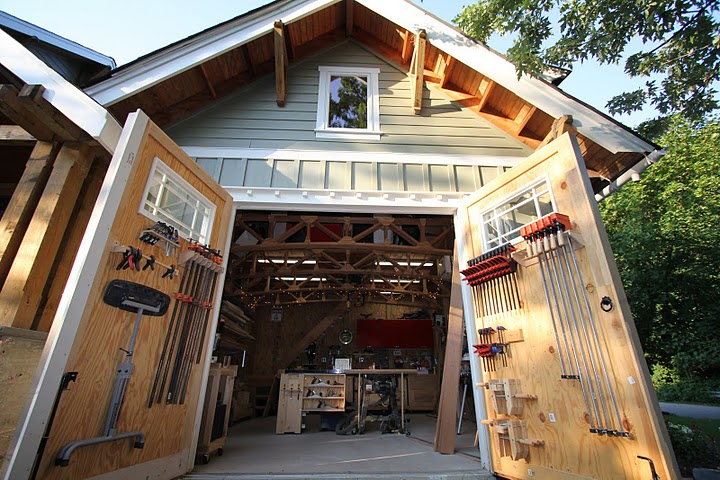
Here's a shot of both doors open, and your first look at the inside.
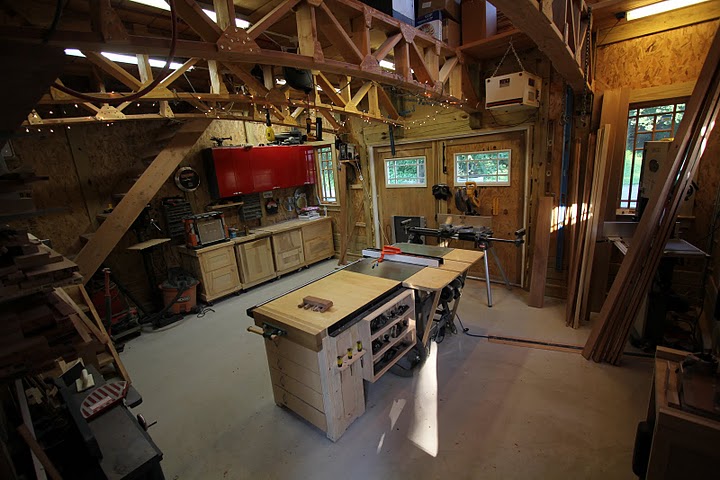
Here's a shot of the inside of the garage, standing on the staircase in the rear corner and looking at the two sets of doors from the inside. You can see the trusses that hold up the storage loft and provide frame support for the structure. You wouldn't believe how easy the trusses are to make. They're just a common gusset plate mass produced on a table saw, a few 2x6's, and some higher end cabinet mounting screws. Cost per truss was about $40 each. Each truss spaced at 4' was designed to take 50 pounds per square foot from the above loft and a 1000 lb point load from any vertical strut point on the truss (never know when you're gonna have to dangle a whole car). The Christmas lights I just added for fun.
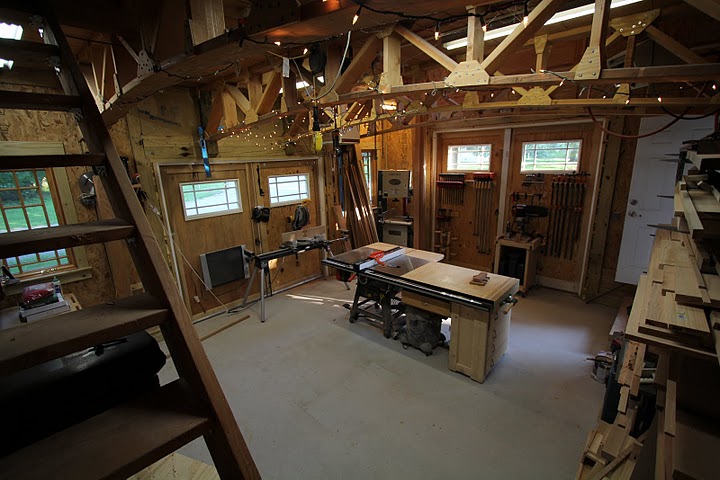
and here's another shot from the opposite corner looking at the long side. You can see the staircase and the table saw a little better. If you look in the back corner, you can see the red cabinets over the workbench modules. They're acutally just old 1950's metal kitchen cabinets that I got for free off a trash heap and then repainted. I can't believe how heavy duty these things are, they make the craftsman/Gladiator stuff feel like junk.
Because the shop is small, everything rolls, even the table saw. The four workbench modules were built to the same height as the table saw so I can orbit them around the saw and use them as infeed and outfeed tables for cutting 4x8 plywood and other sheet goods, or they can be arranged in a square or pairs to act as a supplementary assembly table. Each unit also serves a specific purpose; One holdes all my drills and drill bits, but also serves as planer stand, one is a 2.5 HP router table with a built-in router lift and stores my routers underneath, one has a stationary belt sander built into it with dust collection, and one used to hold a 6" jointer with dust collection. I recently upgraded to a floor standing jointer, and the workbench unit will be repurposed/upgraded to a downdraft table when I get time to do so.
The table saw side table was upgraded with drawers and bench vise, since I really don't have room for a seperate work bench. It also has a rack for my handplanes and chisels.
You can kind of see that each truss is supported by a PT 6x6 post (except for the ones over the doors). The primary structure of the garage is timber framed, and each post sits on a 3.5' deep concrete caisson. I'm a firm believer in post-and-beam construction and that it's the cheapest and most structurally sound way of building a structure. I saved thousands on foundation excavation and when you're working alone or in small numbers, piece framing a large wall is a lot easier than tipping it up.
I don't have any real pictures of the loft yet because it's a disaster up there. I have old tool storage, bookshelves full of auto and furniture books, and a lot of wood that I've, er.. "liberated" from a life crane dunnage or bridge work platforms including a large number of heart-free white oak 6x6's that I can't bring myself to use yet.
thanks for looking!

 Reply With Quote


