Page 1 of 3 123 LastLast
Results 1 to 15 of 36

Thread: How much sanding is enough?

  1. #1
    Join Date
    Sep 2009
    Location
    Atlanta, GA
    Posts
    6,426

    How much sanding is enough?

    I hate sanding. Gotta be done, but I don't have to like it. I am looking at a hefty pile of components that is almost complete, and sanding is next. So I started thinking: "I wonder if I sand too much?"

    All parts jointed + planed with pretty sharp straight blade knives. QSWO = very hard wood [not like that sissy poplar/cherry stuff]. 5" ROS sander hooked to Fein vac. Running Mirka at the moment.

    For "show surfaces", my standard is 120-150-180. Overlapping pattern by 50% [ie - pass 3 covers half of pass 2. etc.]. First cross grain, then with grain. So, in effect, each sq mm gets a sanding pass 4 times. ROS transit speed at between 2 and 3 IPS. Bose noise-cancelling headphones into laptop, and w/bluegrass music via Bluegrass Country-dot-org. Beer or red wine.

    For "can't see" surfaces, I don't overlap 50% - just the minimum, and I stop after 150.

    Has always turned out ducky for the past 12+ years. Typical finish is dye, gel stain to color the grain pores, shellac seal, then XYZ [currently Behlen's].

    But - is there an empirical way to determine when enough is enough? Will practice tell my fingers when its done? Is it some Yoda/Force thing? How do you guys decide?

    thanks

    Kent
    When I started woodworking, I didn't know squat. I have progressed in 30 years - now I do know squat.

  2. #2
    Join Date
    Nov 2009
    Location
    Sinking Spring, PA
    Posts
    881
    Here are my thoughts.
    Parts must be flat first, smooth will come later.
    The goal of the next grit is to remove the scratches from the previous grit.
    I sand flat with the first grit until milling marks and imperfections are gone. Move to the next grit until I don't see the roughness of the previous. Sand with the final grit until I'm happy with the surface, and keeping things flat. I then wipe the parts with alcohol. The alcohol will clean up leftover dust, and give you a quick idea how the wood will look finished, and will surely show any missed milling marks and/or scratches from sanding.

    I'm with ya though, sanding isn't my favorite thing to do!

  3. #3
    Join Date
    Sep 2009
    Location
    Atlanta, GA
    Posts
    6,426
    Quote Originally Posted by Dave Gaul View Post
    Here are my thoughts.
    Parts must be flat first, smooth will come later.
    > Never an issue.

    The goal of the next grit is to remove the scratches from the previous grit.
    > Understood that as well

    I sand flat with the first grit until milling marks and imperfections are gone. Move to the next grit until I don't see the roughness of the previous. Sand with the final grit until I'm happy with the surface,
    > THAT is where I was looking for something empirical - the "happy" part.

    and keeping things flat. I then wipe the parts with alcohol. The alcohol will clean up leftover dust, and give you a quick idea how the wood will look finished, and will surely show any missed milling marks and/or scratches from sanding.

    I'm with ya though, sanding isn't my favorite thing to do!

    Thanks for the thoughts...........

    Regards

    Kent
    When I started woodworking, I didn't know squat. I have progressed in 30 years - now I do know squat.

  4. #4
    "But - is there an empirical way to determine when enough is enough?"

    I'm done when I don't see scratches from the previous grit.

    I usually skip the 150 with no problems. It may take a bit longer with the 180 but still a time saver.

  5. #5
    Join Date
    Nov 2008
    Location
    Victor, Idaho
    Posts
    720
    I love sanding.

    Turn on some tunes and enjoy the final step of the project....

    Here's a few tips which help make it fun:

    -If you can afford a wide belt sander, most parts will just need a quick 220 touch up

    -IF you have a shaper, you can dimension all pieces to width and never again have to sand out rip saw marks.

    -6" ROS gets the job done 30% faster than 5"

    -If you can't see results at each step, you are wasting time. In other words, I'd never go from 150 to 180, since I can't tell any improvment without extremely close inspection in perfect light. I usually go from 120 to 220, and it's obvious were I've sanded and when I'm done.

  6. #6
    Join Date
    Oct 2008
    Location
    Ontario, Canada
    Posts
    106
    Hi
    I do not mind sanding. I usually work with hardwoods, primarily cherry.
    I go 120, 220 and then 320. I used to stop at 220 but I find 320 gives
    a little better finish. I normally will then apply a thinned coat of BLO
    and then shellac or oil/varnish mix which is then rubbed out and then a
    couple coats of Minwax finishing paste wax.
    Maybe I go overboard but I like the results.
    Gil

  7. #7
    I sand through 180 or 220. I also found that sanding became much less onerous after I bought a Festool Rotex sander

  8. #8
    Join Date
    Mar 2006
    Location
    SoCal
    Posts
    22,513
    Blog Entries
    1
    I rarely power sand at all. Unless something odd has happened I give a couple passes with a cabinet scraper to flat surfaces and open curves. I start sanding at 220 grit if required and usually stop there following up with a scraper. For details and end grain I go to higher grits. I go as high as 600 depending on the item but don't do that for large surfaces at all. If I run a clean hand (not one loaded with sawdust) across it and it is smooth to the touch, I'm done. For ebony, carved accents and other details the "finished" point is strictly visual. I do not use heavy film finishes to "smooth things out". This looks too plastic-y (sp?) for my taste. that's just me. YMMV.
    "A hen is only an egg's way of making another egg".


    – Samuel Butler

  9. #9
    Join Date
    Nov 2007
    Location
    NW Indiana
    Posts
    3,089
    I never even thought about how much sanding I need to do as I will get depressed. I have found that if I have done a good job of planing and fitting parts that I need a lot less sanding. I typically will sand 180 and 220 before starting to finish but have found that with some woods or sand paper, I will need more. For surfaces that you can not see, I will do less. For the top of a cabinet, doors or drawer fronts, I will make certain that the 220 feels good and many times will go to 320.

    One of the big differences for me is that I will only put 2-3 coats of finish without too much sanding between for surfaces that you can not see. For ones that are very prominent, I will use more coats and typcially go to a 400 before a final coat which is usually a wipe on coat.

    I know that I have done it properly if my wife makes a final inspection and is happy.

  10. #10

    Sanding - no fuss

    Unless I've got a poorly set up machine or have been sloppy on said machines I rarely have to start sanding below 180 grit. 180 gets attention - remove machine marks and 220 flies on by checking the sanding scratches. Sanding is no drudgery if you are careful on the machiens and can use a handplane or a scraper to tidy things up before you pull out the paper.

    Personally, I don't mind sanding as it is part of the process; this being said I manage my projects in a way that reduces sanding to a bare minumum. Hand in glove.

  11. #11
    Join Date
    Jan 2006
    Location
    Chicagoland
    Posts
    2,802
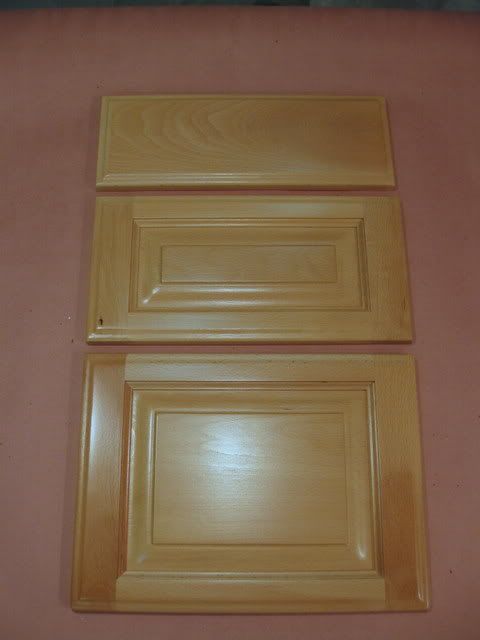
    I hear ya on this subject. I'm about 2/3's done with frame/panel raised panel doors and end caps for our kitchen. The flats sand quickly with my Festool ETS150/3 EQ (I have a Rotex 150 but don't like it for finish work). My ogee raised panel pattern end grains can even be sanded with the ROS. The Freud quatra-cut bits I used leave such a smooth finish I only hit the long grain with final grit. What is really wearing me out is that I mistakenly showed my wife a door edge profile bit that has a very shallow ogee. This profile needs to be sanded by hand. I keep telling myself not to cut corners and the hand finished doors will look great. I'm using 120, 150, 180, 220, then 320.

    Here is my top/mid/bottom drawer fronts:


    I use WB finish. One coat of amber shellac to raise grain and tone the wood a bit and four coats of satin lacquer. I sand the lacquer after the first coat with 320 to rid the raised grain and where needed on subsequent coats use 400 to remove any nibs. I have learned a lot on this project. I'm becoming a spray finish expert. I built a drying rack and run an air cleaner and find almost no dust nibs in my finish. This saves lots of sanding between coats.

    Mike

  12. #12
    Quote Originally Posted by glenn bradley View Post
    I rarely power sand at all. Unless something odd has happened I give a couple passes with a cabinet scraper to flat surfaces and open curves. I start sanding at 220 grit if required and usually stop there following up with a scraper. YMMV.
    I like the scraper also. It takes a little effort to sharpen, and needs to be resharpened often, but it makes a super nice surface. For removing an old finish, in my opinion, nothing is even close.

  13. #13
    What is really aggravating is when you sand, sand, sand, and then, more sand, sand, sand, then start applying the finish, and see something that leads you to believe that you did not sand enough..............I almost believe that too much sanding is not enough, if you know what I mean.

  14. #14
    Join Date
    Sep 2009
    Location
    Atlanta, GA
    Posts
    6,426
    OK - thanks for the insight. I'm going to do it this way this afternoon........150 - 180, feel for smoothness and visually inspect for swirls, and see how it goes. 40 +/- pre-assembly parts for the base of an Arts + Crafts dining room table [2/3 are square spindles, but they still count, right?]. Room is tight for something that big, so I gotta go through finishing and assembly, and move it upstairs to somewhere, so I can get going on the table top.

    I have, in the past, gone past 180, but I haven't seen the benefit on the open-pored QSWO. On the end grain [ie - table tops], I hand-sand 220 - 320 to burnish the grain, then carefully brush on [very small artist's brush] a couple coats ultra blonde shellac - seals it perfectly, so that the dye absorption matches the long grain's color perfectly.

    And - to all the Festool responses....pffthhhht!!!

    EDIT: I guess I shouldn't be too hard on you green kool-aid junkies; I should be grateful that I didn't get a bunch of "dual-drum sander" replies, huh? Which I what I really want to get someday..........but the bucks, not just for the sander, but for the DC piping, and the copper wire to explosion-proof the PVC and flex hose.


    That last bit was a joke, guys.
    Last edited by Kent A Bathurst; 09-28-2011 at 10:10 AM.
    When I started woodworking, I didn't know squat. I have progressed in 30 years - now I do know squat.

  15. #15
    Grit selection The tech staff of sanding supply companies will typically recommend skipping one grit size in a grit progression. So in your case it would be 120 and then 180. The 150 step is unnecessary.

    The "80/20" rule usually works. 80% of the time on the first grit and 20 on the remaining grits. I know I am done sanding at each grit when the surface looks uniformly bright. If there is a shiny spot it means the machine burnishing is not removed. If there is a dull place it means that area has torn grain that is capturing dust (and it will therefore capture stain and be dark).

    I always hand sand the last grit size. I can see problems better while hand sanding and devote more time to these areas.

Posting Permissions

  • You may not post new threads
  • You may not post replies
  • You may not post attachments
  • You may not edit your posts
  •