Results 1 to 15 of 15

Thread: Cherry Burl HF Design Advice.

  1. #1
    Join Date
    Jul 2010
    Location
    Sandia Park, NM
    Posts
    1,068

    Cherry Burl HF Design Advice.

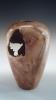
    This is my first attempt at a Dr Keller'esk HF. This was not the shape I intended, but when I saw the figure in the base and at the top, I called an audible. On this, I wanted to leave the gnarly bark at the top. This required me to leave it REALLY thick. Since the top was thick and off balanced, I had to leave some mass at the bottom to keep it from tipping over. Should I leave the bark or re-chuck it and thin it down??? Dry sanded to 320, then BLO sanded with w/d 400 then two coats of shellac.

    Cherry HF 01.jpgCherry HF 02.jpgCherry HF 03.jpg
    When you approach the lathe you have "the plan", after your first catch you have "the intent".- P. Harbeck

  2. #2
    Join Date
    Jan 2011
    Location
    Gresham, Oregon
    Posts
    406
    Nate - You've got an interesting piece of wood there!! From your photo, I'm having a tough time seeing what you've got to deal with in the top half. I can't tell what is bark and what is wood. The challenge for you will be to save the interesting wood, yet hold the integrity and balance/form of the piece. Personally, I like the walls to be a bit thinner. I'm attaching a few photos of a slightly similiar challenge I had awhile back. The shape is different, but you might be able to see some things that you like.....or that you want to stay away from.

    I hope this is useful to you, Mike Ash


    DSCF0278.jpg

    DSCF0274.jpg

  3. #3
    Join Date
    Jan 2009
    Location
    sLower Delaware
    Posts
    5,464
    Looks like a tough call Nate. I have done a couple of cherry burls where I left them thicker than normal because I liked the weathered texture on the outside. Going thinner would have lost that.

  4. #4
    Join Date
    Jul 2010
    Location
    Sandia Park, NM
    Posts
    1,068

    Cherry Burl HF (Reworked)

    Thanks to Mike and Baxter for your input. I went back and thinned it as much as I could without losing the top. I also, did the base so that the form appeared to be floating. Hope you all like it.
    Cherry Burl 01.jpgCherry Burl 02.jpgCherry Burl 03.jpg
    When you approach the lathe you have "the plan", after your first catch you have "the intent".- P. Harbeck

  5. #5
    Join Date
    Oct 2006
    Location
    Manistique, Michigan
    Posts
    1,368
    Nate - Really nice work and interesting piece of wood.
    Thank you,

    Rich Aldrich

    65 miles SE of Steve Schlumpf.

    "To a pessimist, the glass is half empty; to an optimist, the glass is half full; to an engineer, the glass is twice as big as it needs to be." Unknown author


  6. #6
    Join Date
    Sep 2009
    Location
    Enid, Oklahoma
    Posts
    6,741
    That's cool, Nate! I think you did the right thing with the revised version. I like the little interrupted bead detail near the waist of that piece... I may have to borrow that sometime! I love the viewing angle you captured in the second photo... That's a great representation of what I like about this type of piece. I've been giving some thought to making a spherical version like what you've got here... That way it could just wobble to what ever position it felt most comfortable!

  7. Gnarly cherry burls..............they are "like a box of chocolates".........you never know what you're going to get! Sheesh!!!

    Nice job Nate.........that one would have been firewood at my place!
    Remember, in a moments time, everything can change!

    Vision - not just seeing what is, but seeing what can be!


  8. #8
    Much improved!! Still not sure about the waist bead, but it does add an element of interest.

  9. #9
    Join Date
    Jul 2010
    Location
    Sandia Park, NM
    Posts
    1,068
    Thanks all, it was really nice being able to see your tool while hollowing and not having to stop to remove chips
    When you approach the lathe you have "the plan", after your first catch you have "the intent".- P. Harbeck

  10. #10
    Join Date
    Jan 2005
    Location
    Goodland, Kansas
    Posts
    22,605
    I like it Nate much better. Well done.
    Bernie

    Never put off until tomorrow what you can do the day after tomorrow.

    To succeed in life, you need three things: a wishbone, a backbone and a funnybone.


  11. #11
    Nate,

    It looks great. Pieces like that are always tough.

    Alan

  12. #12
    Join Date
    Feb 2008
    Location
    lufkin tx
    Posts
    2,054
    Very nice and open minded work and wood. remember, art and perfection have no relationship.--------------old forester

  13. #13
    Join Date
    Jan 2011
    Location
    Gresham, Oregon
    Posts
    406
    Nice job, Nate!!! I really like the 2nd view, it has an interesting mystique for me.On another note, thanks for your service to us civilians!!Mike Ash

  14. #14
    Join Date
    Jan 2009
    Location
    sLower Delaware
    Posts
    5,464
    Looks great Nate! I love picture 2. How much additional thickness to you think you took off?

  15. #15
    Join Date
    Jul 2010
    Location
    Sandia Park, NM
    Posts
    1,068
    Baxter, off the top at least a half inch, it was really thick. Took an addition 1/8 or so off the bottom so the entire form is uniform now at about 3/8".
    When you approach the lathe you have "the plan", after your first catch you have "the intent".- P. Harbeck

Posting Permissions

  • You may not post new threads
  • You may not post replies
  • You may not post attachments
  • You may not edit your posts
  •