Really nice David. Really like the grain in that wood.


 Contributor
Really nice David. Really like the grain in that wood.
Bernie
Never put off until tomorrow what you can do the day after tomorrow.
To succeed in life, you need three things: a wishbone, a backbone and a funnybone.
 Contributor
Very nice DoubleD. That wood is interesting.
Ken
So much to learn, so little time.....
 Member
It's awesome David! I'm glad this one cooperated! It's cool, I'm gonna have to try one of those slowly disappearing into nothing variations you spoke of
I am enough of an artist to draw freely upon my imagination. Imagination is more important than knowledge. Knowledge is limited. Imagination encircles the world. ~ Albert Einstein
 Member
Congrat's David! Sphere's are tough. Just ask me, I've failed more times than I would care to own up to!
 Member
Way cool David. There is a lot going on with this lovely piece of wood with the great grain patterns.
Spheres are tough indeed but I just finished one (smaller - about 4") using a trick I learned online. Spin it on one axis and cut a groove with a parting tool, rotate it 90 degrees and cut it using the circular groove as a guide. Give it a try - it helps a lot. The one I just turned last week is BLM burl.
Member
David is off on another tangent. Sorry, couldn't resist.
Turning a sphere on a single axis is difficult. Using cup chucks, and turning on 3 different axisssss (or how ever you spell and say it) is simple. Two axis through the pole and one through the equator. Rough form, put between cup chucks (softer wood than your sphere). Turn smooth. Draw a pencil line in about the center with the rotation of the spinning wood. Rotate 90 degrees so the pencil line runs through the cup chuck. Very gently turn down to the line, but not through it. Draw another line at 90 degrees to the first one. Rotate again so the poles are in the cup chucks. Go through the rotation a couple of times and you have a sphere.
robo hippy
 Contributor
That looks pretty cool.
Your opinions and advice are welcome on anything i post - Thanks
 [OP]
Member
[OP]
Member
"David is off on another tangent..."
Could be.... The suggestions about using either a groove (D.R.) or pencil lines (R.G.) as guides are interesting. But that brings up a question in my simple mind. Once you form a sphere using these techniques, how do you hold it securely enough to hollow it out? This one is 6" in diameter and I would like to make larger ones. Either of the suggested methods would preclude the use of a chuck which is how I did this one. I guess maybe one of those "donut chuck" things?
"...is this one dry enough to stay round?"
Don't know. Probably not but I've made a couple of things from this wood and it seems to be pretty stable so maybe it will be OK. So far it's still round...
Last edited by David DeCristoforo; 12-07-2011 at 9:31 AM.
David DeCristoforo
 Member
I like it!
Member
Here is a link to the directions for the way I did mine.
http://www.woodturners.org/tech_tips...structions.pdf
I did not hollow as that would actually interfere with it's intended function but after hollowing while still chucked, you could reverse chuck it using the hollowing opening for the jaws or just make a cup chuck and lots of tape to clean off the spigot.
I looked at the three axis turning and found no benefit over using two axes. It helped to apply black marker to the groove to help make it more visible. I also think making it a bit wider would help visualizing the 'inner sphere'.
Last edited by David Reed; 12-07-2011 at 12:02 PM.
 Contributor
Reed, that is GOOD info. I was talking to one of our senior club members about some spheres he turned and he meantioned turning them between cups. But my attempt didn't work as well. Using a line as a guide makes a lot of sense. I will definitely be trying this method and trying to rig up a holding jig to hollow them out. Thanks Obi-Wan!Originally Posted by Reed Gray

David, thanks for the PDF as well. That opens up a few ideas too.
Last edited by Scott Hackler; 12-07-2011 at 11:36 AM.
-------
No, it's not thin enough yet.
-------
[OP]
Member
I'll be interested in hearing how this works out for you. I'm leaning towards the "groove" idea, mostly because I want a tenon for chucking. I'm not at all comfortable with the idea of trying to hollow a 6" - 8" sphere held between "cups"! In fact, I cannot even visualize it.
David DeCristoforo
 Member
I may have missed it in you post but what kind of wood is it? Marvelous grain pattern. It looks like the wood as already moved a bit. Rather that taking the time and expense of making a ball jig I cut an inch off the end of a PVC pipe. Lay it on the turning and turn until there is no light under the PVC. I have several different diameter PVC rings for different size balls. It ain't perfect but it looks round to the human eye.
I turn, therefore I am
Member
David,
I've turned a few hollow spheres. Start out as a hollow form, rough green endgrain to a fat in the middle sphere to allow for drying shrinkage. Leave the chucking tenon on the bottom. Once dry, jam chuck the opening on a stub, using the center point mark in the tenon to center on the live center. Recut the tenon and shoulder true. Chuck on the tenon, cut the outside using a template to get as close as possible. The pvc or gatoraide lid thing helps. Rehollow the inside to whatever wall thinness you are after/comfortable with. Reverse back onto a stub, and cut as much of the tenon away as possible. Put in the jam cups, and do the multi axis shadow line thing. I still have one here that was done a couple of years ago. I will see if I can find a picture and post it.
Dale
 Member
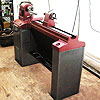
Hi David, here's how I held the balls that I just posted pics of when I did my hollowing.
Picture 015 (Large) (2).jpgPicture 016 (Large).jpg
 Posting Permissions

 Reply With Quote