Page 1 of 2 12 LastLast
Results 1 to 15 of 16

Thread: Maple Egg Thingy

  1. #1

    Maple Egg Thingy

    Hi Folks,

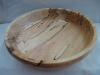
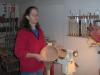
    I haven't posted any projects for a while. This is one of my last projects, it stands about 12 inches tall. The maple is from a tree that was in our yard. I'm still learning about box turning. There is a lot of room for improvement and more to learn, so I'll be doing some more of the eggs and bases.


    002.JPG

    Bob Haverstock

  2. #2
    Join Date
    Dec 2010
    Location
    Willow Spring, NC
    Posts
    487
    Interesting piece. The finish looks flawless, but I believe the form could use some work. I believe a more delicate pedestal and finial would show off the form of the box more. The handle doesn't take away too much, but the foot seems a bit clunky for my taste. Hope it won't be too long before your next post!

  3. #3
    Join Date
    Oct 2008
    Location
    Fresno, Ca
    Posts
    4,032
    As an idea Bob...toss the knob on top, get ride of the base and let it stand on it's own. Could be an idea.
    Your Respiratory Therapist wears combat boots

  4. #4
    Join Date
    Jul 2011
    Location
    Connecticut
    Posts
    644
    Nice work

    The major thing I would change is reverse it, so it is not resting on the nose. It looks upside down to me

  5. #5
    Join Date
    Feb 2010
    Location
    Cut Bank, Montana
    Posts
    29
    Bob, I like your Maple Egg Thingy. I am not an expert, but as I look at the lines, I can appreciate the time and work that went into the piece. Good job.

  6. #6
    I'm still learning about box turning.
    Bob, i like your continuous curve on the main form. enjoy the learning process and continue to develop your form as you climb the learning curve, btw, the curve is not all up and takes lots of twists and turns.

  7. #7
    Join Date
    Feb 2009
    Location
    Chatsworth, GA
    Posts
    2,064
    Bob, I think your egg looks very nice. The shine on it is awesome. Is that poly?

  8. #8
    Join Date
    Jan 2009
    Location
    sLower Delaware
    Posts
    5,464
    Nice egg thingy Bob. A form I have yet to attempt!

  9. #9
    Join Date
    Apr 2008
    Location
    Sunny California
    Posts
    512
    +1 on the excellent finish. Please reveal your "secret sauce!"

    Nice work, nicely done.
    A creative man is motivated by the desire to achieve, not by the desire to beat others.
    Ayn Rand

  10. #10
    Join Date
    Mar 2005
    Location
    Spokane, Washington
    Posts
    4,021
    Hey I like it! Nice curves, the orientation makes a better box than flipping it would, and the finish looks flawless. I don't mind the knob or the stand, not everything has to be long and skinny.

    Dan
    Eternity is an awfully long time, especially toward the end.

    -Woody Allen-

    Critiques on works posted are always welcome

  11. #11
    Bob, I think you did a great job on the form. While I don't particularly care for the base and knob, they are well done, with good contrast, and you are the artist with the vision. If they achieve the vision you had in mind, then this piece is a great success. Excellent finish, as well.

    The pic - it needs some help. The image had low resolution, but I took a shot at some improvement. Perhaps this color is closer?
    Attached Images Attached Images

  12. #12
    Thanks for the comments, it has no finial, it has a plain ol' knob. I don't think in terms of art, I'm a bit too common for that. If it were taller, it wouldn't fit on the shelf.(grin) Oh, without the foot, it fell over on its side and the lid didn't stay on.

    For those that ask, the finish is Rust-0leum clear gloss lacquer from a spray can. My method may seem a bit odd. The lacquer and project are stored at room temperature. the lacquer and project are carried to an unheated shed 30 to 50 degrees) and the lacquer is applied. The lacquer sets up more slowly in cooler air and therefore what has been sprayed flows together nicely. As soon as practical it is carried to the heated garage to setup and dry. Four or five coats have been applied and it was wet sanded with 400 grit as needed.

    Bob Haverstock

  13. #13
    Join Date
    Jan 2009
    Location
    La Grange, IL
    Posts
    1,425
    I like it. It almost looks like a stone piece. The knob and foot could be a bit more delicate. The curve looks pretty good to me, the photo makes it a little hard to tell. One of the challenges with a lidded form such as this is the belt line formed at the mating of top and bottom. Your placement is pretty good. Might have been just a tad lower, where your curve starts turning in. Many of the box builders embellish the belt with something like a bead or groove, helps to add a shadow line and conceal wood movement. But again this is difficult and especially on a lighter wood. Nice work.

  14. #14
    Join Date
    Jun 2011
    Location
    Mulino, Oregon, US (thirty miles South of Portland)
    Posts
    186
    Blog Entries
    1
    Bob I have one word for you Wow. I've been trying to do that for two years. Eggs somehow escape me. Good job.
    There's nothing like a smooth running day in the shop.........at least at my house.

  15. #15
    Quote Originally Posted by Betty Fox View Post
    Bob I have one word for you Wow. I've been trying to do that for two years. Eggs somehow escape me. Good job.
    Hi Betty,
    Eggs are a bit different to turn. I would suggest that you find an egg that has proportions that you like and measure the length and diameter of it. This will give you a ratio, you can apply the ratio to all of you future egg turnings. If you are making an egg shaped container add the parting tool width and material for tendons to the length. I have the foot and knob mounted to small tendons.

    I have turned many natural sized eggs out bits of scrap, eggs are my practice pieces. I've given many to elementary teachers for their students.

    Have fun.
    Bob Haverstock

Posting Permissions

  • You may not post new threads
  • You may not post replies
  • You may not post attachments
  • You may not edit your posts
  •