Page 1 of 2 12 LastLast
Results 1 to 15 of 22

Thread: Stave segmented pens

  1. #1
    Join Date
    Feb 2007
    Location
    West Bend, WI
    Posts
    97

    Stave segmented pens

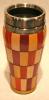
    Here are two stave segmented pens that I've been working on. First is cherry, holly and black dyed veneer. Second is cherry with black and red veneer. Both are based on 12 segments cut at 15 degrees on the table saw. Getting the angle perfect takes some trial and error but once I got it I cut a bunch of pieces so I can make a few more blanks. Both have 12 coats of CA glue for a finish. Thanks for looking.


    PenStripes_1 (1).jpgPenStripes_2.jpg
    "The secret to creativity is knowing how to hide your sources"
    Albert Einstein

  2. #2
    Join Date
    Oct 2006
    Location
    New Jersey
    Posts
    1,295
    I like . I like. That is what I am talking about. nice work and great thinking outside the box. You can do alot with that design now. The one thing is each pen kit is different so I assume you have to make adjustment with different sized tubes.
    John T.

  3. #3
    Join Date
    Feb 2009
    Location
    Fort Collins, CO
    Posts
    946
    Those are great! Impressively tight joints too. I'd love to see a photo of the fixture you use to cut those small staves on the table saw.

    BTW, what is that second pen kit called, and where did you find it? I was looking for one like that recently and could only find a screw-on pen lid style. I was hoping for the magnetic end cap.

    Thanks!
    Man advances just in proportion that he mingles thought with his labor. - Ingersoll

  4. #4
    Join Date
    Feb 2007
    Location
    West Bend, WI
    Posts
    97
    The first pen is a Jr. Gent and the second pen is a Zen with a magnetic cap from Craft Supplies in Utah. I didn't use a jig to cut the segments, set the blade to 15 degrees and ripped the strips. It took a little trial and error to get the saw set at a perfect 15 degrees, once set I cut a bunch of strips.
    "The secret to creativity is knowing how to hide your sources"
    Albert Einstein

  5. #5
    Join Date
    Oct 2009
    Location
    McMinnville, Tennessee
    Posts
    1,040
    I'm not into pens much any more but I really like these. The wider segments would be my pick of the two.

    Sid
    Sid Matheny
    McMinnville, TN

  6. #6
    Join Date
    Dec 2009
    Location
    Mount Sterling, KY
    Posts
    2,504
    For the pen I would take the Jr Gent. Not a big fan of the Zen but both blanks rock.
    ____________________________________________
    JD at J&J WoodSmithing
    Owingsville, Kentucky

    "The best things in life are not things."

  7. #7
    Join Date
    Jan 2009
    Location
    sLower Delaware
    Posts
    5,464
    Nice looking pens!

  8. #8
    Join Date
    Nov 2007
    Location
    Glenelg, MD
    Posts
    12,256
    Blog Entries
    1
    The huge size of the pics hides the work involved in getting such perfectly cut thin staves.

    Nicely done!
    Hi-Tec Designs, LLC -- Owner (and self-proclaimed LED guru )

    Trotec 80W Speedy 300 laser w/everything
    CAMaster Stinger CNC (25" x 36" x 5")
    USCutter 24" LaserPoint Vinyl Cutter
    Jet JWBS-18QT-3 18", 3HP bandsaw
    Robust Beauty 25"x52" wood lathe w/everything
    Jet BD-920W 9"x20" metal lathe
    Delta 18-900L 18" drill press

    Flame Polisher (ooooh, FIRE!)
    Freeware: InkScape, Paint.NET, DoubleCAD XT
    Paidware: Wacom Intuos4 (Large), CorelDRAW X5

  9. #9
    Beautiful pens. I kow what you mean about getting the angle set. I make the staved coffee mugs and once that angle is set on the table saw, I cut a bunch of blanks. I wold love to see pictures of your set-up. I use a sled that I made to cut mine. Thanks for sharing.

  10. #10
    Join Date
    Oct 2006
    Location
    New Jersey
    Posts
    1,295
    I too would be interested to seeing how you cut the staves that small safely. I get cutting one side but are you flipping the board to the other side to cut the thin slices??? Are you using a sled??? There has to be alot of calculating to also be able to add the accent stripes with the staves too. Thanks.
    John T.

  11. #11
    Join Date
    Jan 2005
    Location
    Goodland, Kansas
    Posts
    22,605
    Those are really nice. I really like that staved look.
    Bernie

    Never put off until tomorrow what you can do the day after tomorrow.

    To succeed in life, you need three things: a wishbone, a backbone and a funnybone.


  12. #12
    Join Date
    Oct 2008
    Location
    Fresno, Ca
    Posts
    4,032
    That is a ton of extremely detailed work Jon...you really pulled it off!
    Your Respiratory Therapist wears combat boots

  13. #13
    Join Date
    Dec 2009
    Location
    Vadnais Heights, MN
    Posts
    1,607
    And you still have all your fingers? I'd like to see how you cut such small pieces!

    The pens turned out beautiful! The fit and finish is great!
    Doug Swanson

    Where are John Keeton and Steve Schlumpf anyway?

  14. #14
    Join Date
    Oct 2006
    Location
    Harvey, Michigan
    Posts
    20,804
    Impressive work Jon!
    Steve

    “You never know what you got til it's gone!”
    Please don’t let that happen!
    Become a financial Contributor today!

  15. #15
    Join Date
    Feb 2007
    Location
    West Bend, WI
    Posts
    97
    I thought about making some kind of jig to cut the staves but I'm not good at that sort of thing. I use a Wixey angle box to set the blade angle, I have a Jet cabinet saw. I made corian zero clearance inserts, they're nice and flat. I start with .375" to .5" thick stock, make the initial cut to set the first edge, flip the board end for end, move the fence (I use a Rockler thin strip cutting jig) so the pieces are about 1/64" thick on the narrow edge and make the next cut...and so on. I use a set of Grippers to hold the stock, works well as I still have all my fingers, I use these on everything. To glue them up, I lay out two pieces of painters tape and lay out the strips with a piece of flat veneer between each, then run a line of wood glue between each piece and roll it up using the tape to hold it together. If everything is fitting perfectly I use rubber bands to clamp them until dry, then drill and turn as usual.
    "The secret to creativity is knowing how to hide your sources"
    Albert Einstein

Posting Permissions

  • You may not post new threads
  • You may not post replies
  • You may not post attachments
  • You may not edit your posts
  •