Looks really good, and it's in a mud room!!


 Member
Looks really good, and it's in a mud room!!
 Contributor
Very nice Prashun.............regards, Rod.
Contributor
If that is your "mud" room, can we pls see pix of your kitchen? Sheeeesh, you sure have an eye for the application of fine woodworking.... superb work, thx for sharing pix. The Grex 23g pinners, just for those who may be in the market, bury the head just enough to putty if you desire....but in reality, unless you have young persons eyes and view from 6-10", hard to see. As for 23g pins not on large work.... I find the longer pins have tremendous holding power...but nothing will stop warpage from slowing pulling them apart, in which case, glue is the next line of defense...but if warping pull hard enuff, the glue can fail as well.... warping occurs 24/7 on a piece, slowly breaking down the glue bond. The solution is, make smaller face frames when you can...
 Member
Nicely done, that's a great example of craftsmanship and design for a well used space. Now just get the kids to put their stuff away in those nice cubbies right?
"... for when we become in heart completely poor, we at once are the treasurers & disbursers of enormous riches."
WQJudge
[OP]
Moderator
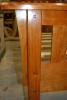
Here are the finished pix with the crown installed.
For other first-time casegood builders, I had a devil of a time fitting the crown. I ended up installing an angled batten on the tops of the cabs, and then attaching the crown to these via pocketscrews.
Next time, I will assemble the crown/battens on the ground, complete with mitered returns, and then attach the whole assembly to the top of the cabinet.
I really like how the finish came out on this (the flash makes it look a little more garish than in person).
I see a lot of people asking how to pop the curl in cherry or accellerate its darkening.
My go-to recipe for finishing cherry is heretofore this:
Sand to 400.
1-2 coats of Zinsser Sealcoat wiped on. Wipe on enough coats until you start to see runs. Then STOP.
Sand with 400
Wipe on Waterlox original Sealer Finish. 3 coats
Sand with 400
Wipe on 2 more coats of Waterlox
Sand with 600
Wipe on 1 more coat
For now, this is the best balance between ease of application and bringing out the best in Cherry... YMMV!!!
Member
One comment, from the close up of the nail you used it appears you are nailing with the gun held parallel to the workpiece. There are two reasons to hold the gun perpendicular: one is that the gun always leaves a wider hole than tall, so perpendicular will always result in a smaller hole as you are severing fewer fibers. Seconds is that pins, unlike nails are only ground on the sides so will tend to follow the grain to the left or right. So you will have much fewer nail blowouts with the gun held perpendicular.
If your pinner is not sinking your pins below the surface you should return it. To me a pinner that doesn't sink pins is next to useless as you using a nail set will end up making a hole as big as an 18 ga nail. Also pins almost always bend when being set, leading to a bigger hole.
Regarding filling holes, for pins I always use thick 2p10 then sand when still wet. It will leave a darker spot, but the surface will be smooth so you will not see the pin holes with a raking light.
[OP]
Moderator
Great advice! Thanks! Noted for next time.
 Member
Prashun,
Great job on the built-in and you always do so well at finishing cherry! What steered you away from spraying considering the size of the project? Did you pre-finish the parts? Did you mill up the crown molding? Is there a profile to it or beveled edges at 45 degrees? How are your shelves attached to the carcases? Congrats on not only a good-looking piece but very functional as well!
Contributor
2p10 ?? pls splain :-)
[OP]
Moderator
THanks for the interest, Brett. I wanted to use Waterlox, and I'm not set up to spray that. It takes longer to wipe it on, but with patience, it's just the easiest way for me.
I prefinished everything. The shelves are dado'd into the carcass, so it was easy to avoid the glue areas.
Yes, I milled the crown molding out of 1x stock. The corners are simply beveled at 45, and then backbeveled at 45.
One other shortcut I took on this first project is the edge treatments. I beveled the face frame components, but stopped short about 2" from each end. This avoided me having to deal with mitering the corners, or fixing the rounded edges from a router bit on inside corners.
I definitely want to try my hand at beaded face frames and frame/panel doors in the future. Trying to convince my wife to replace our kitchen cabs so I can buy a router table or shaper even...
 Member
prashun, i highly recommend the kreg beaded face frame kit if you want to venture into beaded face frames in the near future
[OP]
Moderator
I am on yr wavelength, Frank. Stalkin' for a used one...tell me when u get bored o' yrs...
Member
lol put it on the birthday/christmas wishlist - you won't be disappointed!
 Moderator
Really nice!
--
The most expensive tool is the one you buy "cheaply" and often...
Member
I just finished an 11' build-in, glued and pinned the face frames with the Grex with 1 3/8" pins. I held the pinner at an angle to the face, hid the pins better as mentioned above and I was taught the angled pin (nail) creates a better grip
Ed
 Posting Permissions

 Reply With Quote