Page 1 of 2 12 LastLast
Results 1 to 15 of 16

Thread: Saw storage slot widths?

  1. #1
    Join Date
    Dec 2010
    Location
    Burlington, Vermont
    Posts
    2,443

    Saw storage slot widths?

    Kind of a silly question, but thinking about making a chest or a cabinet or something to start storing my tools better, and thinking about the slots in saw tills in tool chests or saw cabinets, and wondering, how thick folks make them - seems like just sawing them with the saw in question would be a little on the thin side, and might be an issue if the wood moves a bit; but would something like a circular saw kerf be to thick? I'm thinking the little saw on my pocket knife might actually be perfect, but I'm wondering how snug a fit is good. . .

  2. #2
    Join Date
    Dec 2010
    Location
    Burlington, Vermont
    Posts
    2,443
    I've also seen a FWW plan where the back has a panel made of two sheets of 1/4" ply laminated to each other, and attached to the back, with the inner panel having spaces left open to be able to slide a framing square and panel saws into it - any thoughts on this method of storing saws?

  3. #3
    Join Date
    Feb 2003
    Location
    Bucks County PA
    Posts
    646
    Quote Originally Posted by Joshua Pierce View Post
    seems like just sawing them with the saw in question would be a little on the thin side, and might be an issue if the wood moves a bit; but would something like a circular saw kerf be to thick?
    I just got done making a simple saw till and I used the saw with the thickest saw plate (0.042") to cut all the kerfs. After I installed it I found that it made installing and removing the saws from the till too finicky. So I went and remade the "kerf boards" and used my tablesaw. I had a WWII installed and it makes a thin kerf. Personally I think that having a bit more room makes it EASIER to reach in and grab the saw you want. All you need is a slot to stop the saw plates from banging together. And the kerf from a tablesaw blade seems to work just fine.

    Here's a shot before I changed out the kerf board. It worked OK but like I said, too much of a problem when it came time to take the saw out and put it back

    Dominic Greco

  4. #4
    I used an 1/8" edge float to make my kerf board. I also worked the mouths of each kerf with a rasp make them more open outward.

  5. #5
    Join Date
    Aug 2008
    Location
    Portland, OR
    Posts
    528
    Quote Originally Posted by Dominic Greco View Post
    I just got done making a simple saw till and I used the saw with the thickest saw plate (0.042") to cut all the kerfs. After I installed it I found that it made installing and removing the saws from the till too finicky. So I went and remade the "kerf boards" and used my tablesaw...
    I went through a similar process making the saw till for my tool chest. The saw with the widest kerf turned out to be one of those bad impulse-hardened home center saws that I keep around for sawing questionable materials. It worked, but the saws were a little tough to pull out and really fussy to put back in. So I redid the kerfs with a compound miter saw.

    Quote Originally Posted by John McPhail View Post
    I used an 1/8" edge float to make my kerf board. I also worked the mouths of each kerf with a rasp make them more open outward.
    That's a good idea for a neander way to do it. I thought about using a plow, but my kerfs are stopped, so that wouldn't work. I actually tried my LV router plane with fence (first and only time I've used the fence so far btw) and 1/8" blade, but it was incredibly tedious, so I went the quick and dirty somewhat dangerous powertool way.

    sawtill.jpg

  6. #6
    Join Date
    Jul 2005
    Location
    Suffolk County, Long Island NY
    Posts
    1,150
    Andrae, that looks nice, I like it!

  7. #7
    Join Date
    Aug 2008
    Location
    Portland, OR
    Posts
    528
    Thanks. It's a very old idea, of course, and this one is based on what Schwarz shows in The Anarchist's Toolchest, though I tweaked some dimensions. The kerfs on mine are only about 3/4" apart, which is just enough if I alternate the handles. Not for the fat-fingered.

    One downside to this style of saw storage is that it's not so easy to see which saw is which. The hanging open display tills like Dominic's photo make it easier to identify the saw you want. I organized mine by tooth-count and crosscut / rip, but still sometimes grab the wrong saw.

  8. #8
    Join Date
    Dec 2010
    Location
    Burlington, Vermont
    Posts
    2,443
    Quote Originally Posted by Andrae Covington View Post
    One downside to this style of saw storage is that it's not so easy to see which saw is which. The hanging open display tills like Dominic's photo make it easier to identify the saw you want. I organized mine by tooth-count and crosscut / rip, but still sometimes grab the wrong saw.
    No you see, you tell 'em apart by whether the wood you repaired the horn with was a dark mismatch or a light mismatch, and whether the rust is at the toe or up by the handle.

    (okay, my saws aren't that bad - having different handle types and a mix of skew and straight back helps - but when they're hanging out on the bench, I can tell which is which mostly by where the "patina" is on the blade . . . the only two I mix up are my short carcase saws)

  9. #9
    Personally, I would forget about cutting kerfs. I think I used a table saw for mine, but I was in a rush just to see if it would work...it was a prototype. LOL....never got around to making one for real.

    Ahem...

    So anyway, were I ever to do it again, I would cut little strips of wood the length of my proposed slots. Then I would take some sheets of paper....I don't know, 5...10....however many you want, and fold it over the saw plate as a spacer. Finally, I would sandwich the plate between two strips, and glue it down. Drive a couple of brads to hold it in place and move on to the next one.

    One advatage is you only add slots as you need them, so you can make the spacing convenient for your specific saws as you get them.

  10. #10
    Join Date
    Dec 2010
    Location
    Burlington, Vermont
    Posts
    2,443
    That's kind of the obvious answer; John. Can't believe it didn't occur to me. Might be a little more difficult if I go with a chest and want a little height to secure the slots, but for a saw leaning in a cabinet, that's a good idea.

  11. #11
    Join Date
    Jun 2010
    Location
    twomiles from the "peak of Ohio
    Posts
    12,185
    Maybe I should look into this, got to be better than the "system" I have nowSDC12531.jpgSDC12533.jpg A little crowded, even with just eight saws....

  12. #12
    Join Date
    Dec 2010
    Location
    Burlington, Vermont
    Posts
    2,443
    That's how I've been hanging my saws, but I've got two that need to be sharpened laying a shelf, as I don't have space in current hanging setup to add more. Interim I think I'm tacking a board with some shaker pegs up to the wall.. .

  13. #13
    Join Date
    Jul 2010
    Location
    Farmington Hills, MI
    Posts
    137
    I used an old wine box. Cut slots in top with table saw.
    saw box.jpg

  14. #14
    Join Date
    Jun 2010
    Location
    twomiles from the "peak of Ohio
    Posts
    12,185
    After getting those saws set up, maybe i should try to organize the Family a bit?SDC12529.jpg maybe then i could see my Router table?

  15. #15
    Join Date
    Jul 2006
    Location
    A hilltown in Western Mass.
    Posts
    8
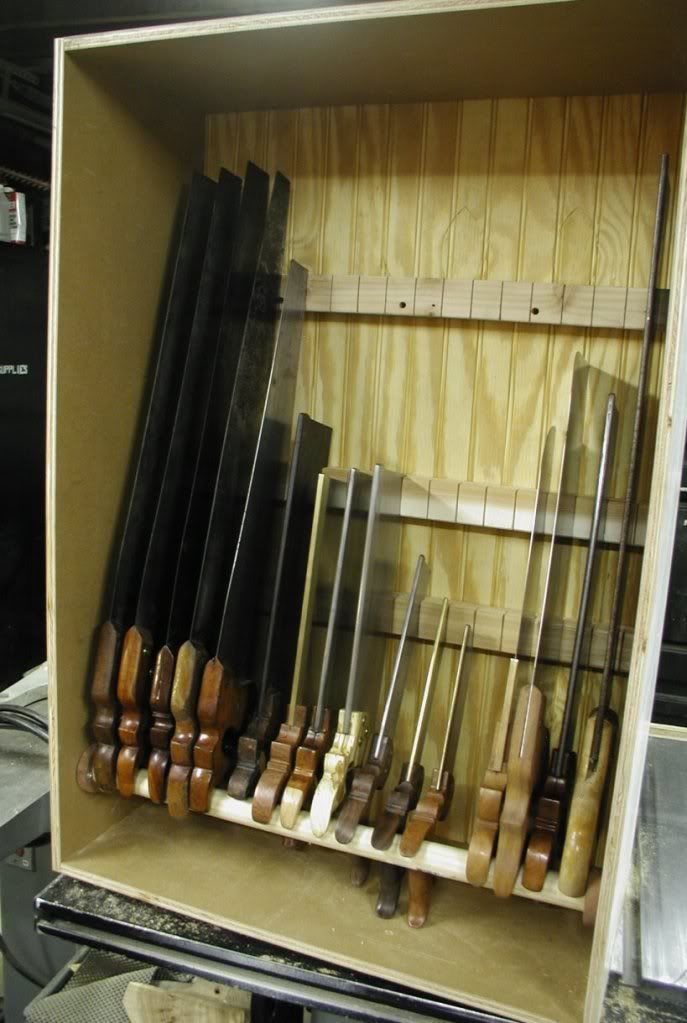
    I've built two saw racks (till will be used for the one with the dovetails and nice wood.) I used a saw with a heavy set to cut the slots. Seems to have worked okay, but some are still finicky to remove and replace. The racks in the pics show the original, which is now paired with a slightly smaller version that holds 20", 22", and 24" panel saws.

    New pictures of both saw racks:

    P5110027.jpgP5110033.jpg
    Last edited by Dwight Beebe; 05-11-2012 at 8:23 PM.
    "Outside of a dog, a book is a man's best friend. Inside a dog it's too dark to read." - Marx (Groucho, that is.)

Posting Permissions

  • You may not post new threads
  • You may not post replies
  • You may not post attachments
  • You may not edit your posts
  •