Results 1 to 15 of 15

Thread: Another Bench Top Question (At Least This One's Somewhat Different)

  1. #1
    Join Date
    Sep 2009
    Location
    Renton, WA
    Posts
    125

    Another Bench Top Question (At Least This One's Somewhat Different)

    (*Brief Disclaimer: I like workbenches. I certainly wouldn't consider myself at the Schwarz level of affliction but I'm young(ish) yet; I've got time. I think workbenches are expressions in wood unto themselves. I recognize that not everybody shares this viewpoint. If you're sick of bench threads/questions or if you don't see the point in extra aesthetic details for what you consider to be 'just a tool', by all means feel free to pass this thread by*)

    Fellow Creekers,

    My Benchcrafted Split-Top Roubo is starting to take shape. I have the legs and stretchers done and ready to be glued and I'm working on the leg vise chop and parallel guide before the base goes together permanently.

    As I'm nearing the time to start work on the top I'd like to describe what I'd like to do for the end of the top(s) opposite the wagon vise and get your feedback for the best manner in which to proceed. I'm constructing the top from a combination of ash and cherry. I really, really like the looks of the cherry slab Roubo in PW recently. I'm currently planning to keep the split-top as I believe it adds versatility to an already versatile design. For the half of the top that houses the wagon vise I'm planning to do the dog strip laminate and the end-cap in cherry, the rest in ash.

    For the end of the top halves opposite the wagon vise I'd like to incorporate an end-cap (in the manner of a breadboard end) only without the vise hardware. This would allow me to have each top half with the center portion ash and a border of cherry.

    My question pertains to attaching this second end-cap. My current plan is to use the same construction as the side that houses the wagon vise screw; namely a great big tenon on the end of the top laminate and a great big mortise on the inside face of the end-cap. Is this sensible from a wood movement perspective? Any other thoughts? Feedback is very much appreciated.

    Thanks!
    Charlie

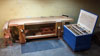
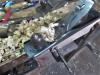
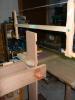
    Pictures are of one of the two leg sub-assemblies dry fit and the leg vise chop being taken down to final thickness. For reference the board next to the slab is for the parallel guide and is 3/4" thick.

    IMG_20120518_203205.jpg

    IMG_20120520_191830.jpg

  2. #2
    Join Date
    Sep 2007
    Location
    Longview WA
    Posts
    27,471
    Blog Entries
    1
    My own disclaimer is that it is all just my opinion.

    You may want to consider using a dovetail joint to hold the end caps in place. It may prevent the caps from popping off if the wagon vise is used a lot or if the far end is holding a planing stop.

    Just my thoughts, others may have better ideas.

    jtk
    "A pessimist sees the difficulty in every opportunity; an optimist sees the opportunity in every difficulty."
    - Sir Winston Churchill (1874-1965)

  3. #3
    Join Date
    Sep 2009
    Location
    Renton, WA
    Posts
    125
    Good thought Jim. I will be dovetailing the dog strip laminate into both end-caps as per the Benchcrafted plans.

    Quote Originally Posted by Jim Koepke View Post
    My own disclaimer is that it is all just my opinion.

    You may want to consider using a dovetail joint to hold the end caps in place. It may prevent the caps from popping off if the wagon vise is used a lot or if the far end is holding a planing stop.

    Just my thoughts, others may have better ideas.

    jtk

  4. #4
    Join Date
    Aug 2008
    Location
    Portland, OR
    Posts
    528
    One point to consider is if you essentially breadboard both ends, then when it comes time to flatten the top (now and in the future), you will probably get some crossgrain tearout running over the end piece, unless you can stop your jointer plane on a dime.

  5. #5
    Join Date
    Sep 2009
    Location
    Renton, WA
    Posts
    125
    Andrae, thanks! That's definitely something I hadn't thought of, I'll factor that into the 'decision matrix'.

    Quote Originally Posted by Andrae Covington View Post
    One point to consider is if you essentially breadboard both ends, then when it comes time to flatten the top (now and in the future), you will probably get some crossgrain tearout running over the end piece, unless you can stop your jointer plane on a dime.

  6. #6
    Join Date
    Nov 2009
    Location
    Ellsworth, Maine
    Posts
    1,809
    Quote Originally Posted by Andrae Covington View Post
    One point to consider is if you essentially breadboard both ends, then when it comes time to flatten the top (now and in the future), you will probably get some crossgrain tearout running over the end piece, unless you can stop your jointer plane on a dime.
    I think a chamfer on that edge should help eliminate the tearout. But you still need to be careful.

    The breadboard end idea is sound. But to help attach it I might consider some bolts through the end piece that pierce the center of the tenon with nuts in little housings under the bench. I would consider leaving the dovetail out as this would prevent you from being able to take this apart in the future for repairs/cleanup. Just an option.

  7. #7
    Join Date
    Sep 2009
    Location
    Renton, WA
    Posts
    125
    Quote Originally Posted by Tony Shea View Post
    I think a chamfer on that edge should help eliminate the tearout. But you still need to be careful.

    The breadboard end idea is sound. But to help attach it I might consider some bolts through the end piece that pierce the center of the tenon with nuts in little housings under the bench. I would consider leaving the dovetail out as this would prevent you from being able to take this apart in the future for repairs/cleanup. Just an option.
    The bolts would then mimic the opposite side (housing the wagon vise). Considering that I'm not making the bench knock-down I may even have enough of the Benchcrafted bolts/barrel nuts to re-purpose for the end of the top.

  8. #8
    Join Date
    Nov 2010
    Location
    S.E. Louisiana
    Posts
    9
    I'm following this thread to learn, so I'm not offering suggestions. Two questions: 1) will the end caps cross the split? 2) does this statement

    I will be dovetailing the dog strip laminate into both end-caps as per the Benchcrafted plans
    mean only the cherry board will be dove-tailed?

  9. #9
    Join Date
    Sep 2009
    Location
    Renton, WA
    Posts
    125
    Rusty, if I go through with the end-caps of cherry I'd have separate caps for both halves of the top; both top halves would be a center laminate of ash with a border of cherry. In the Benchcrafted plans the 'dog hole strip', laminated to form the inclined square dog holes, is dovetailed to the end-cap (condor tails is how Jameel refers to them in the article in PW) that houses the flanged bearing for the wagon vise screw. If I add the second end-cap (at the opposite end of the top) I'll be condor-tailing in the same fashion as the wagon vise side.

    Let me know if that isn't clear.

    Quote Originally Posted by Rusty Quinn View Post
    I'm following this thread to learn, so I'm not offering suggestions. Two questions: 1) will the end caps cross the split? 2) does this statement


    mean only the cherry board will be dove-tailed?

  10. #10
    Join Date
    Jun 2010
    Location
    twomiles from the "peak of Ohio
    Posts
    12,185
    SDC12542.jpgA look at "Condor-tails" on my little bench.

  11. #11
    Join Date
    Dec 2010
    Location
    South Coastal Massachusetts
    Posts
    6,824
    Now THAT'S a bench.

    It's a tool, not furniture.
    I whack nails into mine, to hold battens down.

    Beyond a little oil, I prefer an unfinished surface to keep some measure of "grip".

  12. #12
    Join Date
    Dec 2010
    Location
    Burlington, Vermont
    Posts
    2,443
    Quote Originally Posted by Jim Matthews View Post
    I whack nails into mine, to hold battens down.
    Glad I'm not the only one. (Although I often tend to use screws in the "mystery holes" that came in the reclaimed maple I used - the perfect size for a number 8 screw!) I'm thinking I should be a little more careful about making saw cuts into the bench, though.

  13. #13
    Join Date
    Aug 2010
    Location
    USA
    Posts
    5,582
    Steven, do you plan to tie the legs together side to side like you did for the short spans? If not, I think you should consider this to ease the strain on the joints as you drag this around and re-position it. By the way, I like the simple functionality you went after with this bench.
    Last edited by Pat Barry; 05-23-2012 at 8:00 PM.

  14. #14
    Join Date
    Jan 2008
    Location
    Columbus, Ohio
    Posts
    60
    There are never enough threads about benches. I wish I had room for several work benches and a sharpening bench.

  15. #15
    Join Date
    Jun 2010
    Location
    twomiles from the "peak of Ohio
    Posts
    12,185
    I have installed a bottom shelf between the two leg assemblies. Used to be, i'd try to plane something either clamped to my tablesaw, or clamp it in a machinist's vise on my power tool bench. Both tended to walk away from me. This bench will not walk away, and that is what I wanted. Working on a wagon vise right now.

Posting Permissions

  • You may not post new threads
  • You may not post replies
  • You may not post attachments
  • You may not edit your posts
  •