Page 1 of 2 12 LastLast
Results 1 to 15 of 18

Thread: David D's French Polish burnished dye idea... It works!!!

  1. #1
    Join Date
    Mar 2010
    Location
    Lakeland Florida
    Posts
    2,297

    Cool David D's French Polish burnished dye idea... It works!!!

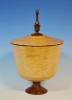
    So here is the quick piece I turned to try burnishing the dye like David suggested. Since he had already tried with the WTF with limited success, and since I recently mixed a 2lb cut of some super blonde dewaxed shellac flakes which I have been dye'ing to try. (sometimes I wish I could stop myself ) I had a bunch of cherry blanks (4" diameter by 5" tall) that I purchased to explore color. I've had a few theories kicking around in my head for about a year now regarding color theory as applied to the medium of wood. This is my second colored piece. (The first will be revealed eventually but it's "top secret" right now ) The overly large hole in the top was a "design opportunity" but I pressed on regardless. I think the color makes up for it. I'll post finished pics soon, but I thought Double D would be interested to see. This has a hint of red burnished into the shellac finish which really made it SCREAM .

    I think this is a brilliant method, and I think it has exactly the controllability you are looking for David. I will say I usually use the cheap Bullseye sanding sealer shellac, and that stuff is garbage compared to these flakes I mixed. I'm tempted to see if I can cheat a french polish on this piece, and just bypass the WTF completely. Honestly the shellac sprays much nicer, and it looks super clear. We will see Let me know what you think! As always C&C welcome understanding the fact that this is a "work in progress" Thanks for looking!

    Edited to add second color corrected photo. Can't figure out how to delete the small thumbnail of the non color corrected one though
    016 small.jpg016 small.jpg
    Last edited by Rick Markham; 05-31-2012 at 4:42 AM.
    “I am enough of an artist to draw freely upon my imagination. Imagination is more important than knowledge. Knowledge is limited. Imagination encircles the world.” ~ Albert Einstein

  2. #2
    Rick, looks like there are infinite possibilities with this! You and DD are pioneers in this area - thanks for your dedicated research. Nice looking little vase!

    What did you use - Transtint?

  3. Perhaps a tutorial with pics is in order, Rick and David! Let's see you do one from start to finish with pics and narrative.......any experience you have will only help others!
    Remember, in a moments time, everything can change!

    Vision - not just seeing what is, but seeing what can be!


  4. #4
    I am curious too about the method for application. My prejudice is that deeper color is attained by dyeing the raw wood. Dyeing after any sealer is applied is for subtle tone adjustment. But that's spoken like a flatworlder.

  5. #5
    Rick, as I understand you sprayed a base coat of shellac then hand applied some red tinted shellac? The Germans dominated the violin trade from the late 1800's up until the 1960's and many of violins have a look similar to your piece. The majority of these instruments were spirit varnished and they were very good at shading. The only thing different is additional resins and essential oils(like oil of spike lavender) were added to the tinted shellac/alcohol to slow the drying and impart a more flexible quality to the finish.

    Traditionally, instrument makers avoided getting color in the wood by sealing off the pores first then applying colored varnish and that still holds true on spruce instrument tops(violin family anyway) but there is a trend to make the figured maple backs "pop" with dyes and this sure can make figured wood turnings look good as well.

  6. #6
    "You and DD are pioneers in this area..."

    Not exactly. As Hayes pointed out, these techniques have been used for many years in toning and glazing processes. With the newer finishes, many of the "old" techniques will not work or not work as well because the finishes themselves to not behave in the same manner.

    "...deeper color is attained by dyeing the raw wood..."

    This is true. I should point out that my coloring process begins with the dye application in "raw" wood. I use the "burning in" technique to get the colors to fade into each other. This can also be done on raw wood but the process is much more controlable if the darker color can be burned into the finish. With lacquer I can apply more or less color simply by adjusting the pressure on the "rubber" or by diluting the dye a bit with more alcohol. The colors can be further manipulated by using alcohol alone after the color has been applied.

    Sometimes, a very dark color is applied first and then mostly sanded away leaving some color in the more porous areas of the wood. When a lighter color is applied over the wood, the darker areas are accentuated. This should also be done on "raw" wood because the darker color will not penetrate into the wood nor confine itself to the porous areas if it is burned into the finish.

    "I'm tempted to see if I can cheat a french polish..."

    That should be totally possible. French polishing is, as I mentioned before, a lot like "spit shining" shoes. The "trick" to getting a good polish with shellac is to find the "sweet spot" combination of alcohol, shellac and oil and to keep the rubber moving. This (IMMHO) is the finest finish ever. It fell out of favor because it is labor intensive and shellac does not hold up well under prolonged use. I would thing that an artistic turning would experience minimal handling so a french polished finish should be just fine if you want to take the time to produce one.

    The experiment continues.
    David DeCristoforo

  7. #7
    Join Date
    Mar 2010
    Location
    Lakeland Florida
    Posts
    2,297
    Sorry I had to sleep (and let the shellac dry some more, it was getting soft from overworking it.)

    John, this is was dyed with 3 colors (All transtint colors): brown, orange, yellow, and then a hint of red burnished in. All of those colors were tweaked a bit before application since the "stock" transtint colors are all just a bit "off" from what you expect (the yellow was straight from the bottle, and so was the red)

    Roger, I'll take process pics of the next one! This one I was trying to do as quick as possible to see if it was going to work.

    Prashun, most of the color you see in the pic is actually in the wood. I'm playing with variations of two primaries (Red and yellow) in a "round about" way. Brown is Orange (yellow and red) + the tiniest amount of black. the Orange was Transtint Orange tweaked with yellow (it leans a little heavy towards a red hue straight from the bottle) then Yellow (straight from the canary yellow bottle) The burst is determined by the differing absorption rates of the wood/ differing removal rates of wood during sanding. The Red, was straight from the bottle, but only a couple drops on a traditional french polishing "rubber" with denatured alcohol, a few drops of shellac, and the rubber lubricated with olive oil. I tried using just the dye and alcohol, however the goal of this is to build on the depth of the finish and blend everything together. It doesn't take much rubbing with just the solvent to overwork the shellac, so I quickly decided that I was going to use a "tinted rubber" and follow French polishing protocol to apply the dye, and then a "traditional rubber" to follow up, clean up areas and blend together everything. Then it's just a matter of French polishing the shellac until it's smooth.

    It's interesting that you mentioned depth of color Prashun. I agree the dye in the wood provides the most depth, The majority of the color seen is actually in the wood, however with the subtleties of adding just a tiny bit of red floating above the other colors made a HUGE impact on depth! I think this is going to be a technique that isn't going to be for everyone, it is going to require some "polishing practice" to not burn through the layer of shellac. You also really can't sand this layer, as you will just remove the hints of color you have added, and you will have to start the polishing process over. It's a neat little trick, thanks David D. for sharing it! I'm definitely going to be adding it to my "bag of tricks", it really allows you to make subtle hue variations on the piece, which opens a whole new world of color flexibility!
    “I am enough of an artist to draw freely upon my imagination. Imagination is more important than knowledge. Knowledge is limited. Imagination encircles the world.” ~ Albert Einstein

  8. #8
    Join Date
    Dec 2010
    Location
    Evanston, IL
    Posts
    1,424
    DD, I have not been able to find the sweet spot combination of alcohol, shellac and oil for french polishing, but I have found a "cheat." After laying down a good base of shellac and leveling it, I use one or both of a couple of Mohawk products: Lac French and Rapid Pad. They are "padding lacquers" used primarily in the refinishing trade. Despite the name, they are primarily shellac and alcohol with other solvents added to create an evaporation rate that is ideal for applying with a rubber prepared as in french polishing. I have more success applying it in long strokes (with landing and take off to avoid stopping on the piece) than with a circular or figure eight motion. Rapid Pad contains more shellac and builds faster, though both work best with a base coat of shellac. The finish is amazing and there is no need to "spirit off" the oil as in french polishing.

    I have used these with great success in flat work, but am still refining the technique of applying it to turnings without streaks. It should work well applied on the lathe, but I generally do my finishing off the lathe. The downsides are that it costs more than shellac and the fumes bother me more than DNA. I have not tried tinting it yet, but I would guess anything that works with shellac would also work with these. In any case, the tinting and burning could be done with the shellac coat before polishing.

  9. #9
    Join Date
    Mar 2010
    Location
    Lakeland Florida
    Posts
    2,297
    Quote Originally Posted by David DeCristoforo View Post
    "You and DD are pioneers in this area..."

    Not exactly. As Hayes pointed out, these techniques have been used for many years in toning and glazing processes. With the newer finishes, many of the "old" techniques will not work or not work as well because the finishes themselves to not behave in the same manner.

    "...deeper color is attained by dyeing the raw wood..."

    This is true. I should point out that my coloring process begins with the dye application in "raw" wood. I use the "burning in" technique to get the colors to fade into each other. This can also be done on raw wood but the process is much more controlable if the darker color can be burned into the finish. With lacquer I can apply more or less color simply by adjusting the pressure on the "rubber" or by diluting the dye a bit with more alcohol. The colors can be further manipulated by using alcohol alone after the color has been applied.

    Sometimes, a very dark color is applied first and then mostly sanded away leaving some color in the more porous areas of the wood. When a lighter color is applied over the wood, the darker areas are accentuated. This should also be done on "raw" wood because the darker color will not penetrate into the wood nor confine itself to the porous areas if it is burned into the finish.

    "I'm tempted to see if I can cheat a french polish..."

    That should be totally possible. French polishing is, as I mentioned before, a lot like "spit shining" shoes. The "trick" to getting a good polish with shellac is to find the "sweet spot" combination of alcohol, shellac and oil and to keep the rubber moving. This (IMMHO) is the finest finish ever. It fell out of favor because it is labor intensive and shellac does not hold up well under prolonged use. I would thing that an artistic turning would experience minimal handling so a french polished finish should be just fine if you want to take the time to produce one.

    The experiment continues.
    David, I agree this isn't a pioneering achievement, it's just different from what most turners are doing currently. I followed a very similar methodology that you describe, first the brown sanded back, then the Orange, sanded back then the Yellow, then burnished in the Red. You can even add the twist of playing with the absorption rates of the wood by varying the solvent used in the dye as the molecule carrying the dye will penatrate differently in the wood. Hence dye with water will penetrate differently than dye with alcohol in it. That is what some of my application of color theory is based on, variations in grain structure affect dye absorption, plus absorption rates are different with water or alcohol. So varying combinations of both with sanding create a "natural" sunburst

    Edited to add: I'm going to try a slightly different approach to final finishing this one than the straight traditional French polish (which I agree is the finest finish there is) If I can manage to make it work, it will be a considerable "short cut" in the whole process. The risk is that I ruin or burn through the finish not paying attention and start over. (No pain no gain!)
    “I am enough of an artist to draw freely upon my imagination. Imagination is more important than knowledge. Knowledge is limited. Imagination encircles the world.” ~ Albert Einstein

  10. #10
    "...I have found a "cheat..."

    Here is a "real cheat":

    First put on a nice even coat of oil using a rag, then immediately brush on a coat of 3-lb cut orange shellac. Let dry just until tacky, then rub off the excess with steel wool, going with the grain, until all the oil and shellac are removed from the surface. Wipe with a dry cloth and you're done! For a higher shine, add another coat of shellac, without the oil.

    This is known as "Frid's Fast Fine Finish" or the "4F" finish, "popularized" by the late great Tage Frid. I have used this finish many times and it works great. I have never tried it on the lathe but it should work well with the piece spinning at around 2-300 RPM
    David DeCristoforo

  11. #11
    I'm talking out of turn here, because I have not tried this technique. I'm also dabbling with dyes now. Tremendous depth is achieved using various colors (I just read a great old blog by Joe Landon on a similar site) whereby he starts dyeing around 180, and uses successively lighter tones, sanding in between each application. After topcoating, it's brilliant. I was therefore under the impression that depth is achieved by the inclusion of different colors - not having the colors reside on different 'planes' in between finish coats.

    I took a page from FWW's technique on applying sunburst patterns on guitar blanks. The idea is to apply dye to two different areas, then use solvent to blur the area in between, drawing color from one side to the other.

    I tried it on a bowl last week, and it's amazingly controllable as is. Getting the blend to look natural requires a lot of thinning of some colored areas, and darkening others in a smooth, natural way. The inclusion of finish would seem to make doing that difficult. I mean, it's not like the dye is instantly mobile; you gotta work it for a while to get it to move and thin from an already applied area. Doing that through a finish layer seems like it'd be really difficult.

    Your technique seems more akin to layering and not blending. I just have to try this myself. CURSE YOU!

  12. #12
    Join Date
    Mar 2010
    Location
    Lakeland Florida
    Posts
    2,297
    Quote Originally Posted by Prashun Patel View Post
    I'm talking out of turn here, because I have not tried this technique. I'm also dabbling with dyes now. Tremendous depth is achieved using various colors (I just read a great old blog by Joe Landon on a similar site) whereby he starts dyeing around 180, and uses successively lighter tones, sanding in between each application. After topcoating, it's brilliant. I was therefore under the impression that depth is achieved by the inclusion of different colors - not having the colors reside on different 'planes' in between finish coats.

    I took a page from FWW's technique on applying sunburst patterns on guitar blanks. The idea is to apply dye to two different areas, then use solvent to blur the area in between, drawing color from one side to the other.

    I tried it on a bowl last week, and it's amazingly controllable as is. Getting the blend to look natural requires a lot of thinning of some colored areas, and darkening others in a smooth, natural way. The inclusion of finish would seem to make doing that difficult. I mean, it's not like the dye is instantly mobile; you gotta work it for a while to get it to move and thin from an already applied area. Doing that through a finish layer seems like it'd be really difficult.

    Your technique seems more akin to layering and not blending. I just have to try this myself. CURSE YOU!
    Essentially I'm blending the colors just in a different way, as the successive layers of color are blended together, this can be achieved either by localized dyeing and then blending the two together, or using a "wet on wet" technique that is used in Watercolors, which is more what I'm doing. (We have to remember that these dyes, and their absorption into the wood "bleeds" with each other, which is exactly how watercolors work on a wet piece of watercolor paper (hence wet on wet). A good watercolor painting should still be layers of color that remain transparent. (The layers and hue, not color, are what create depth in watercolor painting. There is a point in dyeing and watercolor that the color density is so high that the transparent quality is lost, just as in dyeing wood, over doing a color makes it appear flat, as the chatoyance from the wood is lost. I would only use this method to "tweak the color" or as David describes when adding a dark color over a lighter color such as a brown in a sunburst. The problem with tinting too much of the finish is that you will limit the amount of light actually traveling through the finish, which limits how much light reflects back off the color of the dye in the wood, and then is reduced again as it travels back through the finish again. It will start to look dark, muddy and flat. If you keep it just tweaks in the finish then the color should remain "fresh and transparent" and it will really make it pop. This one was a pretty piece before the Red in the finish (which is only in the darker regions of the turning.) but the red really just made the other colors pop. I've got 9 more pieces of this Cherry to play with, and every one of them will be some experiment for me in color.

    Hayes, that's valuable information, I'll be doing some research into that for sure. I will also be exploring this further, and as I said I would have started differently than I did, but using Davids technique, I can emulate the effect without having to redo the piece. to get more brown in the dark regions. (which is going to be my next step with this one (if I can get up the nerve to do it)

    I too prefer the longer oval "take off and landings" the small circles are good for blending edges but it's much easier to get smooth strokes for me with the long oblong take off and landings

    Theoretically by using a more fragmented approach such as what you have described you can completely control the shape of the sunburst pattern. This was an excercise on seeing how the wood naturally wants to behave with the dyes and sanding etc, and my order of operations. (In hind sight, I would have started differently, but this is a first so I am quite content.
    Last edited by Rick Markham; 05-31-2012 at 5:40 PM.
    “I am enough of an artist to draw freely upon my imagination. Imagination is more important than knowledge. Knowledge is limited. Imagination encircles the world.” ~ Albert Einstein

  13. #13
    Join Date
    Mar 2010
    Location
    Lakeland Florida
    Posts
    2,297
    While I was doing yard work (Florida was hot and humid today... ugh) I was thinking about this. Let me try and explain my theory a bit. I should probably start by clarifying what I mean by hue, hue isn't color. Hue is how light or dark a color is. In a transparent medium such as watercolors or water based transparent dyes, all colors have a range of hue, ranging from the least concentrated, to the maximum concentration (when they appear flat or are no longer transparent.) In realism (painting) the goal is to paint 3-Dimensions on a 2 Dimensional space. This is done by painting "light and dark" (hue) and not so much as color (Your brain likes to "trick" you, especially with color.). So if we want to create 3 dimensional appearances based on the absorption rate of the different grain structures (a 2-Dimensional plane, the visible surface of our turnings) then Hue, is more important than the actual colors. (Though color is important, and the use of different colors of different hues with each other results in different effects.) That is largely the theory that I am attempting to explore, the only way to learn this stuff is to do it.

    I have a really good idea for my next piece that might help explain it a bit, and will end up being a good reference. I will definitely take process pics
    Last edited by Rick Markham; 05-31-2012 at 6:02 PM.
    “I am enough of an artist to draw freely upon my imagination. Imagination is more important than knowledge. Knowledge is limited. Imagination encircles the world.” ~ Albert Einstein

  14. #14
    Fabulous thread Guys, I have nothing to add but boy it makes great reading / learing
    Pete

  15. #15
    Join Date
    Mar 2010
    Location
    Lakeland Florida
    Posts
    2,297
    I figured I would update everyone on my progress. So I spent all last night French polishing, and while it is possible to introduce color into the shellac layers that way, it is very time consuming, and by the time I was finished I really didn't like the effect that much. It worked, but I could tell that it really needed a different approach. So after a bit of sanding (to remove the tinted layer from hand applying it) I decided to tint the shellac and spray it from my airbrush. (which worked AMAZINGLY) I'm not going to reveal this one yet, I have an idea for a lid to cover the gaping hole at the top, but I have to try and produce it now The piece is coming along nicely and effectively created an amazing amount of depth, and the chatoyance just blows me away.

    I'll honestly say, that this ultra blonde shellac (other than the denature alcohol fumes) sprays like a dream. This is going to be the way I apply shellac from now on. It's clarity is fantastic too.
    “I am enough of an artist to draw freely upon my imagination. Imagination is more important than knowledge. Knowledge is limited. Imagination encircles the world.” ~ Albert Einstein

Posting Permissions

  • You may not post new threads
  • You may not post replies
  • You may not post attachments
  • You may not edit your posts
  •