Page 1 of 2 12 LastLast
Results 1 to 15 of 17

Thread: Homer Bucket Air Scrubber

  1. #1

    Homer Bucket Air Scrubber

    I finally finished up my Homer Bucket Air Scrubber. Here are the materials I used:

    5 Gallon Bucket (Home Depot, $2.57)
    Lid (Home Depot, $1.28)
    Dust Collector Accessory Kit (Harbor Freight, $38.39 with 20% coupon)
    Contains:
    Flexible Hose, 4” x 10’ (Qty 2)
    Blast Gate-4” x 4” (Qty 2)
    Jointer Hood-6” (Qty 2)
    “Y” Fitting-4” x 4” x 4” (Qty 1)
    Table Saw Dust Hood 12” x 12” (Qty 1)
    Wire Hose Clamp (Qty 10)
    1/2" 12"x12" scrap plywood
    12"x12" scrap window screen
    12"x12" scrap 1/2" hardware cloth (1/2" metal mesh grid)
    Carriage bolts, Nuts, Washers, 1/4" x 1/2" Stove bolts, 8x32 machine screws
    15 lbs Activated Carbon Pellets (Amazon, $30)

    ==============================================

    Using a 4" hole saw, drill a hole in the top center of the lid. (You can use a utility blade to cut the hole if you don't have a hole saw) Position one of the Jointer Hoods over the hole, drill four 1/4 mounting holes through the hood and lid, and secure using 1/4" stove bolts and washers. (You can use any bolts/washers you have laying around; 1/4" diameter x 1/2" long worked well.)

    *Note: I did not silicone the jointer hood to the lid, however it is probably a good idea to do so to prevent air leakage. The bucket will be under negative pressure, so air won't leak out, but it will reduce the amount of suction at the laser if the bucket leaks air in. Eventually I'll put some silicone caulk between the hood and the lid.

    Using a 4" hole saw, drill a hole in the bottom center of the bucket. Position one of the blast gates in the hole, drill mounting holes, and secure with machine screws. Again, you may want to silicone the gate to the bucket before final mounting.

    You'll need to slice a small amount of the bucket bottom rim to accomodate the opening of the blast gate. A utility knife works fine if you score it a few times on the backside of the rim.

    ==============================================


    You'll want an air space above the bottom of the bucket so you need to make a screen to hold the activated carbon above the bottom. I measured the diameter of the bucket about 3 inches off the bottom, cut a 1/2 inch plywood ring, and mounted four 3.5" carriage bolts to hold the ring up. I then cut some 1/2" hardware cloth (the 1/2 inch square screen you see in the photo) and mounted it on the top side of the ring. The hardware cloth will provide structural support for the screen that holds the carbon. Window screen went on top of the hardware cloth to prevent the carbon from falling through the hardware cloth. (The hardware cloth and screen are just stapled in place with 3/8 inch staples)

    ==============================================


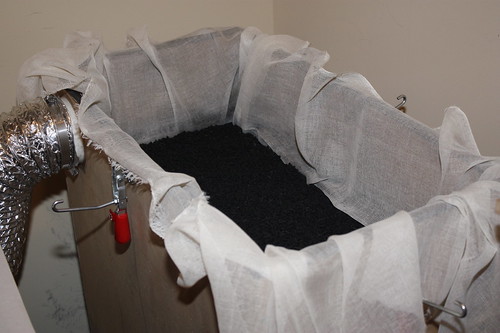
    Cut some inexpensive "cut to size" furnace filter and place it on top of the screen. This is just one more barrier to keep the carbon from falling through the screen and into the blower. The furnace filter had a flat side and a rough side. I placed the rough side down so the flat side would be against the carbon.

    ==============================================


    Pour the activated carbon on top of the screen. I used 5 inches (about 15 pounds) of carbon. Here is a link to the carbon I used: http://www.amazon.com/gp/product/B000YIWT0M . It runs about $6 per 3 lbs. In total, I have five bags of carbon being used.

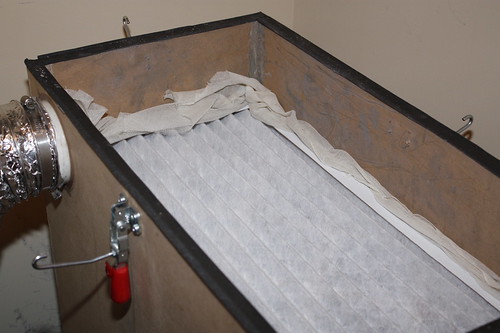
    Place two more furnace filter rings on top of the carbon. This will catch any small bits (like paper). I placed the rough side of the filter towards each other, so the flat sides were against the carbon and towards the air inlet.

    Here is a cross section of the filters and activated carbon. Above and below the blue filter media are air spaces.

    ==============================================

    Here is the finished prototype. I cut a hole in an old mdf table to support the bucket, but the legs were too short to fit the hose at the bottom. Maybe this weekend I'll cut some longer legs. If I get really motivated, I'll eventually build a piece of furniture to house the scrubber and blower.

    (Update: I have the exhaust setup so the laser connects to the scrubber at the top of the bucket, gets filtered through the bucket, then is pulled into the blower and then pushed out the window. Laser=> Scrubber => Blower => Window)


    08_Complete.jpg


    I'm using a Harbor Freight "green" blower (http://www.harborfreight.com/13-gall...tor-31810.html) and it's actually too much air flow through the scrubber with the blast gate on the bottom of the bucket fully open. Sliding it about 1/2 way closed seems to be the sweet spot: enough suction at the laser and doesn't let the burning smells through. The other side of the blower is exhausted out the window.

    I did purchase some 4" elbows (http://www.amazon.com/gp/product/B0000223YE) to go at the top and bottom of the bucket, but the harbor freight hose is just a little too small to fit over the ends. I may go to Rocker and pick up some Dust Right® Quick Connect 4'' Elbows (http://www.rockler.com/product.cfm?p...8&site=ROCKLER) and a better quality hose (though it IS working just fine as is).
    Last edited by Ronald Erickson; 11-09-2012 at 4:11 PM.
    Laser: Trotec Speedy 300-80 watts
    Software: Corel Draw X6, Windows 7 64-bit, Adobe Photoshop CS5
    __________________________________________________ ___

    Please, call me Ron.

  2. #2
    Pretty Slick

    So how do you have it hooked up? Laser - blower - filter - out, OR Laser - filter - blower - out? Also how quite is the blower?

  3. #3
    Laser => Filter => Blower => Outside. (I'll update the original post to reflect the setup)

    The laser and blower are in a closed 9x11 foot room with a lot of hard surfaces. The blower noise is pretty reasonable. It's probably as loud as a microwave, bath fan, or range hood, but with a much lower rumbly note. It's definitely not as loud as a shop vac. I actually don't find it bothersome and I think I could easily fall asleep in my chair listening to it.

    The fan noise the speedy 300 makes is much louder & higher pitched than the exhaust blower. Two 120mm fans spinning at 60,000 rpm (or so it seems ) makes quite the racket. The higher pitched fan noise gets irritating if I leave the laser on for too long. I wish they had a setting on the 80w model to put the laser to sleep like they do on the 30w and under tubes.

    Before I heard the exhaust blower in operation, I had initially though I was going to build an enclosure for the blower to reduce the noise. Now I think I'm actually going to figure out how to make the laser quieter first.
    Laser: Trotec Speedy 300-80 watts
    Software: Corel Draw X6, Windows 7 64-bit, Adobe Photoshop CS5
    __________________________________________________ ___

    Please, call me Ron.

  4. #4
    Ronald, Brilliant Job! Well done and I will start on mine immediately. (mainly to be a good neighbour when burning plastics!)

    Question for you/anyone. How long does that amound of activated carbon last before becoming saturated? As well, I assume if my filter is outside, the ambient humidity will cause issues with the carbon's useful life as well?

    Cheers!

    Darryl
    Darryl Jacobs

    Inter-Action Enterprises
    Epilog Helix - 45W
    Rhino 4.0 / Coreldraw X4 / Stone Chisel 1.0!

    "Does the noise in my head bother you?"

  5. #5
    Thanks Darryl. My main goal is also to be a good neighbor. Acrylic has a nasty smell.

    Dan Hintz has a DIY filtration thread here: http://www.sawmillcreek.org/showthre...diy+filtration

    Here's his quote from the thread: "If possible, weigh the charcoal charge and the whole assembly as a separate item. Weigh the entire piece, charcoal and all, from time to time... when the weight of the charcoal roughly doubles, it's time to change it out."

    I figure when my scrubber gains 15 pounds it's time to change it out. You're probably right that the humidity would affect the lifespan of the charcoal.
    Last edited by Ronald Erickson; 11-08-2012 at 11:25 PM.
    Laser: Trotec Speedy 300-80 watts
    Software: Corel Draw X6, Windows 7 64-bit, Adobe Photoshop CS5
    __________________________________________________ ___

    Please, call me Ron.

  6. #6
    So Ron a quick question...

    With the extra resistance that the bucket adds to the fume draw out of your laser cabinet, does your system still pull well enough to evacuate the cabinet at the needed rate (500-600CFM+/-)? I would think it might be better to put the blower between the laser and bucket, so that you don't loose any strength out of the cabinet.

    Bruce
    Bruce Clumpner
    Brandon Services Laser Engraving
    Academy Commemoratives - Personalized Memorabilia for the U.S. Service Academies
    Irvine, CA
    -
    Epilog 75-watt Helix, 40-watt 18-Mini
    Started with Corel Draw V1 now feeling the pain of CorelDraw x7
    CS4 photoshop
    CS4 illustrator
    PhotoGrav

  7. #7
    Join Date
    Aug 2006
    Location
    Suwanee, GA
    Posts
    3,686
    Quote Originally Posted by Bruce Clumpner View Post
    So Ron a quick question...

    With the extra resistance that the bucket adds to the fume draw out of your laser cabinet, does your system still pull well enough to evacuate the cabinet at the needed rate (500-600CFM+/-)? I would think it might be better to put the blower between the laser and bucket, so that you don't loose any strength out of the cabinet.

    Bruce
    Bruce,
    That's a bad idea because any leaks between the blower and the bucket, no matter how small, will allow the exhaust to escape. You always want the blower to be at the farthest end of the system to draw the air from outside to inside, not push it.

    Gary

  8. #8
    Bruce,

    There are a couple of drawbacks that I can see with putting the blower in between the laser and scrubber.

    The first drawback is the blower impeller will get coated in the soot and acrylic vapor residue from the laser. Although I could clean the impeller, I'd rather the blower be pulling "clean" air through it.

    The second drawback is if the scrubber is after the blower it will be under positive pressure. Any air leaks will actively blow into the room prior to being filtered (smoke, acrylic vapor = dirty air).

    With the scrubber on the negative pressure side of the blower, any leaks in the system will just introduce clean room air into the scrubber. It would reduce the suction at the laser, but it wouldn't contaminate the room with "dirty" air. On the positive pressure side of the blower, if there are any leaks before it goes outside, it will be "clean" air that is leaking because the air has already been scrubbed.

    According to the operation manual for the Speedy 300, the exhaust needs to be capable of evacuating 300 cubic meters per hour at a minimum. 300 cubic meters per hour = 10594.4 cubic feet per hour. That would be roughly 176.57 CFM. Since the blower is capable of 600 CFM, the loss of CFM due to the scrubber should still exceed the minimum requirements of the laser. If I can find an inexpensive anemometer, I'll post some CFM measurements of the system.

    When I observe the laser during operation, if I have the exhaust port fully open on the scrubber, so much air is going through the laser that it starts sucking air through the Harsh Environment Protection Kit (the fabric bands that cover the Y-axis on the laser). The fabric flaps violently like a loose canvas tarp on a trailer on the highway, suggesting that I have too much air flow. When I close off the exhaust port on the scrubber, the air flow lessens enough that the fabric doesn't flap, yet still actively pulls the smoke through the laser exhaust.


    Edit: I picked up an anemometer from Amazon. It will be here Tuesday. I'll post the air flow measurements Tuesday evening.
    Last edited by Ronald Erickson; 11-09-2012 at 5:15 PM.
    Laser: Trotec Speedy 300-80 watts
    Software: Corel Draw X6, Windows 7 64-bit, Adobe Photoshop CS5
    __________________________________________________ ___

    Please, call me Ron.

  9. #9
    Join Date
    Nov 2007
    Location
    Glenelg, MD
    Posts
    12,256
    Blog Entries
    1
    Excellent design work, Ron. I've often considered redesigning mine now that I know what works well and what is more painful than it needs to be (such as loading the carbon). I think I'll steal a page or two from your design notes when I get around to v2.0 of mine. At the moment, I'm thinking two buckets, bottom to bottom, might alleviate a few issues... I'd prefer the link to the blower to be out of the bucket's side rather than bottom (which needs a stand, as you've designed), so the extra bucket on the bottom would allow plenty of room to do that while keeping the suction surface relatively even (rather than to one side of the filter bucket). Also, if I want to pack it up and take it on the road, I could simply flip the bottom bucket over and slide the top bucket inside.
    Hi-Tec Designs, LLC -- Owner (and self-proclaimed LED guru )

    Trotec 80W Speedy 300 laser w/everything
    CAMaster Stinger CNC (25" x 36" x 5")
    USCutter 24" LaserPoint Vinyl Cutter
    Jet JWBS-18QT-3 18", 3HP bandsaw
    Robust Beauty 25"x52" wood lathe w/everything
    Jet BD-920W 9"x20" metal lathe
    Delta 18-900L 18" drill press

    Flame Polisher (ooooh, FIRE!)
    Freeware: InkScape, Paint.NET, DoubleCAD XT
    Paidware: Wacom Intuos4 (Large), CorelDRAW X5

  10. #10
    Thanks Dan. I have to admit it was your thread that turned me on to designing a scrubber in the first place. The nice thing about the Homer buckets is they are inexpensive and have a sealing lid.

    The design was really quick to prototype with the most difficult thing being the routing of the wooden ring (I had to build a circle jig/baseplate for my router). I think my next version will involve lasering a 1/4" thick acrylic ring with a grid for support. It will still need the window screen, but I can just glue some screen to the acrylic.

    What I would really like to do is build a clear acrylic scrubber so I can watch the smoke being filtered. Be sure to post your version 2.
    Laser: Trotec Speedy 300-80 watts
    Software: Corel Draw X6, Windows 7 64-bit, Adobe Photoshop CS5
    __________________________________________________ ___

    Please, call me Ron.

  11. #11
    Join Date
    Aug 2012
    Location
    Sun City West AZ
    Posts
    132
    Thanks for the design. I made 1.0 out of ply wood (thanks Dan). Think Ill go to buckets for 2.0

  12. #12
    A suggestion on changing the charcoal charge, I drape cheesecloth across the support screen in the bottom of my scrubber and let the cheesecloth extend up the sides enough that when it is time to change the charcoal, I gather the edges of the cheesecloth and lift the entire charge out and dump it. I install new cheesecloth each time and it is jsut the right weave to allow air passage while containing the charcoal.


    _MG_9058 by Randy Digby, on Flickr

    In my design, I use the cheesecloth to seal the gap between the prefilter and the sides of the chamber.

    _MG_9059 by Randy Digby, on Flickr
    Trotec Speedy 100 30W
    CorelDraw 2023
    EngraveLab 9
    Sublimation
    MillRight CNC Power Route Plus
    Duct Tape
    WD40

  13. #13
    If things go well, I'll be getting additional lasers in the future. Would one scrubber box /bucket would be enough for all machines, or would it be better to have separate set ups for each machines? I can see some pros and cons for each set up but I'd like to here the pros thoughts on it

  14. #14
    As promised, here are the CFM results


    Test setup:


    All tests were done with a Celestron 48021 Windguide (accurate to +/- 5%), set to average feet per minute, held about 4 inches from the end of the exhaust exit. I moved the anemometer around until the highest speed was achieved for a sustained period of time (~10 seconds at the same speed). (Moving the anemometer closer to the exhaust exit partially blocked the exit, increasing the ft/m reading due to a reduction in the exhaust exit diameter.)

    The blower tested is the Harbor Freight 13 Gallon Industrial Portable Dust Collector ( http://www.harborfreight.com/13-gall...tor-31810.html ). It has a 3.5 inch I.D. inlet and 3.6 inch I.D. exhaust. It has safety grills covering both the intake and exhaust. rating of the blower on the website is 660 CFM.

    The hose diameter used in the calculations was 3.8" with the exception of the blower only tests. The online calculator at http://www.calculatoredge.com/optica...air%20flow.htm was used to convert the LFM to CFM.

    ==============================================


    Blower Only

    5529 ft/m , 391 CFM (3.6" exhaust exit diameter (1.8 radius) was used in the calculations)

    Blower, 8' exhaust hose, 10' intake hose, connected to laser

    1. No exhaust ports blocked in laser: 4189 ft/m , 330 CFM

    2. 1/2 of the exhaust ports in the laser blocked: 3940 ft/m , 310 CFM

    Blower, 8' exhaust hose, 2' blower intake hose connected to scrubber, 10' scrubber intake hose connected to laser

    1. No exhaust ports blocked in laser: 2632 ft/m , 207 CFM

    2. 1/2 of the exhaust ports in the laser blocked: 2554 ft/m , 201 CFM

    Blower, 8' exhaust hose, 2' blower intake hose connected to scrubber, 10' scrubber intake hose connected to laser blast gate 1/2 closed

    1. No exhaust ports blocked in laser: 2600 ft/m , 205 CFM

    2. 1/2 of the exhaust ports in the laser blocked: untested

    Result observations:

    Closing the blast gate 1/2 way results in a negligible drop in CFM. The same is true of covering 1/2 of the exhaust ports inside the laser housing. Running the laser with the scrubber drops the CFM by 47%. However, the CFM drop is still within the air flow requirements of the manufacturer.

    ==============================================

    Test 2

    This second run of testing was done to see how the blower safety grills affect the CFM performance of the blower. A diameter of 3.6" (1.8" radius) was used. The testing was done to satisfy my curiousity. I do not recommend or condone the removal of any safety equipment; It is there for a reason.

    1. Blower only (no safety grills): Exceeded 8600 ft/m , 608 CFM + (beyond the limits of the anemometer)

    2. Blower with intake safety grill removed / exhaust safety grill installed: 8145 ft/m , 576 CFM

    3. Blower with intake safety grill removed, 8' exhaust hose, 2' blower intake hose connected to scrubber, 10' scrubber intake hose connected to laser : 2367 ft/m, 186 CFM

    Result observations:

    Running the blower without the safety guards results in a massive increase in unrestricted CFM. However, once you put the blower back into the system, the CFM drops back down. Interestingly enough, the CFM was actually lower for test 2, item 3 than it was for test 1, item 5. The only difference in the test was the lack of an intake safety grill. My guess is something else was changed like hose position. Perhaps I had a sharper bend in one of the hoses when I was testing?... Or maybe the anemometer really didn't like exceeding its limits.


    Last edited by Ronald Erickson; 11-13-2012 at 4:12 PM. Reason: Bad calculator used
    Laser: Trotec Speedy 300-80 watts
    Software: Corel Draw X6, Windows 7 64-bit, Adobe Photoshop CS5
    __________________________________________________ ___

    Please, call me Ron.

  15. #15
    Hmm, time for a redesign already. My carbon has become contaminated with the smoke/ash particles from cutting so much plywood. The prefilter isn't dense enough to filter out those particles and the smoke residue has made it's way completely through the carbon and into the blower.

    Looks like I'll need to add a media filter to filter out the larger particles so the carbon can do it's job and remove the odors... Homer bucket air scrubber 1.0 is getting an upgrade it seems.
    Laser: Trotec Speedy 300-80 watts
    Software: Corel Draw X6, Windows 7 64-bit, Adobe Photoshop CS5
    __________________________________________________ ___

    Please, call me Ron.

Tags for this Thread

Posting Permissions

  • You may not post new threads
  • You may not post replies
  • You may not post attachments
  • You may not edit your posts
  •