Page 1 of 2 12 LastLast
Results 1 to 15 of 16

Thread: Technique Question

  1. #1
    Join Date
    Dec 2012
    Location
    North East, PA
    Posts
    250

    Technique Question

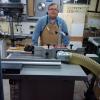
    Hi, I wonder if anyone can help me with this question. I'm building some cutting boards and want to make the poultry JK Adams Board.jpgdepression shown here from this JK Adams Co. board. I have cut one already, but the method took forever. I'm looking for a better, faster approach. The way I made the firsts board was to use a plunge router to cut progressively deeper grooves from edge to center, then a chisel to clean up the waste then a rasp then a sander. Took forever. Adams probably uses a CNC machine, which of course would make it easy.

    Anyone have a suggestion for a fast, efficient way to make this depression in the end grain cutting board?

    thanks in advance........

  2. #2
    Join Date
    Dec 2006
    Location
    Toronto Ontario
    Posts
    11,281
    Adze.................Rod.

  3. #3
    I'd use an angle grinder with a backing pad and 24grit disc (you can get all 3 from a big box store), or - better - an angle grinder with a carbide "kutzall" disc. Once you see how well this thing lets you 'carve' you'll find all kinds of ways to work it into your projects.

    Of course, you'll still need a way to smooth it properly. That's where all the time is, and where it'll always be.

  4. #4
    Many ways to do it. It really depends what tools you have available. In my shop (because my CNC is not up and running yet), I might approach this the way I approach carving the inside of an archtop guitar plate.

    1) Make a little "contour map" of where you want the cutout to be. You're making isometric lines where it's constant "depth" along that line. For example, if I want the depression to go to .75" at the deepest, I'll maybe draw a line around the edge of my cutout....and then come in 1/4" or so a draw another line...and come in another 1/4" and draw another line. When I'm done, I'll have all of these little loops on my cutting board that represent areas of constant depth

    2) Take a drill and go around the lines you drew, drilling holes of the correct depth. So I might drill 1/8" deep around the first line....maybe 1/4" around the 2nd line, and so one. In the center, I drill .75"

    3) Take your favorite tool for wasting lots of wood. In my case, I'd grab one of my carving planes....maybe a large gouge...Rod's adze is a great idea too. Whatever you have. Waste material as close to the bottom of the holes as you dare

    4) Clean up with scrapers and sandpaper

    That will get you there in a hurry and precisely.

    After doing one or two, I'd probably skip the drilling and marking step because I'd have a good idea what the shape looked like.

    If you want to go faster, pick up one of the carving discs, like this:
    http://www.woodcraft.com/product/208...arse-blue.aspx

    That will get you there in a couple of minutes...do be sure to be careful and have the surface clamped down well.

    Unless you have a duplicarver, this is one job best left to something other than a router, IMHO.

  5. #5
    Join Date
    Jan 2010
    Location
    Tampa Bay, FL
    Posts
    3,943
    An adze, and a froe. Every day I learn something new here. Amazing.
    - After I ask a stranger if I can pet their dog and they say yes, I like to respond, "I'll keep that in mind" and walk off
    - It's above my pay grade. Mongo only pawn in game of life.

  6. #6
    Join Date
    Nov 2010
    Location
    Anchorage, Alaska
    Posts
    1,617
    Assuming you're talking about the time it takes to make the "pond" to catch the drippings, I'd use a bowl and tray router bit with a template. Since it's a catch basin, you could choose to make it slightly deeper than the perimeter channel and it wouldn't look out of place.

    Pic below; just my $0.02... YMMV.

    ktbowltray101.jpg
    One can never have too many planes and chisels... or so I'm learning!!

  7. #7
    Join Date
    Feb 2003
    Location
    Chappell Hill, Texas
    Posts
    4,741
    Quote Originally Posted by Alan Lightstone View Post
    An adze, and a froe. Every day I learn something new here. Amazing.
    Adze? Yes.

    Froe? No.

    Scorp? Yes.

    Gouge? Yes.

    Tablesaw would work, but it would take a while. Basically, build a wood frame around the saw blade larger than the cutting board, and move the cutting board, face down, back and forth and side to side within the frame, raising the blade little bits at a time, to hollow it out. Have I done this? No. Would I do this.... yes, but this would not be my preferred method. Too slow. A bit radical of an idea too, if i do say so myself. (edit: and the sides parallel with the blade would be vertical too - so not so good of an idea - it would require a lot of handwork afterwords. Nevermind.)

    Edit: I guess my preferred method, for speed, would be an overhead pin router. You would have to make a template first though.

    Todd
    Last edited by Todd Burch; 12-10-2012 at 5:02 PM.

  8. #8
    Join Date
    May 2003
    Location
    NW Arkansas
    Posts
    180
    Router duplicator.

    They used to be sold by Sears and others. Do a google and you can see examples.
    Larry

  9. #9
    Join Date
    Dec 2012
    Location
    North East, PA
    Posts
    250
    image.jpgThanks to all for the comments and ideas. I'm going to do some experimenting and I'll report back with results! This is my first attempt, using router, chisels and elbow grease!

  10. #10
    Join Date
    Mar 2009
    Location
    Red Deer, Alberta
    Posts
    918
    Why not make a jig to sit on top that has con-cave rails that hold a wide - narrowish base plate and then just slide it back and forth. You could use the 'bowl bottom ' bit and just raise it a bit each time you get closer to the side.

    Someplace I saw that for doing a chair seat...
    Funny, I don't remember being absent minded...

  11. #11
    Rig a router to hang from a flexible cord... and swing it like a pendulum. The longer the cord the larger the radius.
    Bowclamp "good caul"

  12. #12
    Wow, have u actually done that? Too rich for my blood.

  13. #13
    Join Date
    Sep 2008
    Location
    Chesapeake, VA
    Posts
    242
    Hang it in a computer science lab with "Bang Head Here" sign above, you'll get that impression within a week!

    Nice cutting board, if you're going to be making a bunch I'd favor the router/template for bulk removal (done in batches) followed by whichever hand tool/power grinder best fits your style/workflow.
    There are 10 types of people in the world, those who understand binary and those who don't.

  14. #14
    You could build a router dish jig. I saw David Marks build and use one on an episode of Woodworks. It looks something like this (not my picture):

    vitrine14.JPG

  15. #15
    Join Date
    Mar 2005
    Location
    Raleigh, NC
    Posts
    888
    Wouldn't take 10 minutes using a sharp scorp.

Posting Permissions

  • You may not post new threads
  • You may not post replies
  • You may not post attachments
  • You may not edit your posts
  •