Page 1 of 2 12 LastLast
Results 1 to 15 of 22

Thread: Spalted maple lidded box

  1. #1

    Spalted maple lidded box

    This was done to try out another tool I just got in the mail..........no, I am not buying all new tools! This was a test for a certain style flute! It worked well!


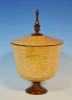
    Anyway, this was a quick little project, and the blank already had tenons on both ends and was just cluttering up my grinding area, so I chucked it up........I thought I would go simple with this one! Sometimes simple is better!

    IMGP3940.JPGIMGP3942.JPGIMGP3941.JPG If you like it, let me know!
    Remember, in a moments time, everything can change!

    Vision - not just seeing what is, but seeing what can be!


  2. #2
    Join Date
    Nov 2009
    Location
    Erie, Pa.
    Posts
    147
    I think it turned out great. What tool were you testing on this piece? I am just getting into box's. Always in the market for a new tool.
    Paul Singer
    Jet 1642EVS 2hp

  3. #3
    Quote Originally Posted by Paul Singer View Post
    I think it turned out great. What tool were you testing on this piece? I am just getting into box's. Always in the market for a new tool.
    The tool was just a bowl gouge..........just doing as a favor to someone.........it was used for the outside and a little of the hollowing before the real important tool.....a square box scraper with 2 sharp sides 90 degrees to each other and beveled back about 25 degrees.......that is my secret to a flat wall and sharp corner and flat bottom!

    Good luck with your future boxes!
    Remember, in a moments time, everything can change!

    Vision - not just seeing what is, but seeing what can be!


  4. #4
    Join Date
    Dec 2008
    Location
    Chesterfield, VA
    Posts
    1,332
    Simple is a good thing! Sometimes I get in a tizzy trying to think out what I want to do, and there are times I suppose when that's necessary. But at other times, it's really OK just to chuck up (as opposed to up chuck) a piece laying around and go simple. Nice little box there!

  5. #5
    Roger a nice clean little box.
    When you say simple, do you mean a "simple" shape?, For me even the simplest of designs still reqires the same regard & effort with the finishing, ie, a nice flast internal bottom, going thru the papers to avoid scratches & then appling your chosen finish, be it lacqure, oil or simple rattle can spray on.
    This piece seems to combine these for, as I say, a nice clean job
    Well done
    Pete

  6. #6
    Quote Originally Posted by Pete Gray View Post
    Roger a nice clean little box.
    When you say simple, do you mean a "simple" shape?, For me even the simplest of designs still reqires the same regard & effort with the finishing, ie, a nice flast internal bottom, going thru the papers to avoid scratches & then appling your chosen finish, be it lacqure, oil or simple rattle can spray on.
    This piece seems to combine these for, as I say, a nice clean job
    Well done
    Pete
    Thanks Pete........yes, I was referring to a simple shape......clean lines and let the figure in the wood speak for itself. You are correct about the finish work.....all that is not so simple!
    Remember, in a moments time, everything can change!

    Vision - not just seeing what is, but seeing what can be!


  7. #7
    Quote Originally Posted by Steve Vaughan View Post
    Simple is a good thing! Sometimes I get in a tizzy trying to think out what I want to do, and there are times I suppose when that's necessary. But at other times, it's really OK just to chuck up (as opposed to up chuck) a piece laying around and go simple. Nice little box there!
    Thank you, Steve.........good to hear from you. Hope things are well! Getting much turning time lately?
    Remember, in a moments time, everything can change!

    Vision - not just seeing what is, but seeing what can be!


  8. #8
    Join Date
    Jan 2005
    Location
    Goodland, Kansas
    Posts
    22,605
    To me Roger simple is good. I like it a lot. Don't give me that story about not buying tools. I know better.
    Bernie

    Never put off until tomorrow what you can do the day after tomorrow.

    To succeed in life, you need three things: a wishbone, a backbone and a funnybone.


  9. #9
    Quote Originally Posted by Bernie Weishapl View Post
    To me Roger simple is good. I like it a lot. Don't give me that story about not buying tools. I know better.
    I said I was not buying "all new tools!" I did not say I was not buying any new tools! This was just a trial of a type that was new to me, and an replacement of another one I had purchased.......finally got everything the way I needed it!

    Thanks for the attaboy, Bernie.....much appreciated!
    Remember, in a moments time, everything can change!

    Vision - not just seeing what is, but seeing what can be!


  10. #10
    Join Date
    Aug 2010
    Location
    Wittmann, AZ
    Posts
    2,503
    Roger, that's a nice, simple little box and some good looking wood too!
    "If it is wood, I will turn it."
    vor-tex: any activity, situation, or way of life regarded as irresistibly engulfing.

  11. Roger some forms are elegant in their simplicity, very elegant and nice to look at, I like it a lot.

  12. Quote Originally Posted by jwjerry w kowalski View Post
    Roger some forms are elegant in their simplicity, very elegant and nice to look at, I like it a lot.
    Thank you Jerry!
    Remember, in a moments time, everything can change!

    Vision - not just seeing what is, but seeing what can be!


  13. #13
    Join Date
    Apr 2012
    Location
    Great Falls, VA
    Posts
    813
    The tool was just a bowl gouge..........just doing as a favor to someone.........it was used for the outside and a little of the hollowing before the real important tool.....a square box scraper with 2 sharp sides 90 degrees to each other and beveled back about 25 degrees.......that is my secret to a flat wall and sharp corner and flat bottom!
    Roger, nice little box, and your point about the box scraper is good to know. As I've commented on another of your boxes recently, I really like the flare at the top and bottom, joined with a smooth curve. Had been wondering if you try to follow the curve on the inside as well, for uniform wall thickness. That would have made for an interesting challenge transitioning from side to bottom.

    Is the box scraper you use for this a custom tool? Wondering if the side edge is ground at 25 degrees to the full depth of the workpiece, or do you relieve it farther up to avoid rescraping the thin sides of the box near the mouth while you're working near the bottom?

    David

  14. #14
    Join Date
    Jan 2006
    Location
    North central Pa Tioga Co.
    Posts
    701
    Nice looking box! Well done.

  15. #15
    Quote Originally Posted by David C. Roseman View Post
    Roger, nice little box, and your point about the box scraper is good to know. As I've commented on another of your boxes recently, I really like the flare at the top and bottom, joined with a smooth curve. Had been wondering if you try to follow the curve on the inside as well, for uniform wall thickness. That would have made for an interesting challenge transitioning from side to bottom.

    Is the box scraper you use for this a custom tool? Wondering if the side edge is ground at 25 degrees to the full depth of the workpiece, or do you relieve it farther up to avoid rescraping the thin sides of the box near the mouth while you're working near the bottom?

    David
    David........I have a Benjamin's Best 1" square scraper from Penn State. I grind it on the end at 25 degrees [that could be 20 or 30 degrees as well...as long as it is a back bevel] and along the left edge, I grind it back about 1-1/2" and you get a really sharp 90 degree corner.....that is the secret......and of course the edge on the front and side help smooth the wall and bottom. Take small cuts .....maybe 1/16th at a time, by pushing the corner into the box wall from the outer opening........

    I also usually take a forstner bit to establish the depth and perhaps hollow out some material with a 1/2" bowl gouge, just to move the process along a bit faster........be careful.......you can overdo the bowl gouge!

    You need to remember, that as you grind away metal on that side, the angle will change over time, so what I do is sight down the inside wall of the box and make sure that I skew the angle as I present the tool to the wood in order to give me a flat inside wall.........hope that makes sense to you!

    Be careful going deep as you need support......after about 5 inches it can get hairy! 
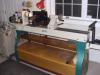
A tool rest that will go inside the box will help with support and also you need to be above center line just a smidgen......think 1/16th.......good luck with yours!
    Last edited by Roger Chandler; 04-26-2013 at 12:20 PM.
    Remember, in a moments time, everything can change!

    Vision - not just seeing what is, but seeing what can be!


Posting Permissions

  • You may not post new threads
  • You may not post replies
  • You may not post attachments
  • You may not edit your posts
  •