Results 1 to 11 of 11

Thread: I'm building a chest of drawers

  1. #1
    Join Date
    Apr 2008
    Location
    Brooklyn, NYC
    Posts
    510

    I'm building a chest of drawers

    I came on a piece of heart pine from a renovation of an old building. It was about 6" x 6" and nearly five feet long. It looked like it wanted to be the frame for a chest of drawers. I didn't take any pictures until the legs and stretchers were milled and joined. The milling was by machine but the joinery is by hand mostly.

    P1030314.jpg
    Here is a leg with the mortises and grooves cut.


    P1030315.jpg
    The panels are glue ups of wood rescued from a demolition job. It looks like Home Depot pine. The side stretchers are heart pine from the same piece as the legs.


    P1030316.jpg
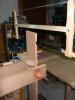
    Here is a side coming together with drawer runners mortised into the legs. The runners are hard maple.


    P1030317.jpg
    Here are the back stretchers. These are made from the same wood as the panels since I didn't have enough of the old pine.


    P1030318.jpg
    The back panel is some type of cedar (I think). It was T&G paneling in an apartment I gutted. It straight grained, knot free and very soft. It also splits easily but it should make a fine back. I planed off the tongues and grooves and glued up a single wide panel.


    P1030319.jpg
    Here it is with the sides and the back assembled. This is just a dry fit. Now on to make the top.

  2. #2
    Join Date
    Apr 2008
    Location
    Brooklyn, NYC
    Posts
    510
    Post deleted because pictures wouldn't open.
    Last edited by Harlan Barnhart; 05-04-2013 at 9:41 PM. Reason: I deleted this post because the pictures wouldn't open.

  3. #3
    Join Date
    Apr 2008
    Location
    Brooklyn, NYC
    Posts
    510
    P1030320.jpg
    Here the top is glued up and ready to fit.


    P1030321.jpg P1030322.jpg
    I left stub tenons on each leg to join to the top with a sliding dovetail. Here I layout the angle for the male part of the joint.


    P1030325.jpg
    Then I undercut the section that needs to be removed...


    P1030327.jpg
    And pare off the waste.
    Attached Images Attached Images

  4. #4
    Join Date
    Apr 2008
    Location
    Brooklyn, NYC
    Posts
    510
    P1030329.jpg
    Here is the male part of the sliding dovetail ready to mark out the rest of the joint on the bottom of the top board.


    P1030330.jpg
    The rest of the joint laid out and ready to cut. The layout lines don't show up so well so you may have to look closely to see them.


    P1030331.jpg
    Now bore out the waste and pare it clean.


    P1030334.jpg
    This is the joint for the front leg which needs a receptacle to accept the dovetail before it slides into locking position. On the back joints, the angled mortise extends out the back so a receptacle isn't needed.


    P1030333.jpg
    I used a pencil to mark the tight spots and slid the joint together little by little. It took some time. After each try, I pared away the high spots.


    P1030336.jpg
    Here the top is fitted.

  5. #5
    Join Date
    Apr 2008
    Location
    Brooklyn, NYC
    Posts
    510
    P1030336.jpg
    I wasn't very happy with the top once I had it fitted. I couldn't think of an edge treatment that suited me and the end grain of the pine wasn't that attractive so I decided it needed breadboard ends.


    P1030527.jpg
    These are made of hard maple and are joined with tenons.


    P1030528.jpg
    The mortise closest to the front is fitted tightly but the others are enlarged on the sides to allow for seasonal movement in the pine top.


    P1030532.jpg
    I undercut the breadboard ends slightly to give it a lighter look.


    P1030533.jpg
    Now I need to pin them on.

    Up next, building drawers. That may take awhile since I don't have the wood yet.

  6. #6
    Join Date
    Dec 2010
    Location
    South Coastal Massachusetts
    Posts
    6,824
    I finally made out the engraving on the material.

    I could not for the life of me figure out why you chose this stuff.
    It makes sense, now.

    I do wish I had seen the breadboard demonstration before I made my dining table.
    Your method, with the haunch would solve one of my seasonal problems.

  7. #7
    Join Date
    Aug 2011
    Location
    Anchorage, Alaska, USA
    Posts
    34
    Great way to put reclaimed material to use and excellent job of implementing your design. Very interesting thread.

  8. #8
    Join Date
    Feb 2003
    Location
    Yorktown, VA
    Posts
    2,756
    Harlan,
    Thanks very much for the build pictures. They are very helpful.

  9. #9
    Join Date
    Apr 2008
    Location
    Brooklyn, NYC
    Posts
    510
    Quote Originally Posted by Jim Matthews View Post
    I finally made out the engraving on the material.

    I could not for the life of me figure out why you chose this stuff.
    It makes sense, now.
    Historical reasons mostly. It's for my daughters who are growing up in the big city but I want them to know their blood if from the south. That and it has a warm quality that may not come through that well in pictures. It's wood with a "presence".

    Quote Originally Posted by Jim Matthews View Post
    I do wish I had seen the breadboard demonstration before I made my dining table.
    Your method, with the haunch would solve one of my seasonal problems.
    I read an article in Fine Woodworking years ago about breadboard ends and I've been making them this way ever since. I think the author was Chris Becksvoort. Sometimes I plow the grooves through the ends to save time but I wanted a cleaner look so I used stopped grooves.

  10. #10
    Join Date
    Jan 2007
    Location
    West Simsbury, CT
    Posts
    384
    Hi Harlan, great project, thanks for sharing. I'm trying to figure out from the photos where is your shop...are you in a kitchen or some other room in your house/apartment? Nice work wherever you are managing to do it!

    Thanks.
    Kevin

  11. #11
    Join Date
    Apr 2008
    Location
    Brooklyn, NYC
    Posts
    510
    Quote Originally Posted by Kevin Adams View Post
    Hi Harlan, great project, thanks for sharing. I'm trying to figure out from the photos where is your shop...are you in a kitchen or some other room in your house/apartment? Nice work wherever you are managing to do it!

    Thanks.
    Kevin
    Hi Kevin, my "shop" is in my bedroom. Here in Brooklyn we don't have space for roomy shops. Take a tour...http://www.sawmillcreek.org/showthre...hop&highlight=

Posting Permissions

  • You may not post new threads
  • You may not post replies
  • You may not post attachments
  • You may not edit your posts
  •