Page 1 of 9 12345 ... LastLast
Results 1 to 15 of 132

Thread: Laser Engraving True 8bit Shades of Grey

  1. #1

    Laser Engraving True 8bit Shades of Grey

    Hi everyone,

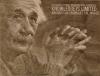
    I'm new here and this is my first thread and post on this forum. I would like to introduce to everyone a new process me and my son developed to laser engrave true 8bit shades of grey using a 445nm laser diode. There is no dithering a image first, no pulsing or overlapping dots to get the allusion of shades. What we have developed is a way to vary the laser diodes intensity by analog modulating the laser's driver to get true greyscale. With our setup, we can just use a standard X,Y and Z g-code from any image to g-code rotary engraving type of program for this process. No special laser engraving software or program is required.

    Using a laser diode compared to a CO2 to do these engraving is a very slow process, but the results are very gratifying/rewarding for us. This is just our hobby so time to produce them is irrelevant. We have successfully engraved on wood, artist canvas and mirrors with stunning results. With our setup, we can use Constant Wattage and vary the feedrate to get shades of grey, or use TTL to pulse the laser with a dithered black and white image also.

    Here is an example of our analog modulation engraving process being used on Birch Plywood.

    Jeff
    Attached Images Attached Images
    40 Years exp. Master Machinist
    The information I received here was of absolutely no value, so I will not be a contributor any longer!!
    Re-worked/Re-designed/Modified Servo K2CNC KG-3925
    Mini 445nm Laser Diode Engraver
    Kubotek KeyCreator/KeyMachinist Ver. 12.0 2D/3D CAD/CAM
    Picengrave Pro 4 + Laser Ver. 4.2.6
    PicLaser3D V1.0.0 -3925 and the Mini Laser Engraver

  2. #2
    Join Date
    Nov 2007
    Location
    Glenelg, MD
    Posts
    12,256
    Blog Entries
    1
    Welcome to the forum, Jeff.

    So you're modulating power instead instead of dithering... it's not exactly a new process. My ULS gives me the ability to set up 16 different power levels based upon gray level. Your second paragraph says you're keeping the power constant and modulating the feedrate instead... that's different, but I'm not sure what you hope to gain using that method.

    For the 16 levels I mentioned above... it's not 256 levels, but when the final product of dithering is indistinguishable, it doesn't really matter. I like your output, but why did you select a laser in the visible wavelength range? You're wasting a boatload of your power that way...
    Hi-Tec Designs, LLC -- Owner (and self-proclaimed LED guru )

    Trotec 80W Speedy 300 laser w/everything
    CAMaster Stinger CNC (25" x 36" x 5")
    USCutter 24" LaserPoint Vinyl Cutter
    Jet JWBS-18QT-3 18", 3HP bandsaw
    Robust Beauty 25"x52" wood lathe w/everything
    Jet BD-920W 9"x20" metal lathe
    Delta 18-900L 18" drill press

    Flame Polisher (ooooh, FIRE!)
    Freeware: InkScape, Paint.NET, DoubleCAD XT
    Paidware: Wacom Intuos4 (Large), CorelDRAW X5

  3. #3
    Join Date
    Mar 2005
    Location
    Anaheim, California
    Posts
    6,909
    I'm pretty sure the ULS electronics could generate 256 (8-bit) power levels with nothing more than a firmware change, but I'm not sure it would matter: are there any laser-suitable substrates with that much dynamic range? ("Dynamic range" probably isn't exactly the correct term in this context but I'm drawing a blank.)
    Yoga class makes me feel like a total stud, mostly because I'm about as flexible as a 2x4.
    "Design"? Possibly. "Intelligent"? Sure doesn't look like it from this angle.
    We used to be hunter gatherers. Now we're shopper borrowers.
    The three most important words in the English language: "Front Towards Enemy".
    The world makes a lot more sense when you remember that Butthead was the smart one.
    You can never be too rich, too thin, or have too much ammo.

  4. #4
    Join Date
    Oct 2004
    Location
    Cape Town, South Africa
    Posts
    3,922
    Gcc does 256 levels when doing 3d engraving...
    Im not sure what varying power levels will do for resolving photographic type greyscale engraving however , if the laser "burns" the material at the lowest level of grey , it will burn the material at the highest level too..just deeper....aka 3d engraving which a lot of lasers offer...
    Rodney Gold, Toker Bros trophies, Cape Town , South Africa :
    Roland 2300 rotary . 3 x ISEL's ..1m x 500mm CnC .
    Tekcel 1200x2400 router , 900 x 600 60w Shenui laser , 1200 x 800 80w Reci tube Shenhui Laser
    6 x longtai lasers 400x600 60w , 1 x longtai 20w fiber
    2x Gravo manual engravers , Roland 540 large format printer/cutter. CLTT setup
    1600mm hot and cold laminator , 3x Dopag resin dispensers , sandblasting setup, acid etcher

  5. #5
    Thanks for the welcome Dan.

    The variable feedrate method was not developed by us, but does give similar 8bit shade results. The first mirror I attached was done by varying the intensity with constant feedrate and the second was done with varying the feedrate with constant power. Both engravings are lit up from the back like a Lithophane.

    Our first successful 8bit shaded laser engraving was produced in August of 2012 and we have come a long way since then. Our work has been mentioned on this forum before, but our identity was not given.

    We are using a 10bit analog shaft encoder to vary the voltage to the modulated laser driver. The shades are produced based on the axis depth of cut in the gcode. I set the depth in the program to cut -.0256". This gives us 256 .0001" incremental moves to get the theoretical 256 shades of grey. Right now our limitations on power levels are with the image to g-code software, otherwise we could have 1024 power levels (10-bit). Could the different in shades be noticeable from 8bit to 10bit, most likely not, but it would be quite noticeable from 8bit to your 4bit power levels.

    We are not wasting any power with the 445nm wavelength either. It has been proven time and time again by us and others that are using them and we all are getting excellent results and burning power. We are able to focus the beam down to a .007" spot using a 3 element glass lens to get the fine detail. We are able to engrave at a 50IPM feedrate with a .008" step over using this 1W 445nm laser diode.

    Rodne, we are not 3D engraving. We are engraving 2D images with 8bit shades of grey. I have not seen where anyone has done any 8bit greyscale 2D engravings with a CO2 laser by varying the power. I have only seen connect the dots type engravings that will give the allusion of shades. Can this be done with a CO2?

    If anyone is interested, I do have a PDF that I could attach that explains this process in more detail. It has been written by the author of the image to gcode program I use. I assisted in the writing of it, but I do not have any direct commercial affiliation with him, his program or any other links it contains. It has links where to buy laser diode components, link to another forum where we and others have posted there laser diode engravings and information, schematics to build a DAC that uses step and direction pins to modulate the laser instead of using an encoder. It explains things in more detail and I would only attach it for the purpose of discussion only. Would this be allowable under this forums rules?

    Jeff
    Attached Images Attached Images
    Last edited by Jeff Woodcock; 05-19-2013 at 8:04 PM. Reason: Pictures timed out and did not attach
    40 Years exp. Master Machinist
    The information I received here was of absolutely no value, so I will not be a contributor any longer!!
    Re-worked/Re-designed/Modified Servo K2CNC KG-3925
    Mini 445nm Laser Diode Engraver
    Kubotek KeyCreator/KeyMachinist Ver. 12.0 2D/3D CAD/CAM
    Picengrave Pro 4 + Laser Ver. 4.2.6
    PicLaser3D V1.0.0 -3925 and the Mini Laser Engraver

  6. #6
    Join Date
    Mar 2011
    Location
    Olalla, WA
    Posts
    1,532
    The Shenhuis can engrave at 256 levels as well. They call it "Output direct". I suspect that getting the same results with an 80W laser would be somewhat difficult due to the lowest possible power being too much.
    Shenhui 1440x850, 130 Watt Reci Z6
    Gerber Sabre 408

  7. #7
    Rich, I can only assume the "Output direct" would be used on the 80W for 3D engravings like Rodne mentioned. Has anyone on this forum tried doing any laser engravings using a laser diode of any wavelength?
    40 Years exp. Master Machinist
    The information I received here was of absolutely no value, so I will not be a contributor any longer!!
    Re-worked/Re-designed/Modified Servo K2CNC KG-3925
    Mini 445nm Laser Diode Engraver
    Kubotek KeyCreator/KeyMachinist Ver. 12.0 2D/3D CAD/CAM
    Picengrave Pro 4 + Laser Ver. 4.2.6
    PicLaser3D V1.0.0 -3925 and the Mini Laser Engraver

  8. #8
    Join Date
    Mar 2005
    Location
    Anaheim, California
    Posts
    6,909
    I still have the question of what material you are engraving. Just because you can send 256 discrete levels of power (or feed-rate) does not mean you can get 256 discrete shades of grey/brown/whatever, especially on things like birch ply.
    Yoga class makes me feel like a total stud, mostly because I'm about as flexible as a 2x4.
    "Design"? Possibly. "Intelligent"? Sure doesn't look like it from this angle.
    We used to be hunter gatherers. Now we're shopper borrowers.
    The three most important words in the English language: "Front Towards Enemy".
    The world makes a lot more sense when you remember that Butthead was the smart one.
    You can never be too rich, too thin, or have too much ammo.

  9. #9
    Join Date
    Mar 2011
    Location
    Olalla, WA
    Posts
    1,532
    Quote Originally Posted by Jeff Woodcock View Post
    Rich, I can only assume the "Output direct" would be used on the 80W for 3D engravings like Rodne mentioned
    Yes, that is the intended use for that feature. That doesn't mean that someone can't be creative and use it for something that they they never thought of.
    Shenhui 1440x850, 130 Watt Reci Z6
    Gerber Sabre 408

  10. #10
    Join Date
    Oct 2004
    Location
    Cape Town, South Africa
    Posts
    3,922
    Jeff , The 3d engravings ARE based on shades of grey with power modulation.However , modulating power in the type of lasers we use wont actually engrave shades of grey in *photographic* terms , they will just burn deeper as the power varies

    There is no other way to get photographic output on our lasers than to convert to a 1 bit B&W graphic with dithering..which works very well for us.

    If you had material that would react discretely to differing power levels , IE "burn" light to darker based on power , varying power might work ..However just about all the materials used here won't do that , yes , you might have a darker mark on something like light wood birch if you apply more power , but all that is is a worse heat affected zone.
    Varying speed with constant power will not work with our lasers either , all we will get is a deeper and shallower marking or if the laser is being pulsed , more widely spaced pulses...
    It's an interesting application for a low powered and low cost application tho...
    Last edited by Rodne Gold; 05-20-2013 at 3:34 AM.
    Rodney Gold, Toker Bros trophies, Cape Town , South Africa :
    Roland 2300 rotary . 3 x ISEL's ..1m x 500mm CnC .
    Tekcel 1200x2400 router , 900 x 600 60w Shenui laser , 1200 x 800 80w Reci tube Shenhui Laser
    6 x longtai lasers 400x600 60w , 1 x longtai 20w fiber
    2x Gravo manual engravers , Roland 540 large format printer/cutter. CLTT setup
    1600mm hot and cold laminator , 3x Dopag resin dispensers , sandblasting setup, acid etcher

  11. #11
    Join Date
    Feb 2012
    Location
    Nambucca Heads NSW Australia
    Posts
    190
    I've had a look at the pics Jeff Posted, whilst they do look good, they do show a distinctive banding pattern much like an injet printer does. My images engraved using the Rastus filter the more traditional way on the laser don't show the banding.
    I'm Back.... & Currently Using a 500 x 300 50w C02 Shenhui Laser
    with Corel Draw X5, RdWorks Ver8, Adobe Master Collection CS5, Ratsus Plugin for PhotoShop instead of Photograv.

  12. #12
    Your correct Lee.

    The theoretical 256 shades is interpreted by the program I'm using and when lasered on Birch Ply does produce more of a brown shading. That first picture was not a good example other then showing the detail I am able to create with this process.

    Here is another engraving that I used white wash pickling wood stain on the Birch Ply first. It starts out white so it's closer to 8bit greyscale.

    Steven,

    I also attached another mirror engraving that does not have the banding you mentioned that is not back lit. I did not even spray anything on the back either, it's just how it came out of the machine. It's not easy to find good quality mirrors without imperfections and when using a florescent type light causes this effect also.

    I don't really like using the variable feedrate method, because it's to hard on the laser diode running at full power for long periods of time.
    Attached Images Attached Images
    40 Years exp. Master Machinist
    The information I received here was of absolutely no value, so I will not be a contributor any longer!!
    Re-worked/Re-designed/Modified Servo K2CNC KG-3925
    Mini 445nm Laser Diode Engraver
    Kubotek KeyCreator/KeyMachinist Ver. 12.0 2D/3D CAD/CAM
    Picengrave Pro 4 + Laser Ver. 4.2.6
    PicLaser3D V1.0.0 -3925 and the Mini Laser Engraver

  13. #13
    Dan, I also want to mention that the person that came up with the variable feedrate method uses a 3W 808nm LD and he can not get his laser to burn wood without some kind of coating first like us using the 445nm. He also came up with this method because he has no analog modulated driver to vary the power.

    Me and my son developed this greyscale engraving process with no intention of any monetary gain and freely shared this information to anyone that would be interested. Not everyone has the resource to purchase a CO2 and like Rodne stated "It's an interesting application for a low powered and low cost application tho..."

    We consider this an open source project and encourage new ideas and input and I just wanted to spread the word on this forum as well.

    If you already have a CNC router, then this laser engraving process can be added to your machine. This PDF is for information purposes only for anyone that would like to try laser diode engraving on there CNC machine regardless of what image to gcode program they have or prefer. My setup will work with any of them as you will see in the information that is presented.

    http://www.picengrave.com/Laser%20Setups.pdf

    Thanks. Jeff


    40 Years exp. Master Machinist
    The information I received here was of absolutely no value, so I will not be a contributor any longer!!
    Re-worked/Re-designed/Modified Servo K2CNC KG-3925
    Mini 445nm Laser Diode Engraver
    Kubotek KeyCreator/KeyMachinist Ver. 12.0 2D/3D CAD/CAM
    Picengrave Pro 4 + Laser Ver. 4.2.6
    PicLaser3D V1.0.0 -3925 and the Mini Laser Engraver

  14. #14
    Jeff

    Welcome to SMC. I see some instances of links that we don't allow on this forum but it is such fascinating reading that I will leave them for others to rule on. While I read the pdf carefully, and I have a vague understanding of what you have achieved, I'm afraid I'll have to retire to the comfort of my workbench and my trusty hammer and chisel.
    Mike Null

    St. Louis Laser, Inc.

    Trotec Speedy 300, 80 watt
    Gravograph IS400
    Woodworking shop CLTT and Laser Sublimation
    Dye Sublimation
    CorelDraw X5, X7

  15. #15
    Join Date
    Nov 2007
    Location
    Glenelg, MD
    Posts
    12,256
    Blog Entries
    1
    Jeff,

    I see one major flaw in your logic (though in practice it may not be as big of a deal, depending upon substrate)... substrates do not burn linearly with increased power, so modulating the power does not give an equivalent change in removed material. This is also highly substrate dependent, so one substrate will display vastly different power curves than another... the process would need to be tuned for each substrate. I imagine it's some logarithmic scale for most substrates, and tweaking the exponent would provide a reasonable tune. But the main point is it's not linear, so you can't just set the two endpoints (0 power and max power). Case in point... I can spend hours setting up my 16 levels for 3D engraving when I do a new substrate, and it's never linear... often a curve with a dip or hump somewhere along the line.

    For mirrors, dithering is the only way to do it. You either have silvering or no silvering in a spot, there's no shading. I suppose you could apply just enough power so the spot fades from no silvering in the middle to silvering along the edges, but in essence that's simply localized dithering.

    My comment about wasting power with the visible laser is about the ability of a substrate to absorb the laser's power. Visible lasers aren't the best wavelength to use for organic substrates like wood... a significant portion of the energy is reflected rather than absorbed. You're correct in that those lasers are significantly cheaper than a typical CO2 cartridge, but then again it's not practical from a business standpoint when a single image can take hours to burn.
    Last edited by Mike Null; 05-20-2013 at 7:56 AM.
    Hi-Tec Designs, LLC -- Owner (and self-proclaimed LED guru )

    Trotec 80W Speedy 300 laser w/everything
    CAMaster Stinger CNC (25" x 36" x 5")
    USCutter 24" LaserPoint Vinyl Cutter
    Jet JWBS-18QT-3 18", 3HP bandsaw
    Robust Beauty 25"x52" wood lathe w/everything
    Jet BD-920W 9"x20" metal lathe
    Delta 18-900L 18" drill press

    Flame Polisher (ooooh, FIRE!)
    Freeware: InkScape, Paint.NET, DoubleCAD XT
    Paidware: Wacom Intuos4 (Large), CorelDRAW X5

Posting Permissions

  • You may not post new threads
  • You may not post replies
  • You may not post attachments
  • You may not edit your posts
  •