Results 1 to 14 of 14

Thread: Trying To Improve Router Table Dust Collection

  1. #1
    Join Date
    Jul 2012
    Location
    Punta Gorda, FL
    Posts
    3,028

    Trying To Improve Router Table Dust Collection

    Pretty much everyone agrees you need dust collection above and below the router table. I'm not a big fan of enclosing the entire router in a box under the table because
    1. The motor vents can get clogged
    2. It's harder to access the speed control

    Several years ago I made a box that allowed for the bottom of the router to poke through the bottom of the lower box. It worked okay but was far from the perfect solution.

    Today I was looking on Google images for what other people did for underneath collection on their router table. I saw one picture that sparked an idea and that led to this:

    I started with roof flashing, tin snips and a Malco sheet metal bender. I made one edge on the 24" side, 3/8" wide


    I then measured the outer dimensions of the plate that the router mounts to and made some bends


    The first shield in place with the router extended to its maximum


    With the router plate bottomed out. This piece will be secured to the top (stationary) plate


    I then had to figure out how to contain the dust under the router mounting plate. I wrapped a piece of sheet metal around the router base. There were sufficient gaps that needed to be sealed and the issue of where the dust collection port will go.


    I needed to get the profile of the router so I used this and took the profile where the lock handle is. Putting the shield where the lock handle was abandoned quickly.


    I cut a piece of 1/2" laminated MDF to the width of the router housing, just inside the handles. Then I used the profiler and cut the sheet metal and then bent it around the MDF. I also used the profiler to get the shapes to cut around the handles.


    I cut back the strip I had earlier used to wrap the router base and screwed it to the box. I wanted to rivet it but it needed to be removable, just in case.


    With the MDF and dust port in place and the router extended to the maximum.


    With the router bottomed out. No conflicts.


    I still have some work to do on it before I test it. I need to secure the stationary shield in place and fill in some gaps on the other side.

  2. #2
    Join Date
    Jul 2012
    Location
    Punta Gorda, FL
    Posts
    3,028
    I temped everything in, using turner's tape to hold some of the shielding in place.


    It's really nice to have easy access to everything. I had accidentally tripped the trigger lock so the router was off. I didn't find out until I went to turn it on at the paddle switch. Before I would have had to remove the door and squeeze my hand in there to set the trigger lock. This was easy!


    The big tell was how much dust and chips landed on the platform below the router. This was taken after routing a deep profile into a 3' piece of 3/4" plywood.


    The biggest problem was dropping the router back into place. With the additional housing on it, I had to modify the opening to get it in. The internal suction is noticeably greater than before. There's full access to the router controls. And the motor vents are out of the dust bin.

    I've got four doors to make next week, so we'll see how it performs under a real test.

  3. #3
    Join Date
    Dec 2006
    Location
    Flint, TX
    Posts
    75
    Julie, I have been pondering how to solve the dust issue and just received the Dust Router from Keen Products LLC. This is a silicone boot that fits around the router collet and has a port to connect to a shop vac. See video http://www.youtube.com/watch?feature...&v=kvwlkOKhoa4. I have not installed it as yet and will report how effective it is. I am curious as to how it will compare to your creative dust solution! Roger

  4. #4
    Join Date
    Jul 2012
    Location
    Punta Gorda, FL
    Posts
    3,028
    Roger,

    I saw that video and thought that might be a great solution. But it didn't work with my setup. This is what I have had for years...


    Yeah, lots of problems.

    Dust escaped through the gap I left for the belt, through the space that allowed the router to move up and down and through all the tiny cracks and crevices.

    I posted this in hopes the brain trust here at SMC might be able to refine this concept. There's a lot of great minds here.

    Thanks Roger for stimulating forward thinking. Maybe this is the start of something amazing.

  5. #5
    Join Date
    Jan 2010
    Location
    Orland Hills, IL (near Chicago)
    Posts
    1,161
    I'm in desperate need of below DC on my lift too. I had some ideas, but haven't had the time. I'll be watching this thread intently.
    Thanx,

    shotgunn

    -----------------

    More is DEFINITELY more!!!

  6. #6
    Join Date
    Jul 2012
    Location
    Punta Gorda, FL
    Posts
    3,028
    One thing I thought of is the collecting between the top and the router attachment plate. That was already happening but with nothing around the exterior perimeter of the plate, it could be more easily removed. But I suppose vacuuming it out from the top should work. I probably won't put it to a real test until late in the week.

  7. #7
    Join Date
    Jul 2012
    Location
    Punta Gorda, FL
    Posts
    3,028
    Michael, don't hold your breath. I just ran a couple of door panels through the router. I underestimated the ability of the dust & chips to escape from any and every little crack & crevice. I'd give this version about 2-1/2 stars. It got some and left some.

  8. #8
    Join Date
    Mar 2005
    Location
    Raleigh, NC
    Posts
    888
    Quote Originally Posted by Roger Davis View Post
    Julie, I have been pondering how to solve the dust issue and just received the Dust Router from Keen Products LLC. This is a silicone boot that fits around the router collet and has a port to connect to a shop vac. See video http://www.youtube.com/watch?feature...&v=kvwlkOKhoa4. I have not installed it as yet and will report how effective it is. I am curious as to how it will compare to your creative dust solution! Roger
    I installed a Keen on one of my tables and the next day ordered another for the other table. Not perfect, but better than anything I had kludged!

  9. #9
    I've been getting almost 100% dust collection on my router tables for years with the typical enclosed router design. Access is no problem with a simple door. The clogged vent issue, IMO, is right up there with static ignited exploding dust collectors.
    Attached Images Attached Images

  10. #10
    Join Date
    May 2007
    Location
    Northern CA
    Posts
    140
    I have posted this before. It is a plastic tub from Target attached to the bottom of my router table with a hinge and sealed with double sided camper shell tape. There is a 4" blast gate on one side of the tub and a hole on the opposite side which provides air circulation and also easy access to the speed control my Hitachi M12V2 router. This setup works well for me. It's mounted on the end of my Grizzly G0691.G0691 Router Table Dust Coll.jpgRouter TDC1.jpgRT Fence.jpg

  11. #11
    +1 on Pete's method. I did this on my workbench router table and get great DC with no above the table collection. Best thing is it's quick to set up.

  12. #12
    Join Date
    Jul 2012
    Location
    Punta Gorda, FL
    Posts
    3,028
    My desire was to avoid encasing the entire router in an enclosure. My concerns are the fan vents will clog, possibly causing the motor to overheat and dust to buildup around the brushes. Also, access to the speed control becomes more difficult and the moving parts of the lift are subject to dust buildup and require more maintenance.

    Ideally picking up dust right at the source is best. I bought some parts for my my router that looked like I could improvise to accomplish that. But they were designed to mount to the bottom of the base and that would interfere with operation of the router lift.

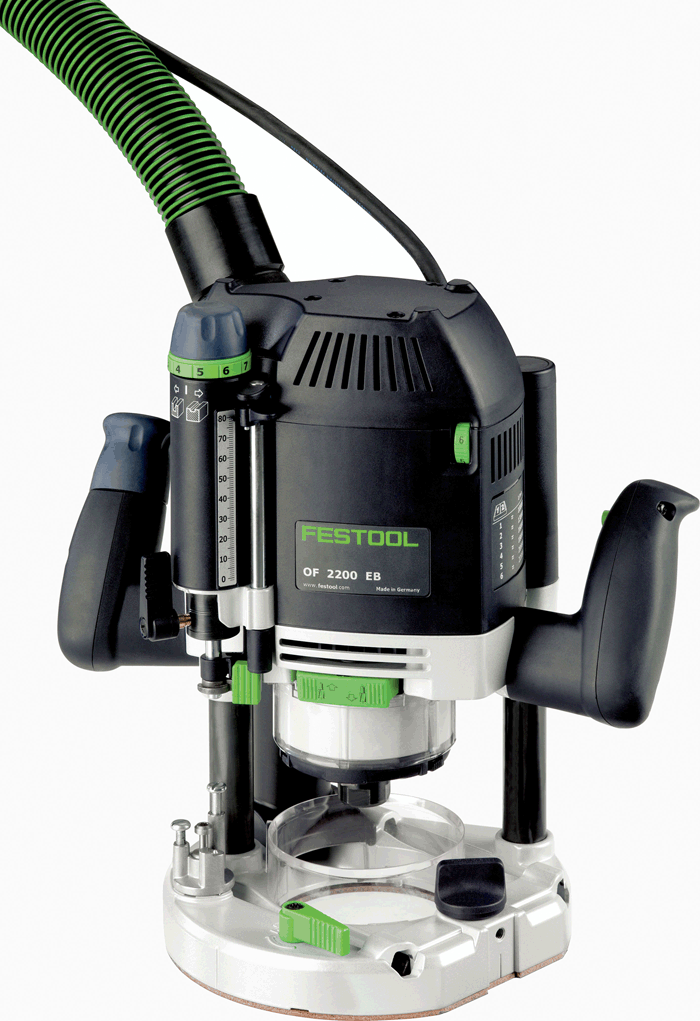
    Festool is said to have excellent dust pickup with their routers when table mounted. Looking at their largest router you can see how they collect the dust, right at the source. But duplicating this would require me to reach under the table to engage the shaft lock when changing bits. I kind of hoped I could keep my present setup that allows me to do everything from above.

  13. #13
    Hi Pete, I like your router fence as well as the dust tub. Could you please tell me the brand on the fence?

    Thanks

  14. #14
    I completely enclosed mine but created a path by which the housing remains clear and there is easy access to the router.

    I think you can see in this picture that there's a gap at the bottom of the hardboard panel. This lets air in across the bottom of the enclosure to sweep out any chips. The panel itself is held in with the two tabs and stays elevated by a simple friction fit.
    Router1.JPG

    Here's the back. Notice that the collection point is at the bottom. Inside, there are baffles in the rear of the enclosure to keep the rear corners clean.
    Router2.JPG

Posting Permissions

  • You may not post new threads
  • You may not post replies
  • You may not post attachments
  • You may not edit your posts
  •