Results 1 to 9 of 9

Thread: My radial arm saw setup

  1. #1
    Join Date
    Mar 2003
    Location
    Upland CA
    Posts
    5,572

    My radial arm saw setup

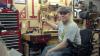
    My RAS setup is a bit different from most. The saw base is set ON the bench, rather than having the saw table at bench height. This puts it at a very comfortable height for use, with no bending over needed. This also allows me to use most of the bench area that would have to be kept clear otherwise. I put my cutoffs there, as well as mix finish materials. To the right side, lined up with the RAS, is my chop saw. On the left side is a 3' extension to the table that is only 6" wide, which is perfectly adequate for holding anything the saw can cut. The saw is only used for crosscuts, and will cut a panel 16 1/4" wide accurately.

    The fence has a T slot cut in the face, with home made stops, and a tape on the top. Notice the two vertical slots in the fence, one for the blade, and the other for the safety 'leaf' so that it does not have to ride over the fence. Next time I redo the fence, I will put a sacrificial piece where the slots are. Table is two layers of MDF or Part board (can't remember), trimmed with birch. It also has a replaceable 1/4" Masonite top that is waxed, and has a sacrificial blade strip (the red). Note the 45 degree angles on the table, so it doesn't poke you when you walk too close.

    The saw is in it's natural habitat, obviously no effort was made to pretty the bench up. This gives you an idea of just how useful the bench can be, and still have the saw ready for use. The Kreg machine is lined up also, and helps hold longer boards.

    PC260166.jpgPC260167.jpgPC260168.jpgPC260169.jpgPC260170.jpgPC260171.jpg


    Rick Potter
    Last edited by Rick Potter; 06-24-2013 at 3:05 AM.

  2. #2
    Join Date
    Jan 2005
    Location
    Harrisburg, NC
    Posts
    2,255
    Nice set up and nice looking shop.
    Richard

  3. #3
    Join Date
    Apr 2010
    Location
    Ft. Wayne, IN
    Posts
    1,453
    I have always wanted a RAS but, for one reason or another, have never gotten one. In fact right now I have a SCMS sitting exactly where I wish a RAS was. When I was setting up my shop, having been a GC for many years, I had quite a number of tools. However, they were contractor's tools not woodworker's tools, which meant that I still needed to purchase a large number of both machines and hand tools. Well, since I had the SCMS and it could perform many of the things that a RAS could, I put it to use and spent the money on things that I didn't have (or have substitutes for). Well, now my shop is all laid out and functional (fully wheelchair accessible) so changing it would mean some big changes when I've only had it up and running for less than 2 years. Besides, although there are times when I really wish I had that RAS because of what I want to do or how I want to do it, I get along without it. Which means that spending the money on a good bandsaw, planer, handplanes, chisels, etc. was better spent because I could not work without those things. Still... Someday.
    "I've cut the dang thing three times and it's STILL too darn short"
    Name withheld to protect the guilty

    Stew Hagerty

  4. #4
    Join Date
    Mar 2003
    Location
    Upland CA
    Posts
    5,572
    Hey,

    I showed you mine, now show me your setup. I am always looking for better ideas than mine.

    Rick Potter

  5. Very cool setup!

  6. #6
    Join Date
    Mar 2009
    Location
    Hood Canal, Washington
    Posts
    1,039
    I have a variation on the same theme. I made a torsion box top for the RAS, so the support legs are 8 feet apart. My 8" jointer lives underneath and rolls out when I need to use it. I can stack lumber on the RAS table as I'm using the jointer, which helps the work flow. I also use the RAS table as a sharpening station, mortiser station and horizontal junk magnet.

    I'm pretty happy with it. It's stayed flat for several years. I also built in a mondo dust shroud which I'm happy with. The core of the dust shroud is a 6" duct which opens just behind the RAS motor. It gets most everything except some large crumbs that bounce off the fence.
    Attached Images Attached Images

  7. #7
    Nice use of space, Rick. Here's a pic of my set up. I really like your multi-level idea. I frequently run into the problem of things being in the way when I want to cut a long piece.
    RASTableSmall.jpg

    I wrote a post a while back about the installation and the below-the-table dust collection design. http://www.sawmillcreek.org/showthre...radial+arm+saw

  8. #8
    Join Date
    Mar 2003
    Location
    Upland CA
    Posts
    5,572
    Great ideas Ben. I remember seeing that post before, but this was the first time to see the video. I gave it some thought then, but it wouldn't work for me without moving the saw off the cabinet it sits on.....which now blocks using your bottom collection system. Maybe some day when I have time I will pursue the method a bit more. I really like using the safety 'leaf' next to the blade, as well as having the high fence and stop system. Looking at your system, it seems that it would work fine if I were to keep these items. What do you think?

    I also wonder about your 6" intake. With the fairly small amount of air coming into the system, do you think 4" would work as well? My saw base is a little tighter on room.

    Right now my RAS is collecting maybe 90% of the dust, unless I cut off half a blade width or whatever on the edge of a board.


    David,

    Love the rebuild on the old DeWalt. That table/bench setup is really solid looking. The extra slots in the fence are for your mortiser and grinder??

    Rick Potter


    PS: Lets see some more of your RAS setups folks........some great ideas must still be out there.
    Last edited by Rick Potter; 07-05-2013 at 2:01 PM.

  9. #9
    The height of my fence/shroud is the same or lower than the stock fence so I don't see how it would interfear with your leaf. I've added some t-track and flip stops since posting. Granted, I can't set them less than 6" from the blade, but a clamp and piece of scrap suffice in those cases.

    You could probably modify your cabinet to accomodate under the table collection if you wanted. The advantage of my design is that the chips are allowed to continue on their existing path and escape the cut into an enclosed space. I don't think the port has to be on the bottom. I don't know where your blade is in relation to the base, but if you had the room, you could probably modify your current set up to collect from below by cutting a hole in the table and rerouting or splitting your current duct.

    I think a 4" duct would suffice for chips, but this technique is basically the same as collection on a table saw. I imagine the same rules would apply with respect to fine dust.

Posting Permissions

  • You may not post new threads
  • You may not post replies
  • You may not post attachments
  • You may not edit your posts
  •