Results 1 to 14 of 14

Thread: Help with my project

  1. #1

    Help with my project

    Hi all,

    Thanks in advance to all advice I have gotten here while learning.

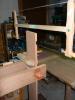
    I am putting this end table together. The case is assembled and I have done my best to ensure squareness with each step but something must not be just right. I am not certain how to fix it or if I should ignore it. Thanks for looking at my pictures. The first is the project, which is upside down on my saw. I am having trouble with the last step which is where I screwed the bottom (on top on picture it is upside down) into the bottom of the case. There is another piece with curved legs I still need to attach. The picture is to show generally how it was made. The top hole in picture is a shelf area and the bottom will have a drawer when it is turned up.

    The second pic (dark one) shows one of the corners, 3 look great, and are perfect. I am happy with them.

    The fourth corner, third pic, has a 1/16" gap. I don't know if my plywood bottom, which is wrapped with 1 3/4" oak, is not perfectly flat. I can't see why I can't get it to come down. I guess one of the styles might be slightly long, but I can't see that. Or maybe one of the rails is sticking up slightly which amplifies in the corner. Maybe the whole thing is slightly out of square. I can unscrew it again, and even put new screws if needed as they will be covered ultimately.

    So I am wondering what my options are. Do you think clamps could be applied in some way so it would screw flat, and would that hold? Maybe I need a hand plane (don't have one now) to shave something down? If the style is slightly long somewhere I have no idea how to bring that down squarely. The last option is to leave it. It will sit between two twin beds and so it will never be seen, but I am hoping to learn.

    Thanks in advance.

    Scott

    PS- for some reason I can't get these pictures upright, they are all upside down. I spent 30 minutes and saved them upside down for reloading and they are still wrong. Maybe someone knows why that is but I can't figure it out! the first one is thus right side up not up side down!

    photo.jpgphoto-1.jpgphoto-2.jpg

  2. #2
    Join Date
    Dec 2010
    Location
    WNY
    Posts
    9,756
    Take the top off and lay it on a flat surface. Does it lay flat? If it does, then lay your table, minus the top, face down on a flat surface. Does it lay flat? At least one of the two probably doesn't. If the problem is the top, then you should be able to pull it flat to the cabinet with a clamp. If it's the table, then something isn't square, and you will have to go back and figure out where the problem is, because if you force the top down the table is likely to rack after you get it attached.

    John

  3. #3
    Join Date
    Dec 2010
    Location
    South Coastal Massachusetts
    Posts
    6,824
    If you need to hold the frame to the base with more than hand pressure, glue will not likely be enough to hold things together.

    I would suggest that you need to plane down the three corners that are already flush, until you "lower"
    the carcass onto the base, as it is. I suggest adjusting the carcasse, as there's less material involved.

    You can achieve the same fitting by planing the base until all 4 corners rest.
    That's considerably more material to remove.

  4. #4
    Join Date
    Mar 2007
    Location
    Terrace, BC
    Posts
    519
    Use a known flat surface (your bench? your table saw?) that is larger than your piece. Check both the bottom and the mating surface of the frame for flatness.

    If it's your frame, take a compass and scribe a line all around all four sides (using the same known flat surface as a reference) so that when you cut/plane/sand to the line, it will be flat. (This is just an expansion on Jim's first suggestion above).

    If it's your base, then the culprit is no doubt the plywood. There are ways to flatten plywood (moisture applied judiciously and then clamping flat for a while) - but if you still have enough of the material left over, and there's a flat piece big enough - it may be easier, and better in the long run, to cut a new bottom piece.

    There's a third possibility - BOTH your frame AND your bottom are not flat - in which case correct both of them.

    It looks like it's going to be a nice piece, by the way.
    I love mankind. It's people I can't stand.

  5. #5
    Join Date
    Dec 2010
    Location
    South Coastal Massachusetts
    Posts
    6,824
    Quote Originally Posted by Roy Harding View Post
    It looks like it's going to be a nice piece, by the way.
    Quite right, I failed to mention my envy of your project.
    It's already better looking than most of mine.

    Keep calm, and chive on...

  6. #6
    Thanks all!
    yes I think it is going to be very nice for my son and I have learned making it. Had to make a bunch of jigs and stuff I can use going forward.

    What is the best way to plane the end of a stile? I will need to buy hand planes I guess (I will need them anyway). It looks like from other threads I have seen a #5 plane is the best first plane. Will that one plane the end of the stile? Obviously I am going to have to practice on scrap first.

    Anyone used those electric planers? I guess that is probably sacrilege but just curious.

  7. #7
    Join Date
    Aug 2007
    Location
    Dickinson, Texas
    Posts
    7,655
    Blog Entries
    1
    The electric planes work, but in my opinion, it is like drinking water out of a fire hose.

    Check the classified postings here for handplanes that may be available.

  8. #8
    Join Date
    Nov 2006
    Location
    NE Ohio
    Posts
    7,036
    Best way to do the end grain on a stile is with a shooting board.
    Well, actually the best way is with a (real) Lion Trimmer - but - they aren't made anymore...
    The best practical way to do the stiles is with a good sharp 40T or higher blade on the table saw and a very well made sled.

    W/a shooting board, the first thing you need to know is how to properly sharpen the blade of a hand plane up to 8000 grit - & - have the right equipment to do that.

    Anyone used those electric planers? I guess that is probably sacrilege but just curious.
    Yes - I have one...
    Let's just say it's a toss up as to what can cause the most damage in the least amount of time.
    Electric hand pane vs 12 ga pump shotgun w/OO buck - either can cause a real mess with just a tiny slip...
    "Life is what happens to you while you're busy making other plans." - John Lennon

  9. #9
    If you can pull it flush with a clamp, as has been said glue alone may not hold it. How about a triangular corner block glued and screwed into the frame and then glue with a screw through that into the plywood base?

    Lacking a plane a belt sander can be used to true up the frame if that is the problem.

  10. #10
    Join Date
    Mar 2007
    Location
    Terrace, BC
    Posts
    519
    Quote Originally Posted by Scott Davis View Post
    Anyone used those electric planers? I guess that is probably sacrilege but just curious.
    I have one - but it is used only on rough construction projects, where speed is more important than appearance. As others have mentioned, a belt sander could be a viable option - amongst other suggestions that have been made.

    I take it from your posts that you are relatively new at this furniture "thang". If I may presume to offer some unsolicited advice - take it slow, don't look for the fastest way to get things done - look for the best way. What constitutes the "best" way will depend upon what tools you have available, and your skill level. The key is to remember that you are not looking for speed - you are looking for the best result possible. This approach will, counter-intuitively, result in the fastest completion of your project - because you won't have to go back and attempt to correct earlier mistakes. Later in your woodworking "career", when you've become accustomed to your own methods of work and procedures, projects will happen in quick time.

    Best of luck to you - and I'd be interested in seeing pictures of your finished project (but I'm not in a hurry - so take your time!)
    I love mankind. It's people I can't stand.

  11. #11
    Join Date
    Dec 2010
    Location
    WNY
    Posts
    9,756
    If the carcase of the cabinet is racked then it will rock when sitting on a flat surface. Measuring corner to corner on each side will tell you what's out of square. If it sits w/o rocking but the corner measurements aren't the same then one or more of the stiles is too long/short. If that turns out to be the case the easiest way to correct the problem is to clamp a straight edge from the lowest corner to the next and route the other stiles/rails off, working your way around the case. A hand plane will work, but a router is far easier and the result is the same. If you don't own a router, it's time to get one. You can build a lot of stuff with not much more than a table saw and a router and a few bits.

    John

  12. #12
    Join Date
    Mar 2007
    Location
    Terrace, BC
    Posts
    519
    Quote Originally Posted by John TenEyck View Post
    ... the easiest way to correct the problem is to clamp a straight edge from the lowest corner to the next and route the other stiles/rails off, working your way around the case. ...
    John
    Wow - that's a great idea. I've been at this for over forty years, and never thought of that one. It's a good day when you can learn something new. Today is a good day.
    I love mankind. It's people I can't stand.

  13. #13
    Join Date
    Feb 2011
    Location
    Redmond, OR
    Posts
    606
    Since the top is secured with no gaps I would just cut the carcass to length on the table saw indexing off of the top (run the top along the fence with the carcass laying on its side). You will need a ~1" piece of plywood to raise the carcass off of the table saw table to account for the lip around the top. Cut one side, rotate the carcass 90 degrees then cut the next side until you have cut all four sides to length.

    Shouldn't take but a few minutes and should be nice and flat when you are done.

  14. #14
    Some awesome suggestions. No I am not in a hurry! With a 4, 2, and 0 year olds (baby born last week, hence why I am fiddling on a weekday), my time for these things is limited. I basically read and look at videos all week until the 2 hour naptime during Sat and Sun afternoons, been working on this for 6 months! My wife says it is the most expensive bedside table in the world!

    Thanks for the tips. I removed the bottom and on looking found one style that was about a 1/32" high, and one rail the same. Some sanding with an ROS made it much better. There is still a slight gap in the back on bottom but it will never be seen.

    The router idea is great but I couldn't figure out how to negotiate the corners where the rails and styles came together.

    I thought about the table saw thing too, but was afraid of screwing things up more, so didn't try it. Went with a partial fix that I don't think anyone will see.

    Now on to that drawer, this will be my first.

    I will post pics when done, have to finish it too, so probably won't be until early 2014 :>

    Scott

Posting Permissions

  • You may not post new threads
  • You may not post replies
  • You may not post attachments
  • You may not edit your posts
  •