Page 1 of 2 12 LastLast
Results 1 to 15 of 18

Thread: Fuller Style Jar: Mesquite

  1. #1
    Join Date
    Jan 2009
    Location
    sLower Delaware
    Posts
    5,464

    Fuller Style Jar: Mesquite

    Turning (and posting) seems to takes a back seat during the summer months. There were a couple pieces of wood I was determined to get to. I have admired Mike Mahoney’s canisters for the last several years and have roughed out quite a few of his style ……. have even finished a few. :)
    When Curt first posted one of his jars with a recessed lid, I was pretty sure I would be trying one before long. Kathy Marshall had given me this piece of Mesquite in San Jose last June and it hadn’t yet found a use. I didn’t want to make just one more canister or hollow form, so it seemed like a good fit.
    Thanks to Kathy for the wood and to Curt for the inspiration!

    1.jpg2.jpg3.jpg
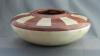
    The design was burned with a wire and pen, then colored with blue transtint.
    4.jpg5.jpg
    8”x 4”(20x10cm) Finished with several coats of AO and buffed.

    Thoughts and suggestions are always welcome.

  2. #2
    Join Date
    Oct 2008
    Location
    Corsicana, TX
    Posts
    704
    Looks fantastic Baxter! The mesquite grain pattern looks good...but that burned design you put on there really sets that jar off.
    Billy

  3. #3
    very nice, Baxter like the shape and the pyro

  4. #4
    Join Date
    Dec 2009
    Location
    Mount Sterling, KY
    Posts
    2,504
    Quote Originally Posted by charlie knighton View Post
    very nice, Baxter like the shape and the pyro
    +1 on what Charlie said. May have to "borrow" the shape for some of mine.
    ____________________________________________
    JD at J&J WoodSmithing
    Owingsville, Kentucky

    "The best things in life are not things."

  5. #5
    Join Date
    Dec 2010
    Location
    Republic, Wash. State
    Posts
    1,187
    A very crisp and clean look. Appeals to me.
    C&C WELCOME

  6. Baxter, very elegant looking and clean, I like it.

  7. #7
    Join Date
    Feb 2010
    Location
    Maryland's Eastern Shore
    Posts
    38
    That's a beautiful canister and the pyro makes it extra beautiful. You have a lot of skill to get those leaves lined up so perfectly.

  8. #8
    Join Date
    Jul 2010
    Location
    Nanaimo BC Canada
    Posts
    37
    Baxter:
    My congratulations on an excellent piece.
    I had been thinking of trying something similar but was defeated on how to go about the lid. I think yours is conical or concave on the lower side, which is what i want to do.
    How did you do it?
    John

    PS I don't have a vacuum chuck.

  9. #9
    Join Date
    Jan 2005
    Location
    Goodland, Kansas
    Posts
    22,605
    Really nice Baxter. Love the form and wood.
    Bernie

    Never put off until tomorrow what you can do the day after tomorrow.

    To succeed in life, you need three things: a wishbone, a backbone and a funnybone.


  10. #10
    Join Date
    Jan 2009
    Location
    sLower Delaware
    Posts
    5,464
    Quote Originally Posted by John Shillabeer View Post
    ......I had been thinking of trying something similar but was defeated on how to go about the lid. I think yours is conical or concave on the lower side, which is what i want to do.
    How did you do it?
    John

    PS I don't have a vacuum chuck.
    John, when the block was between centers to begin with, I cut a tenon on each end. When I parted off the top section that would form the lid, I already had a tenon on the top piece (where the knob is) Using that 2" tenon to hold the lid, the bottom of the lid was turned to fit the canister. After the bottom of the lid was done, I turned a slight recess into a scrap piece of wood (held by a chuck) to fit the lid into. With a tight fit and the tailstock holding it in place, I was able to then turn the top and knob. Hope that is at least a little bit clear.

    Thanks for the positive comments. They are appreciated!

  11. #11
    Join Date
    Feb 2003
    Location
    Richland Wa.
    Posts
    784
    Very nice Baxter. One thing I always wondered about this is how do you decide how far apart the pyro scheme is to be. Is it just a matter of math?

  12. #12
    Join Date
    Jan 2009
    Location
    sLower Delaware
    Posts
    5,464
    Quote Originally Posted by Ray Bell View Post
    Very nice Baxter. One thing I always wondered about this is how do you decide how far apart the pyro scheme is to be. Is it just a matter of math?
    I am not smart enough to plan ahead and lay things out while on the lathe. For this one, I just wrapped a paper tape around the form to measure the circumference along the lines. Then it was just trying to find a number that would divide evenly into it to determine an even size/spacing for each repeating pattern.

  13. #13
    Join Date
    Jan 2004
    Location
    Fredericksburg, TX
    Posts
    2,576
    Very nice neat design and finish piece. At first look, I was expecting it to be a lidded box parted at the middle of pattern. Good trick.

  14. #14
    Join Date
    Apr 2006
    Location
    Tucson, Arizona
    Posts
    855
    Great looking canister. I love everything about it.
    Lori K

  15. #15
    Join Date
    Mar 2011
    Location
    Pendleton, KY
    Posts
    803
    Nicely done, Baxter. Did the dye add any color?

Posting Permissions

  • You may not post new threads
  • You may not post replies
  • You may not post attachments
  • You may not edit your posts
  •