Page 1 of 2 12 LastLast
Results 1 to 15 of 30

Thread: Timing Grinding and Honing a Hand Plane Iron (attn: Derek Cohen)

  1. #1
    Join Date
    Mar 2007
    Location
    PA
    Posts
    13,076

    Timing Grinding and Honing a Hand Plane Iron (attn: Derek Cohen)

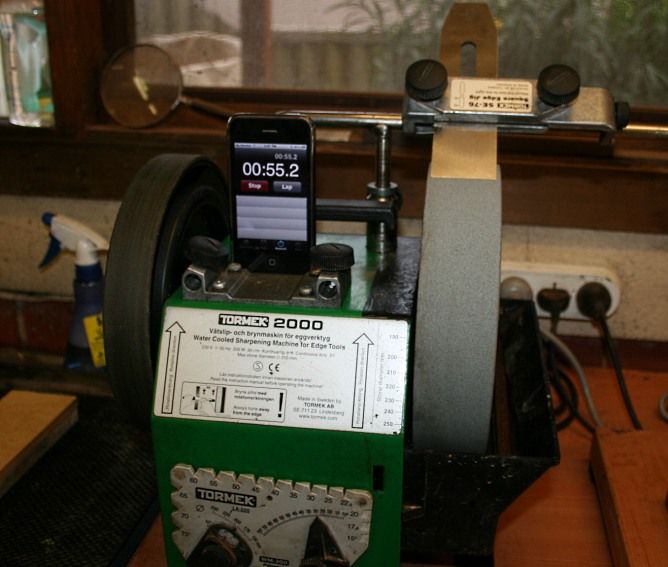
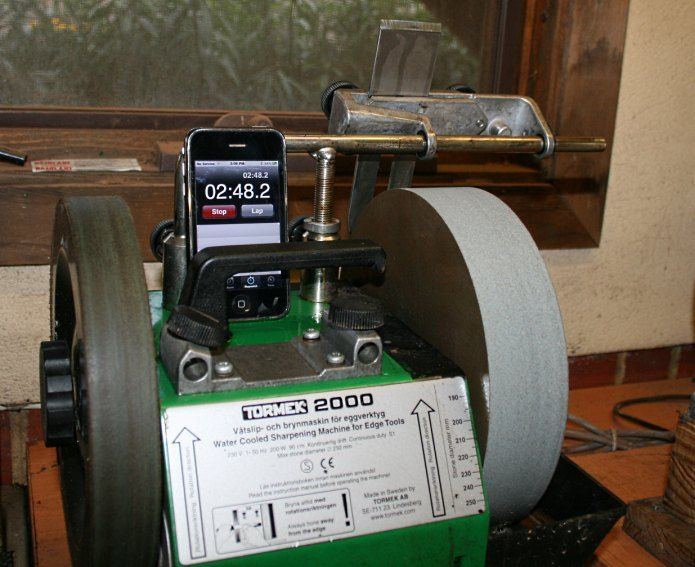
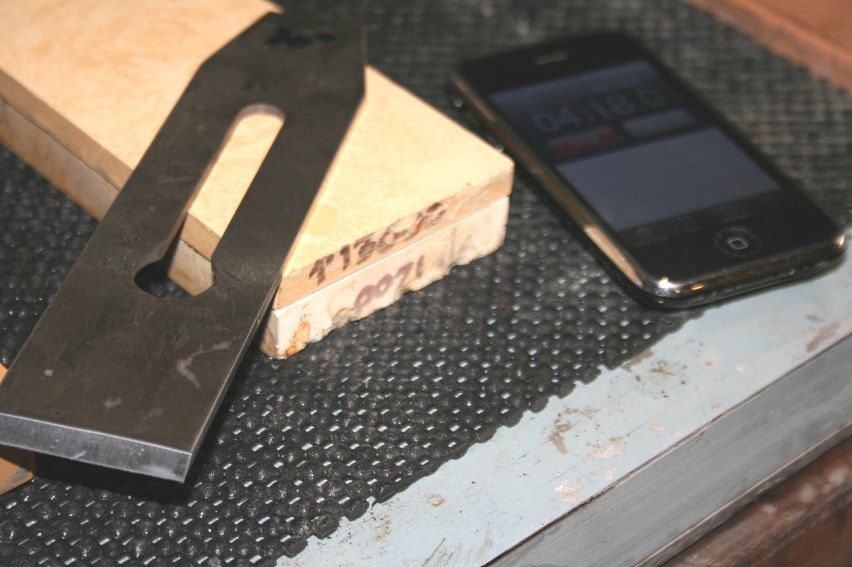
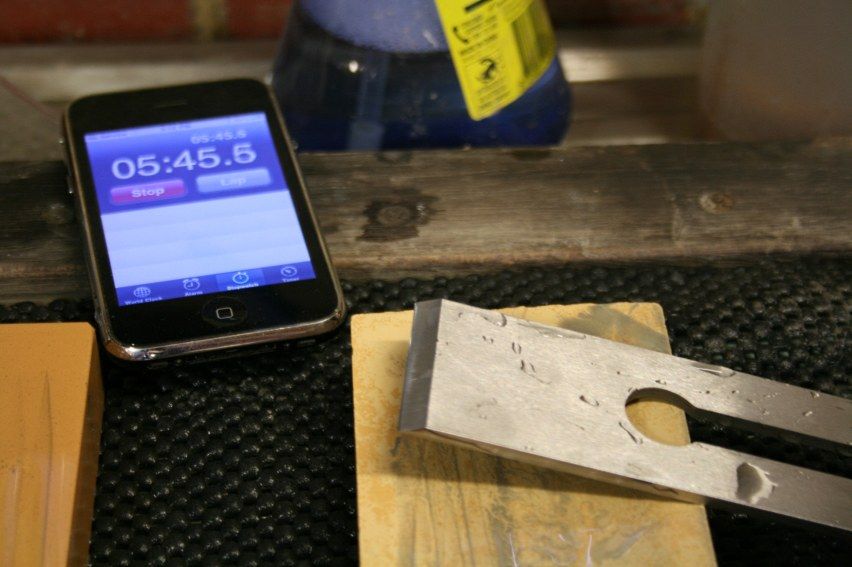
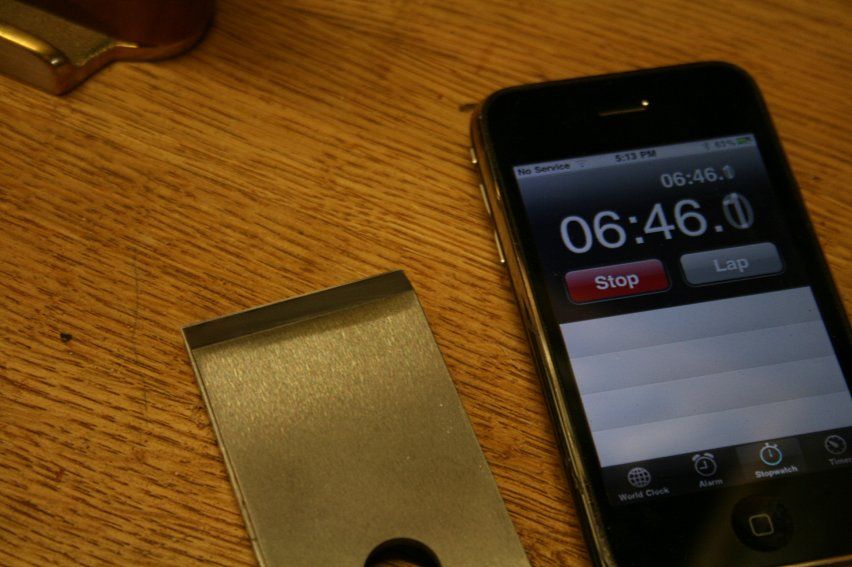
    So, this is the first video I've ever made, and it's made because I made the claim to derek that I will usually have an iron honed faster than I used to have just a ground made on the tormek (a friendly little contest/discussion we have going). I didn't list it publicly on youtube because the entire purpose was to time how long between start of grind to finished honing.

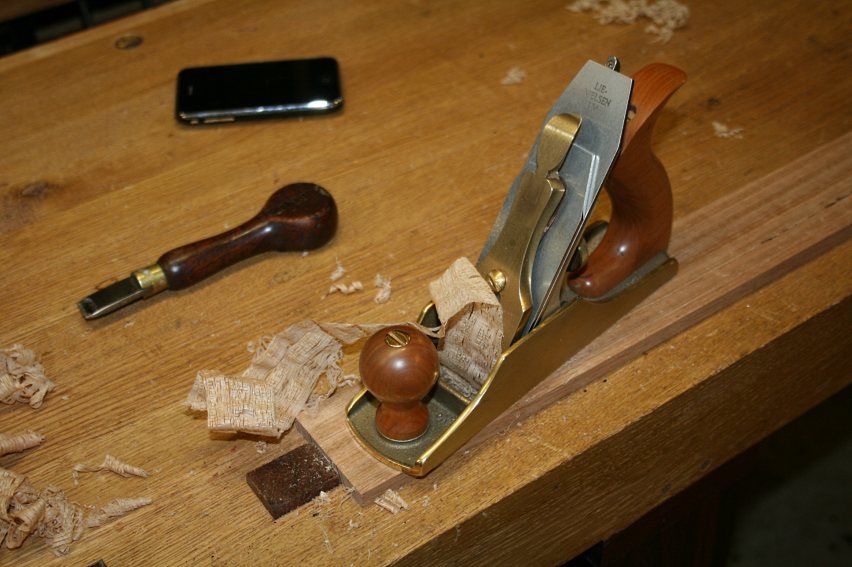
    Unfortunately, the only place I had to throw my phone was on the lumber rack, and I couldn't look at the view finder to see what it was capturing.

    At any rate, Derek, it looks like 1:30 to 1:40 or so for the whole process (about 0:20 and 2:00).

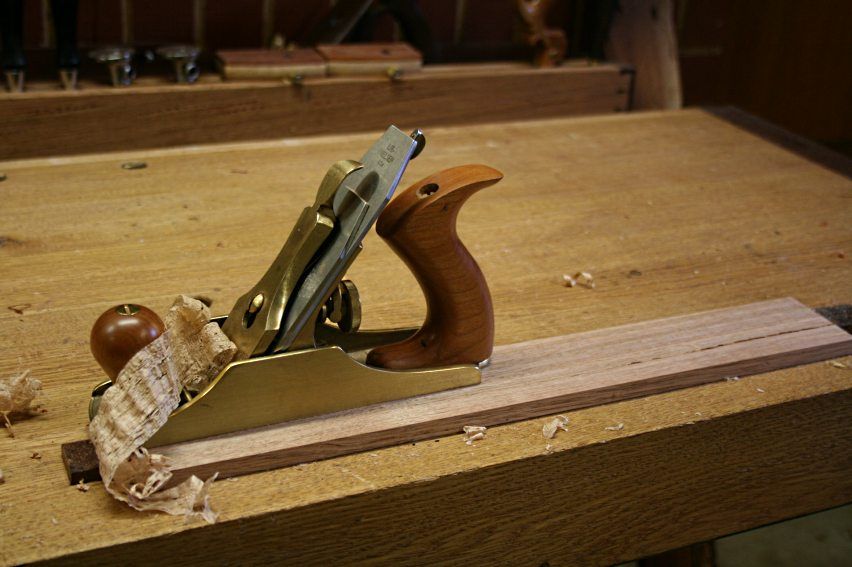
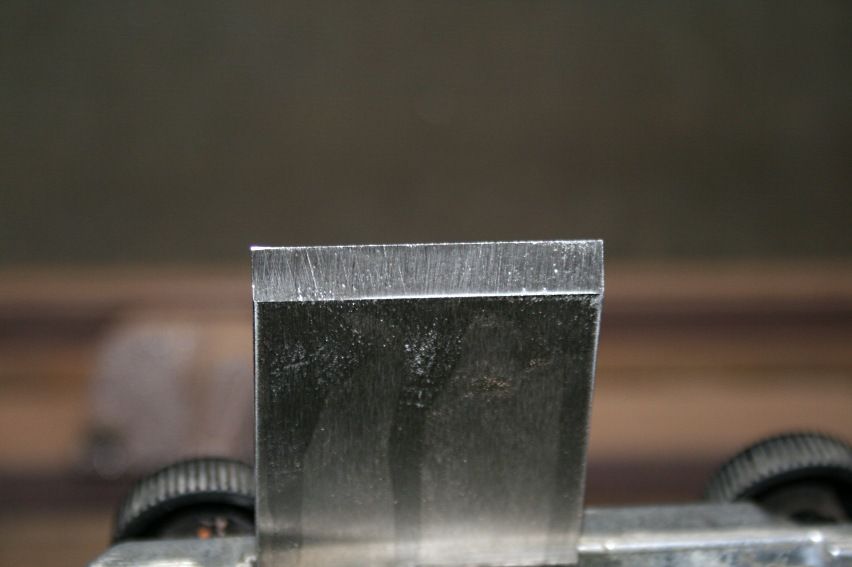
    I've been fascinated lately with the washitas and the old stock irons. Certainly not aussie woodworking, but I've been using them soup to nuts for face frames and doors on cabinets.

    http://www.youtube.com/watch?v=r1MDwHCEBfk

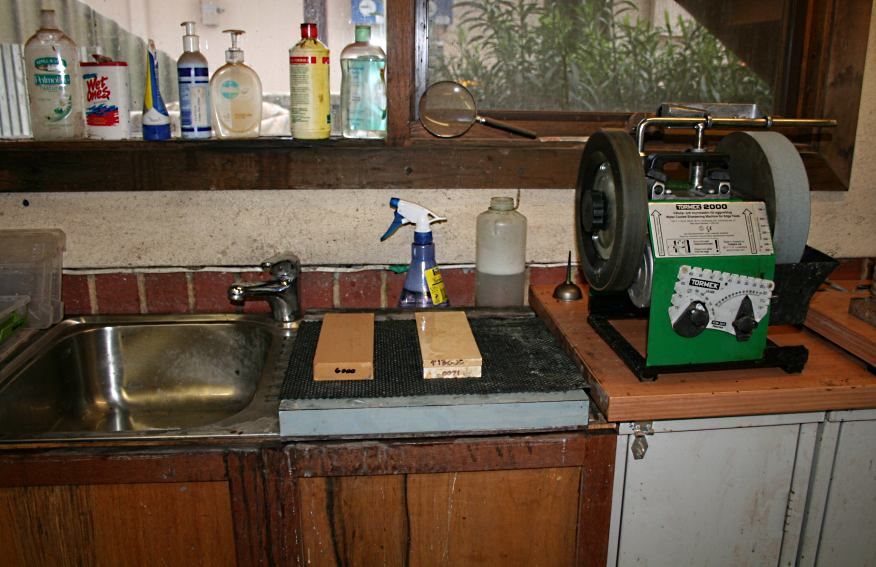
    I'll get a better one at some point. Those of you guys who like tidy shops....well, I'd be lying if I said I was sorry.
    Last edited by David Weaver; 09-02-2013 at 8:59 AM.

  2. #2
    Join Date
    Mar 2007
    Location
    PA
    Posts
    13,076
    One other side comment about the chipbreaker, from about 2:10 to just short of 2:30 is how long it generally takes me to set the chipbreaker appropriately for a smoother shaving. I don't know how far away it is from the edge, probably just a little under a hundredth. It never takes longer than that.

    I've seen a lot of people, including some supposed experts saying that it's too fiddly to set a chipbreaker/cap iron (this part is not related to the promise that I'd post a video for derek as I'd mentioned that I thought the tormek process took too long, and it's not directed at derek).

    I chose a washita and a vintage plane iron because that's what I've been using a lot lately. It might take marginally longer to go through the process with a newer iron because it would take longer for the new iron to be ground. The washita and the vintage irons (either vintage woodies or vintage stanleys) is a real treat. If it's allowed to settle in it is easily hair shaving sharp but it quickly raises a wire edge on the vintage irons (and they are soft enough that the wire edge hangs on - on much harder carbon steel irons - like japanese irons - the wire edges do not persist on this stone).

    I once saw Warren Mickley mention that he would match irons to the stones they were designed for. I thought that sounded odd at the time, but I think he was right. This stone works in a way with these irons that is a real treat, surprisingly sharp despite the fact that the underlying grit in it is really large, but the bare leather strop is essential, and working both sides of the iron on the strop is also to get a good edge from it, with the back close to flat on the strop so as not to reduce sharpness of the edge. I always use the smooth side of the strop because it tells you what the condition of the edge is by showing any defects as scratch lines in the leather. Eventually the scratch lines get uniformly smashed back into the smooth leather surface and disappear. It's also a lot easier to tell if there's anything foreign in it, which is a toxic scenario to say the least, even if there's a chunk of wire edge in it.
    Last edited by David Weaver; 09-01-2013 at 10:45 PM.

  3. #3
    Join Date
    Jun 2010
    Location
    twomiles from the "peak of Ohio
    Posts
    12,195
    I had two vintage block plane irons to grind and sharpen today. Seemed to take a while since both had bad edges, one was a wave like thingy. The other had a skewed view of things. Had to mark both with a square and a sharpie to start thing up. Haven't figured out the one with the wave effect just yet. Oh, it is now straight across and squared to the sides, just haven't seen thattype of block plane, yetSDC15746.jpgmight be by Ohio tool co.? did they use a "U" inside a circle for their block planes?

  4. #4
    Nice to see your face! You're a lot younger then I somehow thought you were.

    Anyway, that's a quick sharpen session. Keep it simple, that's the key.

    What do you mean with "the back close to flat on the strop"? Do you put a small backbevel on it?
    Last edited by Kees Heiden; 09-02-2013 at 3:25 AM.

  5. #5
    Join Date
    Mar 2007
    Location
    PA
    Posts
    13,076
    Quote Originally Posted by Kees Heiden View Post
    Nice to see your face! You're a lot younger then I somehow thought you were.

    Anyway, that's a quick sharpen session. Keep it simple, that's the key.

    What do you mean with "the back close to flat on the strop"? Do you put a small backbevel on it?
    I work slightly steeper than the bevel on the bevel side, and on the back, I make sure I don't lift the iron too much. It's very close to flat, just pulled across the strop to work the wire edge back the other way and make sure its gone.

    Everybody I meet always says I'm the oldest younger person they ever met (!), but I'm getting old enough that I'm getting close to middle age (see the bald spot starting?)
    Last edited by David Weaver; 09-02-2013 at 8:56 AM.

  6. #6
    Join Date
    Feb 2004
    Location
    Perth, Australia
    Posts
    9,497
    Hi David

    Many thanks for that ... but if I have nightmares tonight I think I shall blame you

    I'd like to reciprocate, and then we can compare notes. I am not in a position to video - yet .. I plan to build a stand for my iPhone 4S, which should do an OK job. I couldn't even jury rig it as the battery was flat. So I took photos today (my Canon EOS 400D does not have a video facility), and used the stopwatch on an iPhone 3.

    I even cleaned up my sharpening station - it was Grunge City after a couple of projects. A story for another day.


    On the left is a Sigma 6000 and on the right is a Sigma 1200/13000. Now I only plan to use the 6000 and 13000. There will be no need for the 1200 at this stage.

    I used my LN #3 with 55 degree frog, here seen playing a piece of Tasmanian Oak (similar to White Oak, but a Eucalypt) ..


    The blade had been used but was sharp enough to plane. The hollow was not even - I should have dressed the wheel (which I have done this time around).


    The aim was to time going from this point to planing again.


    We are going to have to estimate how long it took as the process of photographing used up a lot of time. I kept the stopwatch going all the way, but would, for example, have to set it up before a photo, then I would take another photo or two or three. Below you can see it is almost a minute gone before I even begin grinding ...


    The blade is fully ground with a faint wire edge across the length of the back ...


    The light is shining off a bit of wire at the left side of the picture, otherwise it is clear ...


    Below I have completed work on the 6000. It takes only a few strokes to create a wire edge on the full grind. However it takes several more to camber the blade for smoothing. Note that this will not need to be redone when it comes to re-sharpening.


    Now the 13000 is done. For both grits I have used a side-sharpening method.


    The chip breaker is back on ...


    ... and we are taking fine shavings ...


    I took a few photos of shavings but have so many pictures here that I decided not to use them. Instead here are pics of the planed board .. shiny ...!


    The area around the knot in the board is smooth ...

    Last edited by Derek Cohen; 09-02-2013 at 11:49 AM.

  7. #7
    Join Date
    Feb 2004
    Location
    Perth, Australia
    Posts
    9,497
    One shaving picture ...


    So the blade is sharp and the board is smooth. It probably took about 4 minutes maximum in all ....

    ..... but the best thing is that the next time I sharpen, it will take mere seconds. This is why ....

    This is a re-sharpened blade. It took about 30 seconds to do. Can you guess why ...


    Regards from Perth

    Derek
    Last edited by Derek Cohen; 09-02-2013 at 9:40 AM.

  8. #8
    Join Date
    Mar 2007
    Location
    PA
    Posts
    13,076
    I'll find a subject board today and get corresponding pictures. When you hone with a washita that is not refreshed (as this one) you don't want to use the entire hollow on an iron, instead you grind around 25 degrees and lift to 30 (that's just about where my freehand hone ends up no matter what). So you end up with a microbevel and you redo the hone when it takes more than about 10 seconds of hone time to raise a wire edge - that's usually about four hones.

    I try to sharpen with the stones the way I think they were probably used, so when I use modern stones and modern irons, I don't use the same process. I prefer charlesworth's method on modern smoother irons (because they never chip then and you have extreme control over the camber) but something like this process on the more coarse irons, except two synthetic stones and no strop.

    Resharpenings take about as long to do as the sharpening part of this video. If I wasn't fixated on using a single stone, I'd replace the strop with a jasper bench stone and the edge would be similar in fineness to a synthetic finishing hone and no stropping would be necessary (the jasper is a peculiar thing on its own, but all of my examples also prefer plainer steels - it removes the wire edge and leaves a very bright polish). But I'm fascinated right now with the one stone idea, and super fascinated with what it is exactly that a pike washita does that my soft arkansas examples don't seem to do - and that is make a hair shaving sharp edge without any other assistance. The edges off of a plain soft arkansas will shave hair, but only just, and the edge is noticeably duller.

    I played the same game with a 1000 grit king stone a few days ago to see if the stropping is to receive more of the credit and it was not remotely close to as sharp as the washita, so the stone deserves some of the credit.

    One more comment - it is easier to follow this quick freehand process with a washita stone than it is with a modern stone. The washita does not remove steel quite as fast and aggressively, and you can allow yourself freedom to maintain the angle of the iron and move it in whatever direction you want. I can do it with any stone, but I prefer it with the washita. Little material removal means little change for the next sharpening and none of the rumored edge getting out of control such that it's hard to rehone when doing freehand.

    Actually, it's not really ever hard to rehone when doing freehand like this if you commit to it and force yourself to find where about 30 degrees is (which should be enough to keep quality irons from chipping).
    Last edited by David Weaver; 09-02-2013 at 10:09 AM.

  9. #9
    Join Date
    Jan 2009
    Location
    Millerton, PA
    Posts
    1,558
    Two comments:

    1. Cool video.

    2. Nice legs.
    Last edited by Harold Burrell; 09-02-2013 at 11:42 AM.
    I am never wrong.

    Well...I thought I was wrong once...but I was mistaken.

  10. #10
    Join Date
    Mar 2007
    Location
    PA
    Posts
    13,076
    After some use of the iron, I recorded the third honing on this grind. Unfortunately, the front camera on the phone doesn't have the same resolution (it's crappy), and I didn't know that until after I did the video, but you can make out what's going on.

    http://www.youtube.com/watch?v=IZC-DXaIaH0

    Here is a picture of the bevel after a fresh grind. I've mentioned before here that I grind pretty much all of the way to the edge, and I don't use water. The pink surface grinder wheel has made this so easy that I can grip the iron immediately after honing without getting burned, but it worked fine with a cheap wheel, too, it didn't burn but was a bit warmer. This bevel looks a little wonky because I purchased the iron from someone and my primary bevel is steeper - it will eventually all look even, but I'm not going to waste iron and (more importantly) time to get there.

    IMG_20130902_100004_226[1].jpg

    Here is a picture of the wood, I had trouble getting a good picture of the reflection, but this is quartered cherry and you can make out the reflection of the screwdriver handle hole on the surface (well, you could've before the SMC image size reducer blurred the picture some). Quartered wood usually yields less shine than a flatsawn orientation, and this is not a finish stone. On a wider surface, the honing process by freehand relieves the corners just enough that they don't mark the wood on a finish pass, and this surface can be finished without toolmarks or tearout.

    IMG_20130902_100814_494.jpg

    And a picture of the same bevel above after planing this board. As I mentioned, the washita just blackens the oil and removes very little from the iron. I might get 5 hones out of this iron before I go back to the grinder. The wear might've been 1/2 again more than this if I would've really pushed the iron hard before rehoning.

    IMG_20130902_101006_003.jpg

    The goofiness of the changing primary angle still exists, but once everything is established, it will be cleaner looking - a 25 degree bevel with a microbevel around 30, only the microbevel has contacted the stone. I could've had a cleaner iron to show this with, but this is the one I'm using right now so the ugly facets give the illusion that there is a narrowing hollow, but they are just remnants of a prior grind.
    Last edited by David Weaver; 09-03-2013 at 8:16 AM.

  11. #11
    Join Date
    Jun 2012
    Location
    Lubbock, Tx
    Posts
    1,490
    Quote Originally Posted by Kees Heiden View Post
    Nice to see your face! You're a lot younger then I somehow thought you were.
    And here I thought your current avatar was you Truth be told I'll always think of you as that avatar you had of that wrestler.

  12. #12
    Join Date
    Mar 2007
    Location
    PA
    Posts
    13,076
    Yeah, I might weigh almost as much as harley race, but I can only wish I was half as tough! I usually have the same expression on my face, though.

  13. #13
    Join Date
    Aug 2013
    Location
    Enchanted land of beer, cheese & brats
    Posts
    1,314
    What no banjo music? Just kidding

    I like what you wrote about your use of a bare smooth side up leather strop. I'm currently using a rough side up loaded with chromium oxide strop. I'm sure that I have enough leather to make another one like yours. Thanks

  14. #14
    Interesting stuff ,thanks . In using the Arky ,you are using more pressure than with a waterstone to cut and burnish at the same time ; the good result with strop is because of that burnishing ?

  15. #15
    Join Date
    Jan 2009
    Location
    Millerton, PA
    Posts
    1,558
    Quote Originally Posted by David Weaver View Post
    Yeah, I might weigh almost as much as harley race, but I can only wish I was half as tough! I usually have the same expression on my face, though.
    Yeah, we do need to work on your "expression". You are way too young to be that grouchy.

    Now, if you were as old as I...
    I am never wrong.

    Well...I thought I was wrong once...but I was mistaken.

Posting Permissions

  • You may not post new threads
  • You may not post replies
  • You may not post attachments
  • You may not edit your posts
  •