Page 6 of 13 FirstFirst ... 2345678910 ... LastLast
Results 76 to 90 of 184

Thread: Miniature Tools

  1. #76
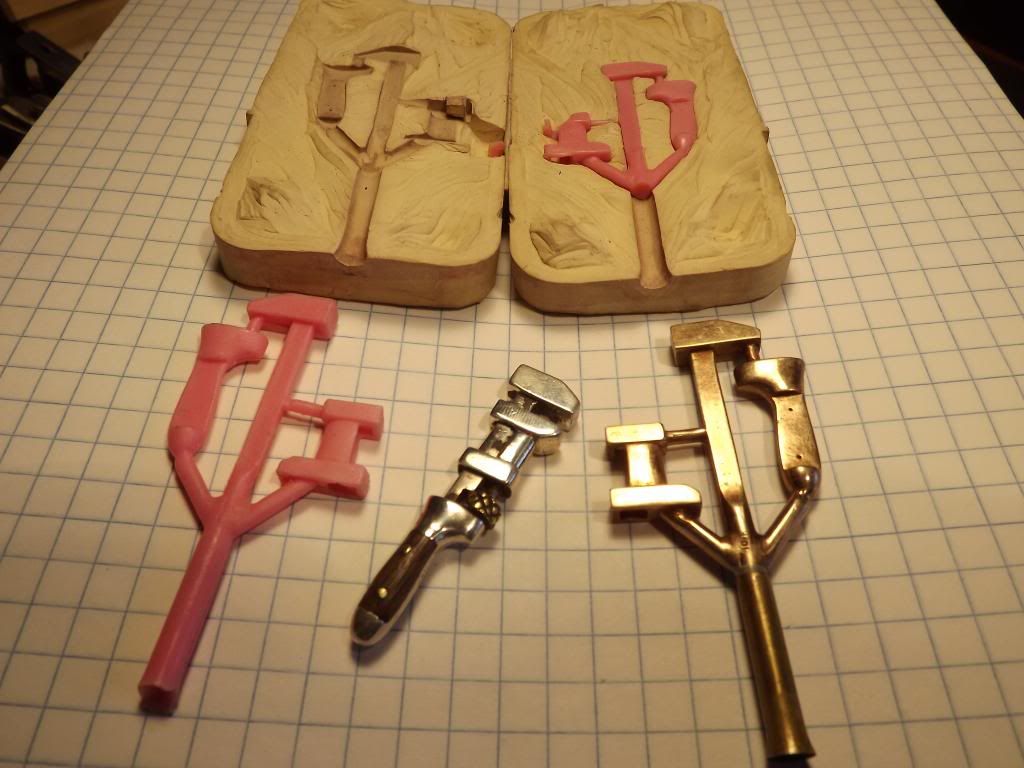
    Please just call me Max, when ever I am called Maximillian I'm being scolded lol but if you would rather call me Maximillian its cool too you've earned by providing me the kid in a toy shop feeling. I really like how you intended to make hammers and ended up with tool art, but hey everything you make is art and still usable which makes it even better. I know you may not have a cut and dry answer but which is your favorite one?

  2. #77
    Join Date
    Mar 2013
    Location
    Colorado
    Posts
    126
    Hi Max. Thanks again for your thoughts. I have always liked fine art in its many forms and am proud to be a contributor as well as an appreciator. My favorite piece is typically the one that I am currently working on. However, over time some remain more memorable due maybe as much to my state of life and disposition of the moment as to other qualities. But I am especially proud of some pieces that are unique in the world with limits or elements that no one else has yet achieved - such as the 1/4 scale fully functioning silver #4 planes that I have built. Ralph


    and the gold one.


    or my 1/4 scale Infill dovetailed models.


    etc.
    Last edited by Ralph Juarros; 12-21-2013 at 11:01 PM.

  3. #78
    Again your work is perfect! I like the dovetailed ones so much.

  4. #79
    Join Date
    Mar 2013
    Location
    Colorado
    Posts
    126
    Thanks again Max.

    And thank you Chris J.


    I did post an "improved" video on Youtube. http://www.youtube.com/watch?v=zZgUu...qMJcEsSWF5Eu5A

    Ralph

  5. #80
    Join Date
    Apr 2009
    Location
    Mandalay Shores, CA
    Posts
    2,690
    Blog Entries
    26

    Miniature knife

    My miniature knives.

    image.jpgimage.jpg


    .
    Shawn

    "no trees were harmed in the creation of this message, however some electrons were temporarily inconvenienced."

    "I resent having to use my brain to do your thinking"

  6. #81
    Join Date
    Mar 2013
    Location
    Colorado
    Posts
    126
    Shawn, those miniature knives are very nice. Gives me ideas. Thanks for posting. Do you have others you can post? Ralph

  7. #82
    Join Date
    Mar 2013
    Location
    Colorado
    Posts
    126
    Tool board and bench for miniature tools. Ralph


  8. #83
    I just showed that to my girlfriend she said that "you're crazy" so that puts you somewhere in the realm of michelangelo because she thinks he was crazy too.


    This is far better than the plane till I brought up earlier and by the way I hope I can have a collection as good as yours but in full size. lol

  9. #84
    Join Date
    Nov 2007
    Location
    Glenelg, MD
    Posts
    12,256
    Blog Entries
    1
    Quote Originally Posted by Ralph Juarros View Post
    Tool board and bench for miniature tools. Ralph


    Now THIS is a proper PC desktop background...
    Hi-Tec Designs, LLC -- Owner (and self-proclaimed LED guru )

    Trotec 80W Speedy 300 laser w/everything
    CAMaster Stinger CNC (25" x 36" x 5")
    USCutter 24" LaserPoint Vinyl Cutter
    Jet JWBS-18QT-3 18", 3HP bandsaw
    Robust Beauty 25"x52" wood lathe w/everything
    Jet BD-920W 9"x20" metal lathe
    Delta 18-900L 18" drill press

    Flame Polisher (ooooh, FIRE!)
    Freeware: InkScape, Paint.NET, DoubleCAD XT
    Paidware: Wacom Intuos4 (Large), CorelDRAW X5

  10. #85
    Join Date
    Mar 2013
    Location
    Colorado
    Posts
    126
    She's probably right Max. One doesn't have to be crazy to do this, but it helps. And if I wasn't crazy, I'd go insane. Check out the action video. Ralph


    http://www.youtube.com/watch?v=B9XXJ...F5Eu5A&index=6

  11. #86
    Join Date
    Mar 2013
    Location
    Colorado
    Posts
    126
    Hi Dan. Again I hadn't thought about it as a desk top background. But I do now. Thanks. I'll use it that way. Check out my video of it. Ralph


    http://www.youtube.com/watch?v=B9XXJ...F5Eu5A&index=6

  12. #87
    Join Date
    Mar 2013
    Location
    Colorado
    Posts
    126
    I have built a variety of miniature tools employing the lost wax process and have been asked to post elements of the procedures I employ. This is an ancient art that has been modified and "improved" over time. I have added some modifications that I have experimented with which make the art a doable home hobby. Ralph


    This post outlines the build process for a Monkey Wrench.


    A master pattern is built and packed with uncured rubbed in a metal frame then baked to vulcanize. The rubber mold is carefully cut open to remove the master pattern then used to produce multiple exact wax patterns.The mold halves are lubricated and ready for injection.


    Wax is injected.


    Wax patterns are carefully removed from the rubber mold, and a "tree" is formed with three patterns. This will call for a 3oz pour, and that is about as much as I can safely handle at this time.


    The patterns are mounted at the bottom of a casting flask (in this case a 10oz soup can.


    Plaster is mixed and debubbleized in an improvised vacuum chamber on a custom built vibration table.


    The flasks are placed in an oven to melt out the wax (lost wax) and hard bake the plaster molds.


    When well baked in high heat, molten metal will be injected (shot) into the cavities in the molds.
    Last edited by Ralph Juarros; 01-01-2014 at 6:51 PM.

  13. #88
    Join Date
    Nov 2007
    Location
    Glenelg, MD
    Posts
    12,256
    Blog Entries
    1
    Reminds me of how they cast finger pieces for flutes, clarinets, etc. Build a tree of the individual wax pieces, then cast them all at once.
    Hi-Tec Designs, LLC -- Owner (and self-proclaimed LED guru )

    Trotec 80W Speedy 300 laser w/everything
    CAMaster Stinger CNC (25" x 36" x 5")
    USCutter 24" LaserPoint Vinyl Cutter
    Jet JWBS-18QT-3 18", 3HP bandsaw
    Robust Beauty 25"x52" wood lathe w/everything
    Jet BD-920W 9"x20" metal lathe
    Delta 18-900L 18" drill press

    Flame Polisher (ooooh, FIRE!)
    Freeware: InkScape, Paint.NET, DoubleCAD XT
    Paidware: Wacom Intuos4 (Large), CorelDRAW X5

  14. #89
    Join Date
    Mar 2013
    Location
    Colorado
    Posts
    126
    The mold is in the centrifuge ready for casting. This is the most exciting part of the process and the part with the greatest risk where it can go dangerously wrong. This machine is a "broken arm" spring wound instrument that slings the molten metal into the cavity in the plaster mold. Ralph


    The cast "button" at the top of the mold is indication of a successful cast. it is from this button that the piece in the mold draws material as it cools and tends to shrink - the reason for using 50% more metal than the castings call for.


    After the mold is broken open, there is evidence that it was a good cast. Next the cast is washed thoroughly and prepared for separation of the pieces.


    cutting, filing, sanding, buffing & polishing will follow.


    Other operations - drilling and tapping as needed.


  15. #90
    Join Date
    Mar 2013
    Location
    Colorado
    Posts
    126
    filing, sanding, buffing and polishing


    And a finished product with fine grained wood accents results. Ralph


Posting Permissions

  • You may not post new threads
  • You may not post replies
  • You may not post attachments
  • You may not edit your posts
  •