Results 1 to 15 of 15

Thread: Novice pen turner question -- how to deal with tear out?

  1. #1

    Novice pen turner question -- how to deal with tear out?

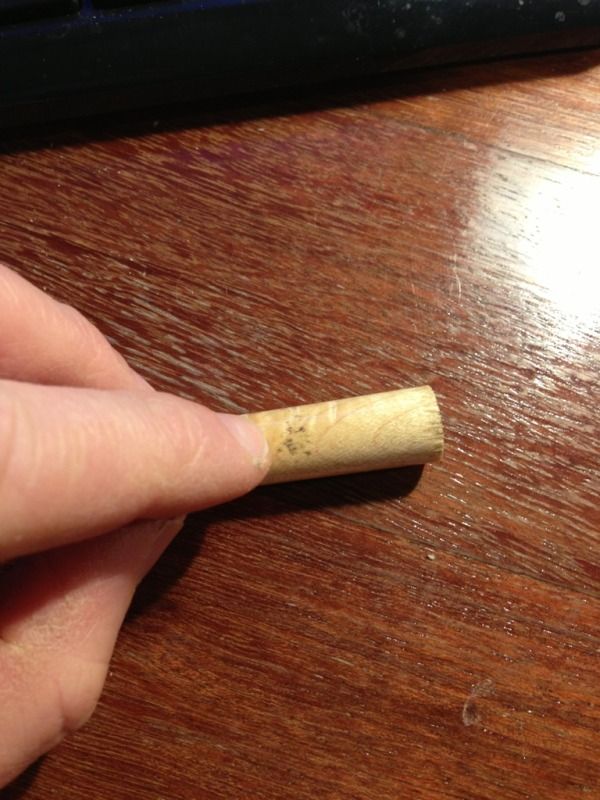
    After finishing some larger projects (desk, bed frame and headboard) recently, I'm enjoying taking a turn (forgive the pun) at some smaller, more discrete projects. I've made 4 pens so far, and the latest is an Atlas style pen using some curly hard maple I've cut into blanks. After turning down to the bushings, I wiped on a light coat of BLO to bring out the curl, then burnished it, hit it with two coats of friction polish, and a coat of carnauba wax.

    At first glance, I was extremely pleased with the outcome:


    Then I rotated the blank, and saw the dirty areas of inclusions and tear out, one in the center and more tear out near the cap:


    Two sets of questions for the community:

    1. How did this occur, in that is this a question of a) bad luck, just sometimes happens, b) execution/technique, or c) tool choice (I used a quite new and sharp carbide cutter)?
    2. What is the best approach to rescuing a piece when this happens? I'm already down to the bushings, so I can't do heavy sanding from here but I can remove the polish and hit it with a filler of some sort.

    Thanks,
    Scott

  2. #2
    Join Date
    Mar 2007
    Location
    Fort Collins, Colorado
    Posts
    327
    Try using a CA finish to fill voids, especially if you are down to the bushings. Using medium to thick CA, you can build up the finish with numerous coats. I usiually use a skew to even out the CA (it can get lumpy or irregular). I had some spalted maple that was so fragile you could crumble it like a piece of balsa. I saturated it with CA, turned it some, added more CA, and repeated the process until it was completed. Then I did a micro mesh progressive sanding onthe CA to make it as glossy as glass. Still looks great after a couple years of use. Using micro mesh with CA is similar to using micro mesh on acrylic -- you are basically polishing a "plastic-like" material until it is super smooth.

    I prefer CA since so many finishes dull with exposure to oils in the users hands. I loved the warmth of a friction polish, but found it justt didn't hold up well. For me, something like a pen that gets a lot of handling needs a durable finish. Somethign like a wine stopper is not held that much, and friction polish finishes hold up well.

    If you don't find information on doing a CA finish here, check out the IAP forum (penturners.org). No offense to Sawmill Creek, I am just more familiar with the other forum.

    Lathe turning is enoyable. I am doing peppermills for Christmas. Here are some reversible screwdrivers I did for Christmas last year. Rockler sells the kits for something like $6.99. I buy the Buck Bros. plastic handled ones at Home Depot for $2.99, and Dremel off the handles to get the socket for the bit holder.

    rev-drivers,sm.jpg
    Last edited by Lee Reep; 12-06-2013 at 10:15 PM.

  3. #3
    Join Date
    Nov 2007
    Location
    Glenelg, MD
    Posts
    12,256
    Blog Entries
    1
    I wouldn't use CA to fill voids... it's a clear finish and is unlikely to hide blemishes in many circumstances. Instead, use the CA to stabilize sections you think might have easy tearout (burls, heavy curl, etc.) before you get tearout. Everything else Lee said applies.

    Make sure your tools are sharp... this is generally the biggest cause of tearout. No matter what tool you use (most use a skew, I mostly use a roughing gouge), reduce your angle of attack so the cuts aren't as aggressive. If you run into a particularly troubling piece (palms are a good example) and don't want to use CA to stabilize (say you want a natural finish), considering roughing to size and then using sandpaper for final sizing. It's more work, but you'll get there without tearout.
    Hi-Tec Designs, LLC -- Owner (and self-proclaimed LED guru )

    Trotec 80W Speedy 300 laser w/everything
    CAMaster Stinger CNC (25" x 36" x 5")
    USCutter 24" LaserPoint Vinyl Cutter
    Jet JWBS-18QT-3 18", 3HP bandsaw
    Robust Beauty 25"x52" wood lathe w/everything
    Jet BD-920W 9"x20" metal lathe
    Delta 18-900L 18" drill press

    Flame Polisher (ooooh, FIRE!)
    Freeware: InkScape, Paint.NET, DoubleCAD XT
    Paidware: Wacom Intuos4 (Large), CorelDRAW X5

  4. #4
    Thanks, Lee and Dan for the quick responses. This is helpful. I'll remount the tube, sand and try to fill the current inclusions. On the next one I'll stabilize with CA before the final cuts. I'll also experiment with the skew vs the carbide cutter.

    Lee -- those screwdriver handles look great.
    Dan -- if I rough to size and use sandpiper for final sizing, what grit would you suggest? 100/120 for sizing work?

    Cheers,
    Scott

  5. #5
    Join Date
    Nov 2007
    Location
    Glenelg, MD
    Posts
    12,256
    Blog Entries
    1
    Quote Originally Posted by Scott Nicholas View Post
    Thanks, Lee and Dan for the quick responses. This is helpful. I'll remount the tube, sand and try to fill the current inclusions. On the next one I'll stabilize with CA before the final cuts. I'll also experiment with the skew vs the carbide cutter.

    if I rough to size and use sandpiper for final sizing, what grit would you suggest? 100/120 for sizing work?
    Take some of your fine sawdust from your initial roughing and place it in the tearout before applying CA... that should help fill and hide. If I'm roughing to size with sandpaper, no need to use anything fine. I have a few pieces of 80 grit (possibly 60 grit?) sitting near the lathe, so I just use that... be careful, you can get some minor tearout with too rough of paper if you're aggressive, but for the most part it will be much better. As you get close, then you can switch over to 120 to avoid deep scratches, then sand/finish as normal.

    All of that said, you should really shoot for solving the tearout problem in the first place... make sure your tools are sharp (hone them on the more difficult woods, don't just go from the grinder to lathe) and pay close attention to tool presentation.
    Hi-Tec Designs, LLC -- Owner (and self-proclaimed LED guru )

    Trotec 80W Speedy 300 laser w/everything
    CAMaster Stinger CNC (25" x 36" x 5")
    USCutter 24" LaserPoint Vinyl Cutter
    Jet JWBS-18QT-3 18", 3HP bandsaw
    Robust Beauty 25"x52" wood lathe w/everything
    Jet BD-920W 9"x20" metal lathe
    Delta 18-900L 18" drill press

    Flame Polisher (ooooh, FIRE!)
    Freeware: InkScape, Paint.NET, DoubleCAD XT
    Paidware: Wacom Intuos4 (Large), CorelDRAW X5

  6. #6
    Join Date
    Apr 2006
    Location
    Escondido, CA
    Posts
    6,224
    What about angle of attack with the carbide tool? Would that make a difference?
    Veni Vidi Vendi Vente! I came, I saw, I bought a large coffee!

  7. #7
    Join Date
    Nov 2007
    Location
    Glenelg, MD
    Posts
    12,256
    Blog Entries
    1
    Certainly... although I thought I would absolutely fall in love with carbide (and ended up purchasing several tools), I haven't used them enough to decide if I should dump my other tools. Still, I twist mine at a 45 degree angle to get more of a shearing cut.
    Hi-Tec Designs, LLC -- Owner (and self-proclaimed LED guru )

    Trotec 80W Speedy 300 laser w/everything
    CAMaster Stinger CNC (25" x 36" x 5")
    USCutter 24" LaserPoint Vinyl Cutter
    Jet JWBS-18QT-3 18", 3HP bandsaw
    Robust Beauty 25"x52" wood lathe w/everything
    Jet BD-920W 9"x20" metal lathe
    Delta 18-900L 18" drill press

    Flame Polisher (ooooh, FIRE!)
    Freeware: InkScape, Paint.NET, DoubleCAD XT
    Paidware: Wacom Intuos4 (Large), CorelDRAW X5

  8. #8
    Join Date
    Jun 2007
    Location
    Lakewood, Australia
    Posts
    35
    Scott, re the dirty areas. I have found with many light coloured woods that when I move to 320/400 grit paper that the wood grain can get filled with a dark colour. Have not found a solution to this yet - also have not spent much time looking for one.

  9. #9
    Join Date
    Jun 2007
    Location
    Misawa, Japan. Summers in Virginia.
    Posts
    300
    Preventing tear out is best prevented by having sharp tools. Next, increasing the speed some can help. Lastly, I spend quite a bit of time on sanding down to the final shape and level. Harder woods always seem to come out better and on softer woods I have to take a little extra care. As well, when sanding, avoid sanding the bushings, as the metal flakes can then get onto the wood and tarnish it.

    At base wood shop, I often work across from a novice pen turner (he is an expert in his eyes), but he fractures, or chips out, a good half of the wood and acrylic blanks he is turning. Just too impatient and dull tools.

    Good luck.

  10. #10
    Join Date
    Feb 2008
    Location
    lufkin tx
    Posts
    2,054
    The sanding thing workd well. Also a double cut bastard file works on problem woods when everything else fails.

  11. #11
    Join Date
    Dec 2009
    Location
    Mount Sterling, KY
    Posts
    2,504
    Quote Originally Posted by Dan Hintz View Post
    Certainly... although I thought I would absolutely fall in love with carbide (and ended up purchasing several tools), I haven't used them enough to decide if I should dump my other tools. Still, I twist mine at a 45 degree angle to get more of a shearing cut.
    I use both a carbide tool and an 1-1/4" skew. About half the time I am holding the carbide like Dan says and it acts like a skew, but mostly I use the carbide tool for roughing but rolled up on it's side it will do as a skew in a pinch. Like most others have said most tear-out can be solved with sharp tools.
    ____________________________________________
    JD at J&J WoodSmithing
    Owingsville, Kentucky

    "The best things in life are not things."

  12. #12
    Recently I've begun working with a bedan in some relatively simple spindle work -- you can get remarkably smooth surfaces. Takes some getting used to, but I'm certainly going to do more (quantity and complexity) given the results I'm already getting.

  13. #13
    Join Date
    Oct 2006
    Location
    New Jersey
    Posts
    1,295
    If I may I would like to give you my humble opinion. A few things come to mind. First, this wood is nothing special from what you have shown. It is not a burl but just some common maple. Unless the wood is or has some sentimental value to you, I would scrap it and start over. The time you spend trying to fix this problem will take longer than doing another blank. You can get spare tubes from just about anyone who sells pen kits and it is usually always a good idea to order extras whenever you are ordering kits, just for instances such as this. Now if you do not want to do this then another alternative is to turn the blank completely off the tube. Sand the tube to get rid of the glue residue and start over.

    Now if all that does not float your boat and you do want to repair then here is my thoughts on this. You can not fill in the voids with CA and then sand down. The voids and rough edges will show thru the clear finish. What you can do is sand down the blank untill you get all voids and defects out. Use no less than 220 grit and work your way up to 400. After each grit of sanding, stop the lathe and sand with the grain of the wood to get rid of sanding marks. Wipoe the blank off and repeat steps with next grit. No need to sand over 400 grit because you will be top coating. Now the rub here is that you need to be careful of the bushings because one you will sanding them down also and changing their dimentions. This can effect the next pen made with them. Also you can contaminate the wood with metal dust and thus you will have black marks. This can be all elliminated if you have the ability and know how to sand between centers and use delron bushings. Anyway say you get this all sanded down to satisfied looking blank, now you need to buid it back up to match the diameter of the kit's fittings. Note I did not say the kit's bushings. There can and usually is always a discrepency between bushings and kits fittings and thus this is where the use of a caliper comes in handy. This is how all good and professional pen turners turn their blanks to fit kit parts. To rebuid the finish I would recomend layers of med CA. Here again is another learning lesson that needs to be perfected to get good results. After you get the many coats of CA on and built up to the sanding stage then you need to carefully sand to proper dimentions and finishing with the MM pads to give the perfect shine. Now here is where something you said stands out. You mentioned friction polish. This does 2 things in my mind. You do not have the know-how or ability to do CA finishes or you do not like the look and feel on wood pens and opt for the friction finish. I will not go into the pros and cons. That is for another day.

    Now to the operator error thing that got you here. It is a combination of tool choice and presentation of tool and possibly sharpness of tool. I always choose to use my skew to turn most pens especially wood pens. I turn the ends down first and work the center toward the ends both ways. What this does is prevents tearout on the ends because you are not takeing alot of material off that is unsupported. You do this in nice increments and you will be very successful. The other advantage with using a skew is I go right from turning to finishing and no sandpaper touches my blanks. But the thing here is I use CA as my finish. It is a hard durable finish that can withstand the oils and grime of the hands.

    OK there is my take and some of the pitfalls and things I like to do when turning pens. Again after reading this I still think you best bet is to scrap the blank and start over. I do not as well as anyone else here know your skill level when it comes to pen turning and what you have available so all the advise given is just guess work. You have to make the choice based on what you can do. Good luck.

    Boy did not realized I wrote a book. It is always hard to explain some things because they are always not black and white.
    John T.

  14. #14
    Join Date
    Oct 2008
    Location
    Fresno, Ca
    Posts
    4,032
    You'll find that many maples have an oddball grain leading to tear out. Leave it a lit thick and finish to thickness by sanding. Try not to focus on one tool or another, learn to use them all well and for their intended purpose.
    Your Respiratory Therapist wears combat boots

  15. #15
    Join Date
    Nov 2004
    Location
    Winterville NC
    Posts
    389
    All of the above is great only one addition. Put a thin coat of med or thick Ca on the blank with small problems like open grain and sand it while while wet with the lathe on slow speed. . Then finish as you like.. It will fill open grain like paduk (sp) and no color problem. Some one suggested long ago on this forum. Harry

Posting Permissions

  • You may not post new threads
  • You may not post replies
  • You may not post attachments
  • You may not edit your posts
  •