Page 1 of 2 12 LastLast
Results 1 to 15 of 20

Thread: Button Blocks?

  1. #1
    Join Date
    Jan 2010
    Location
    Lafayette, Indiana
    Posts
    1,379

    Button Blocks?

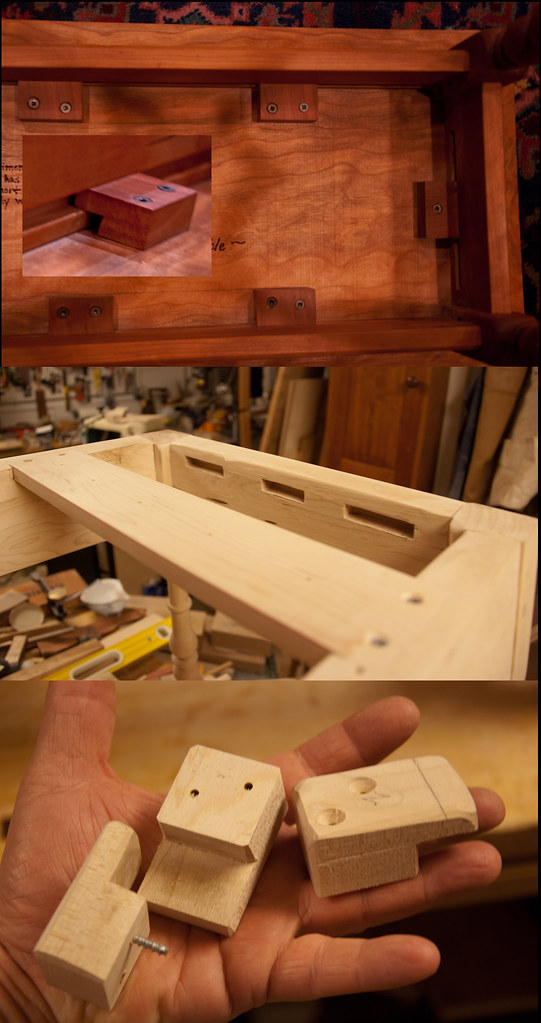
    I came across a joinery technique for attaching a top to a bookshelf case which uses button blocks. The plans are not very detailed. No dimensions of the Button Blocks were provided, and nothing was mentioned as to how to attach the "buttons". Essentially these look to be what I will call "mini cleats". They look to be 1 inch square blocks with a tongue. It appears that they are attached to the insides of the top rails in the case work of the bookshelf by making a small mortise in the rail.

    As I said, I've never seen this technique before. Have any of you used this method? If so, how large do you make the "buttons" and what spacing would you recommend. How deep are the tongues and how thick? The exploded drawing clearly illustrates only one on the sides of the case (12" deep), and three on the front and back rails which are only 28" long. Are the pilot holes on these over sized to allow for some movement? Any help with Button Blocks is appreciated.
    Last edited by Joe A Faulkner; 03-09-2014 at 11:35 PM.

  2. #2
    Join Date
    Mar 2009
    Location
    Chevy Chase, Maryland
    Posts
    2,484
    I've used button many times. They are perhaps my favorite way to attach tabletops. In fact I made buttons today to attach the top of my tavern table. The great thing is that they allow wood movement so you just size stuff to allow the approximate movement anticipated.

  3. #3
    Join Date
    Feb 2003
    Location
    Austin, TX
    Posts
    442
    Buttons are typically how I connect table tops to the base. There is nothing magical about the dimensions. Mine usually end up made out of 3/4" - 1" stock I have leftover from the build. I usually make them about 1-2" wide with1/4" tongues. They sit in a mortise or continuous groove in the rail or case side. If you use a mortise, then it needs to be wider than the button to allow for movement (therefore no need to use an oversized screw hole). One little trick is to place the mortise or groove about 1/16 - 1/8" lower than the tongue so that you can be sure and bring the top tight.
    Spacing depends on project and use. Small side tables only need two per end while a large one may need four or more.

  4. #4
    Join Date
    Mar 2009
    Location
    Chevy Chase, Maryland
    Posts
    2,484
    Perhaps some pictures will be worth 1000 words:

  5. #5
    Join Date
    Sep 2007
    Location
    Longview WA
    Posts
    27,475
    Blog Entries
    1
    Gee, I have used those and didn't know what they were called.

    jtk
    "A pessimist sees the difficulty in every opportunity; an optimist sees the opportunity in every difficulty."
    - Sir Winston Churchill (1874-1965)

  6. #6
    Join Date
    Jan 2010
    Location
    Lafayette, Indiana
    Posts
    1,379
    The pictures do indeed tell the story. I was thinking the buttons were mortised and glued into the rail -hence the "mini cleat" reference which is why I asked about the over-sized hole. I now see that they are essentially clamping the top to rails - clever. Thanks for the tutorial.

  7. #7
    Using handtools it is much easier to run a groove the length of the rails. Not seperate mortices for each button block.

  8. #8
    Join Date
    Mar 2009
    Location
    Chevy Chase, Maryland
    Posts
    2,484
    While I would agree that I can plow a groove faster than chop several mortises, I think the issue is slightly more complicated than that. In the pictures above, the small cherry side table has grooves and the tavern table has mortises. If I was building another tavern table, I might think about grooving, but there are some considerations that militate against it. Its aprons are at a significant angle - around 8 degrees off 90 - which means plowing just got a lot more complicated if you want the grooves parallel to the top. Second, when building this tavern table by hand, you must prioritze the leveling of the turned feet in construction, which means that unlike say with a welsh stick chair or windsor, where you can cut the legs to adjust the level and height after assembly, one must make any adjustments from the top of the table. This means that groove cut before assembly, may no longer be parallel to the top after assembly and adjustment.

    There is also the issue of how thick the apron is compared to the depth of the groove one must cut to accomodate the anticipated movement of the top. On large tables, the groove may need to be pretty deep, which may compromise the strength of the apron in a way that some staggered mortises on the same apron would not.

    Etc.
    Last edited by Sean Hughto; 03-10-2014 at 9:05 AM. Reason: typos

  9. #9
    Join Date
    Mar 2009
    Location
    Chevy Chase, Maryland
    Posts
    2,484
    Yeah, just to be clear, no glue. Indeed, I wax the surface of the buttons that meets the top of the mortise/groove to make sure that as the top moves with the seasons, the botton will not bind. Same reason for the spaces under and at the tip of the tongue.

  10. #10
    Join Date
    Jan 2009
    Location
    Williamsburg,Va.
    Posts
    12,402
    I always use buttons on every table I build. Learned it from old mr. Simms back in 1970. Remember,I was concentrating on making guitars.lutes,etc.,not furniture when I first came to the museum. I have never had a problem with a table top splitting using buttons.

  11. #11
    Join Date
    Jul 2013
    Location
    NE Ohio
    Posts
    1,029
    I think I saw button blocks for the first time on an episode of TNYW. They seem really obvious once you've seen them. I use them most of the time if I have room. For tight spaces, I sometimes use figure 8 connectors instead.

    Note the grain direction in Sean's pictures.
    -- Dan Rode

    "We are what we repeatedly do. Excellence, then, is not an act, but a habit." - Aristotle

  12. #12
    Join Date
    Nov 2006
    Location
    Sebastopol, California
    Posts
    2,319
    Quote Originally Posted by Tom Scott View Post
    Buttons are typically how I connect table tops to the base. There is nothing magical about the dimensions. Mine usually end up made out of 3/4" - 1" stock I have leftover from the build. I usually make them about 1-2" wide with1/4" tongues. They sit in a mortise or continuous groove in the rail or case side. If you use a mortise, then it needs to be wider than the button to allow for movement (therefore no need to use an oversized screw hole). One little trick is to place the mortise or groove about 1/16 - 1/8" lower than the tongue so that you can be sure and bring the top tight.
    Spacing depends on project and use. Small side tables only need two per end while a large one may need four or more.
    If you're attaching them to the end of the top, where wood movement will/could move the blocks sideways, then, yes, the mortises should be longer than the width of the blocks. In some applications, like tabletops, it's nice to fasten a block or two along the length of the top, with the blocks at right angles to the wood grain. In this case, make the tongue long enough, and the mortise deep enough, to allow for wood movement toward/away from the apron you're clamping to, not side to side.

    Buttons are great little devices. One technique for making them that I've seen is to cut a rabbet across a fairly wide piece of scrap, then saw out the individual buttons, rather than making the rabbets one by one.

  13. #13
    Join Date
    Sep 2009
    Location
    Cedar Rapids Iowa
    Posts
    209
    Sean,

    Thanks for the great info and pictures.

    One thing I didn't see mentioned here is just how tight do you "clamp" the top to the apron with the button blocks? Is there a rule of thumb for making it just tight enough to allow movement due to changes in moisture, but not so loose that the top seems wiggly or loosey goosey (to use highly technical terms)?

    Many Kind Regards . . . Allen
    No, the sky is not falling - just chunks of it are.

  14. #14
    Join Date
    Jul 2013
    Location
    NE Ohio
    Posts
    1,029
    The wood is not going to measurably expand or contract across the thickness, so wood movement is not really an issue. I make my blocks so the tenon is just short of the groove height. 1/64" is enough. That way I can get a bit of tension as I tighten the screws. The back of the button seats flush and the front might hold just proud but it's all good.

    It's really more a feel as I tighten everything up. Snugly tensioned but not forced.
    Last edited by Daniel Rode; 03-11-2014 at 2:37 PM.
    -- Dan Rode

    "We are what we repeatedly do. Excellence, then, is not an act, but a habit." - Aristotle

  15. #15
    Join Date
    Mar 2009
    Location
    Chevy Chase, Maryland
    Posts
    2,484
    Expanding and contracting wood is VERY strong. I saw a documentary once where they quarried huge slabs of rock off a face by boring holes at the top, driving dry wood stakes into the holes and pouring water on them. My point is that the chances of you making the tenon so tight with the top of the slot or mortise (remember, it doesn't even have to touch onthe bottom really) that the slab would crack before it could move the button is slim and none if you asked me. As I mentioned elsewhere in this thread I think, I also wax the top of the tenonfor extra slidability no matter the tightness.
    Last edited by Sean Hughto; 03-11-2014 at 2:16 PM.

Posting Permissions

  • You may not post new threads
  • You may not post replies
  • You may not post attachments
  • You may not edit your posts
  •