This is part 6 of a hand tool build of a cherry Chest-on-Chest from Glen Hueys excellent book Building Early American Furniture.
Nothing fancy, just basic hand tool build pics. FWIW, brief description of some hand tool techniques in the hope they may be of interest to some of my fellow meanders. Im certainly not an expert, this is what works for me after plenty of trial and lots of errors!
As described in previous posts the chest carcass is finished, moldings and split turnings applied. Now for building the drawers:
I start with dimensioning the drawer fronts to fit the drawer pocket. Reference off the bottom left corner of the drawer pocket for consistency still end up trimming the wrong part of the drawer front on occasion, but at least its an attempt to keep the gap around the outside of the drawer decent.
I use a square/sliding bevel to measure the exact angle between the horizontal/vertical components of the drawer pocket (frequently not exactly 90°), then transfer that angle for marking the horizontal dimension of drawer fronts.
1.jpg
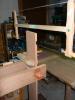
Heres an oversized Bench Hook I use for finish cross cutting of components at the bench. Generally I prefer doing almost all my sawing at the saw bench, but this appliance raises the work piece so I can make accurate cross cuts with back saw to final dimensions.
2.jpg
Seems like new project always created the need to build a new shop tool (does this happen to you?) in this case a shooting board. On the right is my original shooting board; it is too heavy I (built out of MDF), the fence is fixed so that inevitably as I tilted the plane to less than 90° I shaved off the very end of the fence and started getting some tear out on the back edges of work pieces. Finally I used some high density/low friction plastic for the slider portion worked okay, but not as consistently flat/stable as Id like.
3.jpg
On the left is the new shooting board: much lighter BB plywood construction and adjustable fence so I can slide it over as I shaved away the end grain, and finally an adjustable track to help hold the plane against the edge of the work piece. I highly recommend a track, regardless of what plane you use used for shooting. I bit the bullet and splurged on an LV shooting plane which I absolutely love! Not essential, but very fun.
4.jpg
Heres all drawer fronts in the case; a light source behind makes it easier to see the gaps.
5.jpg
I cut everything with hand saws (have an ancient 14 BS I use for resawing but its been broken for some time, have to eventually have to get around to fixing that ).
I am a huge fan of saw benches; for me the geometry, body position and set up makes everything about hand sawing easier. IMHO key SB elements are:
1) Weight/stability; I like a SB thats heavy enough it absolutely wont move even if I dont have any body weight holding down the work piece.
2) Clamping; if you have sharp handsaws and want to cut quickly and efficiently I think its much easier to clamp the work piece, rather than rely on your body weight to hold it still, especially if youre putting a little muscle into the job. I use a couple 4 hold fasts/holes in the Doug Fir bench top and a flip up stop for crosscutting.
3) Light: the number one reason I wander off the layout line is Im too lazy to get sufficient light to clearly see the tooth line against the layout line. I clamp a light directly over the saw bench which made a big difference for me.
6.jpg
For crosscutting drawer components I saw a little bit fat of the layout line so I can shoot the end grain to the final dimension with a couple passes. A 12 PPI panel saw is ideal for smaller components like drawer sides/backs.
7.2.jpg7.5.jpg

 Reply With Quote