Page 1 of 2 12 LastLast
Results 1 to 15 of 20

Thread: having fun here...

  1. #1
    Join Date
    Jan 2014
    Location
    Lafayette, LA
    Posts
    235

    having fun here...

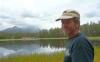
    ...with the new trotec s300. Have been doing some practice work on wood, thought I'd attach one pic here.
    This was a tiff of an MCEsher print, "ripples in water". I have always been a big fan of his work, and it looked like a lot of his work translates well to halftone laser engraving. In trotec job control process options, this was done under relief setting, 500 dpi, floyd steinberg dithering, 100% power, 85 speed, 500hz.

    Anyone know much about the different choices in dithering found in trotecs print setting page? I notice there are different choices for 'halftone' settings in the pull down box, such as 'ordered dithering', 'stuckey', 'jarvis', 'floyd steinberg', etc.. What setting do you tend to use for halftone relief engraving?

    Really enjoying this new tool!

    edit* added original print

    ripples3.jpg EscherRippledSurfaceLR (1).jpg
    Last edited by Don Corbeil; 04-07-2014 at 10:39 AM.

    Don Corbeil

    _________________
    Trotec Speedy 300 (80W) w/rotary
    CorelDraw Graphics Suite x6
    PhotoGrav v.3
    AutoCAD 2000i


  2. #2
    Don

    That looks great. Did you consider inverting it?

    I generally do not do photographic images so somebody with more experience will have to answer your question.
    Mike Null

    St. Louis Laser, Inc.

    Trotec Speedy 300, 80 watt
    Gravograph IS400
    Woodworking shop CLTT and Laser Sublimation
    Dye Sublimation
    CorelDraw X5, X7

  3. #3
    Join Date
    Jan 2014
    Location
    Lafayette, LA
    Posts
    235
    Mike,
    Thanks. This was actually done from a print (I believe a linoleum cut) by mc escher. He was a dutch graphic artist who was a master of creating geometric patterns with animal/landscape subjects that blended into optical illusions.
    Here's another print of escher and my engraving of it (bats&angels). You can see that I didn't get the white/dark balance good enough to balance out the depth of cut. I think I need to adjust the gamma a bit more to try to get the darker and lighter aspects more balanced.
    His work is sure fun to experiment with to learn the laser abilities a little better. I just need to make sure I have enough scrap wood on hand


    mcescher.jpgbats&angels.jpg
    Last edited by Don Corbeil; 04-06-2014 at 8:19 PM.

    Don Corbeil

    _________________
    Trotec Speedy 300 (80W) w/rotary
    CorelDraw Graphics Suite x6
    PhotoGrav v.3
    AutoCAD 2000i


  4. #4
    Join Date
    Nov 2007
    Location
    Glenelg, MD
    Posts
    12,256
    Blog Entries
    1
    Don,

    That's an image that would do very well as a 1-bit (no dithering) with a high power to really dig deep. If you still want some shading in there to keep the sun, try two passes, one at high power for depth (with the sun removed), then a second for shading (everything other than the trees and ripples). A bit of extra work, but I bet it would really pop.
    Hi-Tec Designs, LLC -- Owner (and self-proclaimed LED guru )

    Trotec 80W Speedy 300 laser w/everything
    CAMaster Stinger CNC (25" x 36" x 5")
    USCutter 24" LaserPoint Vinyl Cutter
    Jet JWBS-18QT-3 18", 3HP bandsaw
    Robust Beauty 25"x52" wood lathe w/everything
    Jet BD-920W 9"x20" metal lathe
    Delta 18-900L 18" drill press

    Flame Polisher (ooooh, FIRE!)
    Freeware: InkScape, Paint.NET, DoubleCAD XT
    Paidware: Wacom Intuos4 (Large), CorelDRAW X5

  5. #5
    Join Date
    Jan 2014
    Location
    Lafayette, LA
    Posts
    235
    Dan,
    thanks! I will try that procedure.
    So, if I understand correctly you are saying that in the 'processes' part of the print choices, select black/white (1 bit) instead of any dithering options?
    And then mask out (deselect) certain parts when I burn the others? Sorry, still learning all the capabilities of the job control...

    Don Corbeil

    _________________
    Trotec Speedy 300 (80W) w/rotary
    CorelDraw Graphics Suite x6
    PhotoGrav v.3
    AutoCAD 2000i


  6. #6
    Don

    I would also bring the photo into Photopaint and work on the grays, darkening them a bit.(the angels photo) I think you have produced a very good example.

    I suggest you photograph everything so you have a reference. Thanks for posting these.
    Last edited by Mike Null; 04-07-2014 at 7:16 AM.
    Mike Null

    St. Louis Laser, Inc.

    Trotec Speedy 300, 80 watt
    Gravograph IS400
    Woodworking shop CLTT and Laser Sublimation
    Dye Sublimation
    CorelDraw X5, X7

  7. #7
    Join Date
    Nov 2007
    Location
    Glenelg, MD
    Posts
    12,256
    Blog Entries
    1
    Quote Originally Posted by Don Corbeil View Post
    Dan,
    thanks! I will try that procedure.
    So, if I understand correctly you are saying that in the 'processes' part of the print choices, select black/white (1 bit) instead of any dithering options?
    And then mask out (deselect) certain parts when I burn the others? Sorry, still learning all the capabilities of the job control...
    Sounds like you have the idea. Split it into two images... one that provides a sense of texture (the high power run) and one that provides a sense of visual depth (a lighter power shading run). The ripples/trees should be run as a black/white image, basically cutting the wood really deep. The sun won't be touched, but the rest should be run as a 1-bit dithered image, which will provide some shading to everything. I bet it would look really sharp. If you wanted a spot of color, add some yellow or orange dye to the sun, or go really crazy and add some light blue to the water.
    Hi-Tec Designs, LLC -- Owner (and self-proclaimed LED guru )

    Trotec 80W Speedy 300 laser w/everything
    CAMaster Stinger CNC (25" x 36" x 5")
    USCutter 24" LaserPoint Vinyl Cutter
    Jet JWBS-18QT-3 18", 3HP bandsaw
    Robust Beauty 25"x52" wood lathe w/everything
    Jet BD-920W 9"x20" metal lathe
    Delta 18-900L 18" drill press

    Flame Polisher (ooooh, FIRE!)
    Freeware: InkScape, Paint.NET, DoubleCAD XT
    Paidware: Wacom Intuos4 (Large), CorelDRAW X5

  8. #8
    Join Date
    Jan 2014
    Location
    Lafayette, LA
    Posts
    235
    guys, thanks for the feedback and encouragement. This has really been fun testing the abilities of this laser. I'm going to work on both of these escher prints some more, as per suggestions. I'll post results back later. It's funny, since I got the machine, I am finding it hard to get to sleep at night with all the different ideas and potential settings variations running through my head

    Don Corbeil

    _________________
    Trotec Speedy 300 (80W) w/rotary
    CorelDraw Graphics Suite x6
    PhotoGrav v.3
    AutoCAD 2000i


  9. #9
    Join Date
    Oct 2013
    Location
    Seattle, WA
    Posts
    1,664
    Blog Entries
    1
    Don,

    I am afraid I am not familiar with some of those dithering patterns so I can't speak to their strengths.
    But, if you have enough play wood around why not do up a one of your images in a grid pattern, but with each square of the grid on a different layer. Then run each square onto the same wood as a different job with a different dithering pattern and then have a record of what each does? Maybe do a set for the graphics like you have in the MC Escher prints, and another with a photograph. Unless someone else out there has already done that and would care to share?

    Glad you have having such fun!!!

    <grin>

    Dave
    900x600 80watt EFR Tube laser from Liaocheng Ray Fine Tech LTD. Also a 900x600 2.5kw spindle CNC from Ray Fine. And my main tool, a well used and loved Jet 1642 Woodlathe with an outboard toolrest that helps me work from 36 inch diameters down to reallllllly tiny stuff.

  10. #10
    Join Date
    Jan 2014
    Location
    Lafayette, LA
    Posts
    235
    David, great idea to help see a side by side comparison.
    I just returned from the local lumber yard, and picked up a new batch of assorted scrap wood. Oak, maple, poplar, pine, etc.. I think it should keep me in the shop for awhile.

    Don Corbeil

    _________________
    Trotec Speedy 300 (80W) w/rotary
    CorelDraw Graphics Suite x6
    PhotoGrav v.3
    AutoCAD 2000i


  11. #11
    Join Date
    Jul 2007
    Location
    Marietta, GA
    Posts
    621
    I like that ripples pic. I'd love to try that in marquetry, vs engraving.
    Steve \o/
    Dynamite With A Laser Beam LLC
    Epilog Helix 75W/Epilog Fusion Edge 80W and Jet 1642-EVS2

  12. #12
    Join Date
    Jan 2014
    Location
    Lafayette, LA
    Posts
    235
    Steve,

    Yes, that would be very nice with a marquetry inlay pattern. I could see some curly maple and darker hardwoods working well in there.

    Here's another iteration of the image following the above suggestions. I broke down the image into three layers, then engraved those at varying depths and with both an x & y engrave orientation. It did pop out nicely. I had to be careful with the smoke residue adhering to the lighter parts of the image during the deep burn on the tree outline. The order of engraving was important, and I got rid of most of it, but I still had to do a light 'cleanup' engrave on the moon reflection to reduce residue. The darker branching benefitted from a deep cut that charred the surface a bit. The natural grain in the wood darkened that lower section in a way that I would prefer to avoid in the future.


    P1000685.jpg

    Don Corbeil

    _________________
    Trotec Speedy 300 (80W) w/rotary
    CorelDraw Graphics Suite x6
    PhotoGrav v.3
    AutoCAD 2000i


  13. #13
    Join Date
    Oct 2013
    Location
    Seattle, WA
    Posts
    1,664
    Blog Entries
    1
    Don,

    Just curious, how long did that last version take you? It looks very good though. You really got depth in that!

    Dave
    900x600 80watt EFR Tube laser from Liaocheng Ray Fine Tech LTD. Also a 900x600 2.5kw spindle CNC from Ray Fine. And my main tool, a well used and loved Jet 1642 Woodlathe with an outboard toolrest that helps me work from 36 inch diameters down to reallllllly tiny stuff.

  14. #14
    Join Date
    Feb 2014
    Location
    Milton Keynes, UK
    Posts
    59
    Don, can you tell me the individual settings you used for each layer please, and what parts of the image those layers were? I'm very impressed with how the latest one you did compared to the first image you posted, a vast improvement. Your first one is more like the results I've been getting when doing this kind of thing and so I'm very keen to improve. Also what do you mean by "both an x and y engrave orientation" and "cleanup engrave"? Sorry for the questions but as a new S300 user myself I'm keen to get the most from my machine.
    Cheers, Steve

    --

    Trotec Speedy 300, Rated at 89.8 watts.
    Atmos Duo, Rotary Attachment, Corel Draw 7

  15. #15
    Steve
    Your Trotec can be set to engrave in the Y axis.

    Don
    Nice work. I use diluted Pinesol or similar cleaner to soak up the residue on wood. (don't rub if it"s unfinished wood)
    Last edited by Mike Null; 04-09-2014 at 6:31 AM.
    Mike Null

    St. Louis Laser, Inc.

    Trotec Speedy 300, 80 watt
    Gravograph IS400
    Woodworking shop CLTT and Laser Sublimation
    Dye Sublimation
    CorelDraw X5, X7

Posting Permissions

  • You may not post new threads
  • You may not post replies
  • You may not post attachments
  • You may not edit your posts
  •