Do the initial shaping on the handle (especially at the bottom) then trace the mortise lines around it.
P1040138.jpg
A gouge works well to work safely to the lines. Anything else runs the risk of having a fiber lift and bungle the surface.
P1040139.jpg
Mortise looks something like this after cleaning the bottom out with a chisel and checking it with a square to make sure the depth is good
P1040140.jpg
Unfortunately, what I didn't expect is that the handle could really crush its own fibers under a tight fit. And it did. It also started a hairline crack where these fibers broke, so next time I make a plane, i'll leave the mortise a bit more loose.
P1040146.jpg
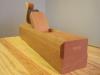
And the handle sunk in the plane - the damage behind the handle is there, but it's not too severe.
P1040147.jpg
This handle needs some aesthetic help yet, it's looking a little slab sided. I think even though it's fitted I can get away with fairing the curve without making it look too bad. It's also a bit too fat at the top, and from the feel I'd like the handle to have a little more downward angle, so I can push the part where the web of your hand fits inward a little bit and clean up those curves.
After that, it'll just be cutting the bevels on the front and back and then rounding over the rear end a little bit, and them some kind of quickie finish.
I'll fit the other iron and another wedge after I've used it a little bit.

 Reply With Quote