Page 1 of 2 12 LastLast
Results 1 to 15 of 17

Thread: Try to build a Dizzy Bowl .. Photos ..

  1. #1
    Join Date
    Jul 2008
    Location
    Courtenay BC Canada
    Posts
    2,750

    Try to build a Dizzy Bowl .. Photos ..

    I've been woodworking a while, but am really new to turning. I've been watching a few video's on Dizzy Bowls and realized that they are more woodworking than turning, so I decided to give it a try .. I have it roughed out .. and realize .. I'm gonna have to turn this thing.

    Here are the pics .


    Yes.. I went heavy on the glue .. Its Lepages Exterior.. I actually used about 1/2 of a 500ml bottle.


    Glue on my jointer .. I didn't see it till this photo..


    The wood is all scraps..
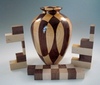
    Its Maple, Purple Heart, Wenge, Mahogany, Afromosia


    I decided to cut the slabs at 12mm and sand to 10mm


    I cut the first circle with the bandsaw, and the rest of the circles with a Jig saw. My bandsaw has a 1" blade and it won't really track anything less than 1/2" .. So it was 40 minutes with a Jigsaw.

  2. #2
    Join Date
    Jul 2008
    Location
    Courtenay BC Canada
    Posts
    2,750

    I made is so the overhang increases.. It should start at about 65 degrees and flare to less than 45 at the top ..

    I might throw out some of the small ones .. the bowl looks a bit like a dunce cap. Shorten it but leave the width.


    Tomorrow I will start gluing it together. Not sure the technique, but I picture using the other half of that bottle of glue ..

    My question is .. When this thing is on the lathe. Should I attach a cross bar at the top so I can use the tail stock? Is this gonna fly apart and try to kill me ? I might wear a hockey helmet .. lol

    Should I do the inside first ? Bowl gouge ? Scraper ? Carbide Scraper ? I have an easywood finisher .. but not a rougher .. What about the outside ? To me its like a bowl blank ?

    Maybe I'll put it in a closet and wait till my turning skills are better .. lol

  3. #3
    My question is .. " When this thing is on the lathe. Should I attach a cross bar at the top so I can use the tail stock? Is this gonna fly apart and try to kill me ? I might wear a hockey helmet .. lol

    Should I do the inside first ? Bowl gouge ? Scraper ? Carbide Scraper ? I have an easywood finisher .. but not a rougher .. What about the outside ? To me its like a bowl blank ?

    Maybe I'll put it in a closet and wait till my turning skills are better .. lol"

    Rick. I glue mine on the lathe and turn the inside as I go -- glue up two or three rings at a time and turn the inside. Make a jam chuck out of MDF and insert it into the top inch or so of the piece for stability when turning the out side.

    You glue up looks good and should make a nice looking bowl when finished.

  4. #4
    Join Date
    Aug 2014
    Location
    Ontario, Canada
    Posts
    35
    There is a new turning club in Courtenay. I think they meet at Bow River. Should be some help there. At the very least I would take your blank to the nice guy that works there and is a veteran turner. You are going to need a bad **** lathe to handle that puppy! Goalie gear might be appropriate. Good luck!
    Last edited by Scott Hackler; 12-23-2014 at 9:33 AM. Reason: removed inappropriate word

  5. #5
    Join Date
    Nov 2012
    Location
    UP of Michigan
    Posts
    354


    Here are some similar concepts
    https://forum.canadianwoodworking.co...hing-Technique

    This one is from Canada and has 6 videos involved
    https://www.youtube.com/watch?v=WypviY1wLv4&feature=related

    I have not tried these concepts, but I think some segment turners will attach a temporary base to the stack, and some will turn part of the stack than glue up more layers and turn those until they have the completed stack. I like your concept but my band saw would not accept that amount of height. It will be interesting to see your finished results. I think by watching all of the videos from Canada you will have most of your question answered as far as what turning tools to use.

  6. #6
    Join Date
    Jul 2008
    Location
    Courtenay BC Canada
    Posts
    2,750
    Bill .. Thanks for that idea, that makes so much sense .. My rings are 10mm or 3/8" .. I have 4 glued in clamps. will turn the inside of those first ..

  7. #7
    Join Date
    Jul 2008
    Location
    Courtenay BC Canada
    Posts
    2,750
    Thanks for the idea Bill .. I started on the outside as well, but think now I will let it wait till the bowls assembled. I will turn the inside as it goes though. .


    I threw out the first 4 rings. went with a wider base. Glued it to a mahogany sub base..


    That last pic shows how it cleaned up .. The wall thickness at the base is about 12mm or 1/2" .. it flares slightly and should be 8mm at the top. I assume I will lose another 2mm in sanding and final clean up ..

    So far so good.

  8. #8
    Join Date
    Jul 2008
    Location
    Courtenay BC Canada
    Posts
    2,750
    This marks the end of Dizzy bowl ..

    It was in the home stretch, when catastrophic failure occurred. It cannot be repaired.


    I got the outside finished, using the tail-stock, I squeezed the bowl with board. It worked well..


    I took the tail-stock away to finish the inside ( with a gouge ) ..


    I got a catch inside the bowl .. My fault .. I think I called this.. lol


    Thanks for the encouragement.. Its not a waste, I learned a bunch .

  9. #9
    Join Date
    Jan 2007
    Location
    Ottawa, ON Canada
    Posts
    1,473
    Rick: I believe that most of us on here have "been there, done that". I'm sorry that it happened to you. I've done a few of these and learned the hard way on the first one. On yours, I'm curious. How thick was the wall when you started. Your rings look quite wide. Your final thickness looks to be less than 1/4". If I'm getting this right, you had to take off a lot of wood to get to your final thickness. That adds to the stress issues on the wood and the glue joints. Just a thought.

    I'm sure that you learned enough from this one that your next will be a screamin' success.
    Grant
    Ottawa ON

  10. #10
    Join Date
    Jul 2008
    Location
    Courtenay BC Canada
    Posts
    2,750
    Grant.. yeah.. that is a good point.. The rings where quite wide, but the wall thickness turned out quite thin. Part of that is because I didn't get it mounted dead center on the lathe.. So it spun off balance. I cut the corners off the mahogany base before finding center. Simple mistake, result was thinner walls than planned.

    I think in future, I would leave the outside alone until done. Lots of mistakes = lots learned. I didn't really like the look of it that much anyway .. lol .
    Last edited by Rick Fisher; 12-24-2014 at 3:51 PM.

  11. #11
    Join Date
    Dec 2005
    Location
    Texas Hill Country, USA
    Posts
    1,967
    Quote Originally Posted by Rick Fisher View Post
    I think in future, I would leave the outside alone until done.
    Rick, I make a lot of segmented vases. I have never done the bowl-from-a-board trick, but some of the principals still apply. Your biggest issue is compounding any errors. This is the main reason that you should not glue all of the rings together and then go to town turning. As previously advised, glue 2-4 rings together and then turn them. You can usually turn the inside to finish. This keeps you from trying to hang a tool 8-10" over the rest and having a problem later on. And at this point is where your "leave the outside alone until done" is going to cause you problems. You should turn the outside down to at least where you have turned it to about 80% of completion. The reason for this is that the ring that is mounted and just turned IS PERFECTLY CENTERED on the lathe. If you did not turn the outside and just glued on the next ring, you would simply line it up and it is possible, even likely, that the ring you are gluing it to is a bit off-center. This means that the next ring to be glued on is STARTED off-center, plus you add in any amount of error that gluing the next ring on might have in it. If you just glued up all the rings without turning some of the outside, when you started turning the outside, it is possible that the bottom third (with the fewest errors accumulated) would turn just fine, the middle third (which has all the errors from the bottom third plus any errors in the middle) would be fairly thin, and the top (which has all of the errors accumulated from bottom, middle, and top) might just disappear into thin air. (It has happened!) When using the method I am explaining though, after you glue on the last ring, the inside should be all turned and the outside should be about 80% turned. Now you can go back and finish turn the entire outside at once so that you can get good clean lines and a good looking final shape. Hope this helps.
    Last edited by Robert McGowen; 12-24-2014 at 4:07 PM.

  12. #12
    Join Date
    Mar 2009
    Location
    Toledo, OH
    Posts
    152
    That's really a shame, it was a very nice piece. Like you said, if you learned from it, it wasn't a loss.

    Thanks for sharing all the pics along the way.

  13. #13
    Join Date
    Jul 2008
    Location
    Courtenay BC Canada
    Posts
    2,750
    Robert.. that is what was happening for sure.

    How would I turn just 3-4 of the rings without attaching them to the base ? I guess I could pin them to a center ?

  14. #14
    Thanks for the information. I have never tried that, but have learned a lot from reading this post.

  15. #15
    Join Date
    Jul 2008
    Location
    Courtenay BC Canada
    Posts
    2,750
    Hah.. Tom .. I know what you mean ...

    I learned a whole bunch more in life from screwing up than being successful ... but I prefer success..

    Glad to help ..

    I have the new one in the clamps drying .. I should be able to cut it into planks in about an hour..

    Round 2..

Posting Permissions

  • You may not post new threads
  • You may not post replies
  • You may not post attachments
  • You may not edit your posts
  •