Results 1 to 15 of 15

Thread: Spalted Maple with Feet

  1. #1

    Spalted Maple with Feet

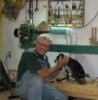
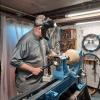
    This rough out warped a little more than I planed, but there was enough left to make a 1/8" bowl. This is about 10 1/2" wide and 5" tall. It is finished with Danish oil and Beall buffed. I have been admiring the carved feet that I have seen online and decided to give it a try. I'm happy that I didn't destroy the bowl trying to do it.

    sp-maple4304.jpg
    sp-maple4308.jpg

    C&C welcome.

  2. #2
    Join Date
    Nov 2007
    Location
    Fort Pierce, Florida
    Posts
    3,498
    Very nice Jim. I will agree, the first time you carve feet tends to be a bit of a tense period. Looks like you did an excellent job.
    Retired - when every day is Saturday (unless it's Sunday).

  3. Jim......you have a great form here! I really like the thinness of the bowl and of course the wood is a beautiful palette, but you did it justice! The feet give it nice lift. For your first time carving feet, you did pretty well! I have yet to put carved feet on one, but it is on my bucket list for sure!

    Thanks for sharing this........nice!
    Remember, in a moments time, everything can change!

    Vision - not just seeing what is, but seeing what can be!


  4. #4
    Join Date
    Dec 2010
    Location
    Republic, Wash. State
    Posts
    1,187
    Looks pretty fragile. Work like that could make one sweat. Allan.
    C&C WELCOME

  5. #5
    Join Date
    Dec 2011
    Location
    Pineville, KY
    Posts
    250
    Nice work. I have turned many bowls, but never tried any feet yet. How did you carve your?

  6. #6
    Very well done, this is a nice bowl. The wood is pretty also.
    _______________________________________
    When failure is not an option
    Mediocre is assured.

  7. #7
    Thanks for the comments and complements!

    Thomas, this is how I did it. I left a big enough foot when turning to have something to cut away. After laying out a triangle to locate the feet I sketched them on. I cut away the wood between the feet with a jeweler’s coping saw being careful to stay away from what I wanted to keep. The first cut was the most difficult for me, not just performance, but in commitment. For cutting out the waste between the other two I made a couple of relief cuts straight down to relieve binding on the coping saw. I have a rotary rasp that fit in a die grinder to further rough out the shape. Then I used hand files to further refine the shape and then sanded. I kept in mind what they say about making beads, to sneak up on the shape. There were some tools that I thought would work, but didn’t. I would suggest trying what tools you have and you will find which works best. Perhaps others have suggestions or methods to do this. I would appreciate their input too.

  8. #8
    Join Date
    Nov 2007
    Location
    Fort Pierce, Florida
    Posts
    3,498
    When I did mine, I used one of those things with a the wires held in a row to get the area inside of the foot as close to where I wanted it as I could. I used a micro motor to remove the waste after making the cuts with a modelers/jewelers saw.
    Retired - when every day is Saturday (unless it's Sunday).

  9. #9
    Join Date
    Feb 2008
    Location
    Central NC
    Posts
    492
    I'm admiring this bowl for several reasons, the shape and finish is very nice, the thinness works but the kicker are those feet. I really like how you angled/curved out the feet. The feet really elevate the quality of this bowl. A darn fine job on your first attempt!

  10. #10
    Amazing job indeed. I would just like to turn a thin bowl like that. The feet are a nice touch to an already spectacular piece. Beautiful work Jim!
    Being new to turning, it's just a reminder that there is no end to the different things and ideas that come from turning. You can turn 100 bowls and no two are
    going to be exactly the same. But you guys already know this, it's just new and exciting for me.

  11. #11
    Join Date
    Jan 2008
    Location
    Bangor, PA
    Posts
    1,853
    Jim,
    Adding feet to a bowl allows someone looking at the bowl to see the curve all the way to the bottom. The curve is interrupted when you leave the ring that the feet will be carved from making it difficult to visualize that curve correctly. You did a good job, especially for your first footed bowl. Just making a bowl 1/8" thin is difficult enough without the added difficulty of the foot ring and achieving the continuous curve. Great work.
    faust

  12. #12
    Join Date
    Sep 2008
    Location
    Gassaway, WV
    Posts
    1,221
    Nice job on the feet and the bowl. I have done a few with three feet to keep them from wobbling.
    Fred

  13. #13
    Join Date
    May 2010
    Location
    Ambridge, PA
    Posts
    968
    +1 and +2 on what everyone else has said Jim. You nailed this one and thanks for sharing.

  14. #14
    Join Date
    Dec 2011
    Location
    Pineville, KY
    Posts
    250
    Thanks for the instructions. I'll have to give it a shot sometime, but expect it to look as good as the one you did.

  15. #15
    Join Date
    May 2008
    Location
    Mountain Home, AR
    Posts
    547
    That's sharp Jim! That's nice wood, too. Can't beat art that holds soup I'll have to give that a shot soon. Seems like a great idea for those of us that tend to end up with the best grain on the bottom!

Posting Permissions

  • You may not post new threads
  • You may not post replies
  • You may not post attachments
  • You may not edit your posts
  •