beautiful slabs! I can say that I share you hand planing addiction


 Member
beautiful slabs! I can say that I share you hand planing addiction
[OP]
Moderator
John,
LMK how you'd handle the dyeing.
I have a love hate relationship with my router sled. It's tricky for me to set up perfectly, and I still require clean up for all the track marks. My jack and jointer planes are fast workers on easy wood like this walnut. More importantly, there's less thought; just go at it, and check, and go at it some more.
I'm more suited to the nibble and sneak up than measure twice, cut once.
Member
After seeing your past projects and then hearing about curly walnut; if the customer doesn't like the natural preview you give I would find some other walnut or even HD poplar , "espresso" it up and see what they think, maybe they don't have a clue and you could save that beautiful wood for someone that will appreciate it.There's some really nice curl in here.
 Contributor
Imo, I think you have to set yourself apart.Originally Posted by Prashun Patel

If you take a look at people who have deviated from the standard you have basically a very small group carving out names for themselves and people are still going to spend the biggest money at the most recognisable names because they have history.
The most interesting deviation IMO would have to be Chris Hall's Ming table, it is a 'slab' table in that it uses bookmatched bubinga slabs, but he does not do live edge or anything of that sort.
The customer could potentially care how the table gets flat if you allow them to understand the purpose for taking the approach that you are taking, the history behind it and the reason why it is unique. A hand planned finish is not an easy task to accomplish and that alone is worth something to a consumer in my opinion.
When it comes to live edge type slab tables you're going to have to create your own bases and they're going to have to be architecturally interesting and also unique.
Now how many people are turning out slab tables by hand with an architecturally interesting base...not many because it's a much rarer group.
Last edited by Brian Holcombe; 03-13-2015 at 12:28 AM.
Bumbling forward into the unknown.
 Contributor
Maybe time to get some new slabs more suitable for espresso and save these beauties where they can really be appreciated
[OP]
Moderator
Brian, I'm shy to show you the base she's picked. It's just two slabs (18" wide) joined by an upper stretcher. Something like this.
However, she is partial to a standing desk, so I'm uncertain how monolithic this may look.
I'm looking at this as a challenge though. I might be able to do something subtly creative where the stretcher meets the legs. I'm also thinking to split one side near the bottom to mimic the split on the top.
I suggested trapezoidal sides (tapering narrower to the floor) , but I'm kind of glad she voted against that. I mean, I feel like most of these tables are poor Nakashima knockoffs as it is.
Started work on the 2nd slab this morning. Gotta say, My old Bailey jack has a special place in my heart. It still has the original blade, and I can't even remember how I obtained it. The screws don't quite sit well, so the handle jiggles loose frequently, but he just works so reliably. One thing I really love (ironically) is that the mouth does not eject shavings as efficiently as my LA jointer and LA jacks do. This means when I'm doing the messy scrub work - especially across the width - the chips just collect in the cavity above the mouth. After about 5 strokes, I just empty it into a drum next to the bench. It keeps things so neat and tidy (relatively speaking), and adds a nice rhythm to my work. It keeps me from fatiguing and makes me think and assess more frequently than I probably would.
Anyway, these drums of spent shavings are a thing of beauty to me. I'll fill probably 4 of these.
Last edited by Prashun Patel; 03-13-2015 at 9:21 AM.
Contributor
Prashun, there's no magic to what I've done dying walnut. Sand to 320 grit, raise the grain, knock off the whiskers, and then flood on whatever color Transtint you like. I've never had problems with walnut blotching so this is the process I use. After it dries I topcoat with whatever finish I like. In your case, you could go directly to your Waterlox. Try it on some scrap and see what you think. To me, the depth is comparable to BLO on walnut but you can adjust the color to anything you want, with control.
John
 Member
I do agree working to client's expectations - often very different from real world possibilities - make profitability tenuous. Working for friends who are likely also expecting a "friend discount" only adds to the sacrifice to your craft. Good luck with that. You have some beautiful stock and as we have all seen, you are more than up to the challenge. Your craftsmanship/art should not be subjected to catalog shopper mentality. I hope this is a really good friend.
+1 to transtint dyes - allows you to direct the color to whatever level and will be less expensive than multiple trips to Starbucks
"... for when we become in heart completely poor, we at once are the treasurers & disbursers of enormous riches."
WQJudge
Contributor
IMO, I wouldnt encourage a split in the legs simply to repair it.
Keep in mind, and hopefully this will help to inspire thought; The joining of slab table to an architectural base is similar to the effect of utilizing 'peeled bark' beams in timberframe, and quite frankly thats what I expect inspired the early slab tables.
The rustic element of the peeled post is joined very gracefully into an otherwise very rational structure. In temple carpentry it may be a single beam like this or a handful of similar beams which work in this fashion. It is a fine dance that the carpenter performs as he incorporates these elements into the structure.
I think you may find that the stretcher must be lowered from the top to create a fully secure base. A half lap joint along the top of the base will be fighting a great deal of leverage and will loosen over time. You'll likely find you need to use a combination of both a stretcher at the top and away from the top. Infact I would use two across the top and half lap battens into them.
You can also tenon the top of those legs and that will have an impact as well.
Working with friends also allows you to request greater artistic license. I take on 'friend projects' if I'm allowed the completely stretch my wings in everything from material selection to how it sits in the room.....like a sort of unpaid Dictator of Aesthetic.
Last edited by Brian Holcombe; 03-13-2015 at 11:31 AM.
Bumbling forward into the unknown.
[OP]
Moderator
Got a little workout at lunch today.
Contributor
Coming along nicely!
Anyone who has not seen what a heavy cambered jack plane can do should take a close look at this.
Bumbling forward into the unknown.
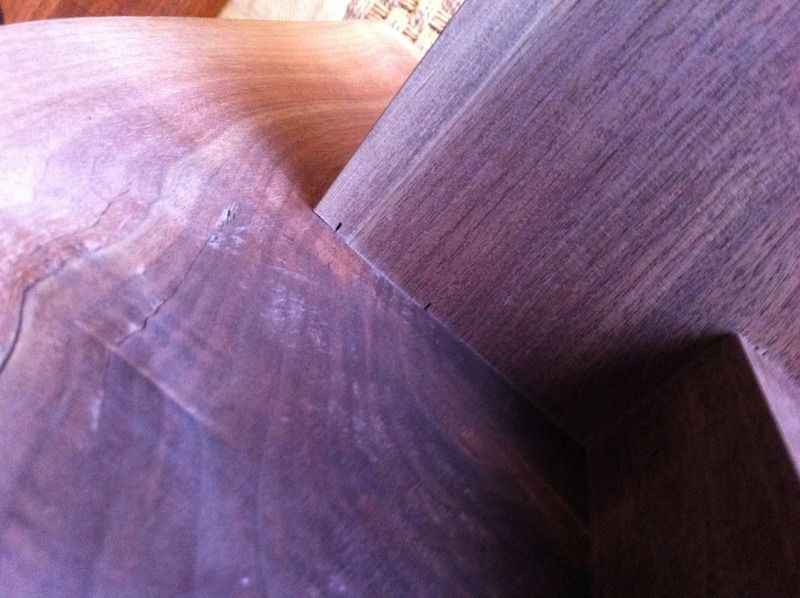
Contributor
If I'm prattling on about this too much just let me know;
Here is what I'm talking about when I say tenoning the base into the top;
Those overcuts are where the tenons are.
Bumbling forward into the unknown.

 Moderator
Such beautiful material...and a wonderful project. Tough one on the dye thing...managing the customer's expectations vs what is "woodworker's morality" is sometimes a challenge!
--
The most expensive tool is the one you buy "cheaply" and often...
[OP]
Moderator
I did the unthinkable today.
When flattening the back sides, a crack opened up on one of the pieces the entire length of the board. These slabs are right through the pith; nice quartersawn grain on both sides, but right through the pith.
I am grateful this appeared early on. And honestly, I wasn't comfortable with the pith in there. I've "pithed" away many a turning blank that contained the pith. I didn't want to take a chance on this top cupping after the fact.
Further, the combined width was 42", but the finished desk is to be 30" wide.
So, I ripped these down the middle and trimmed out the pith from each board. I am down to about 38" now, and trying to figure out how to preserve that sap in the center. the boards bevel in the opposite directions, so preserving that line comes at the sacrifice of a full mating surface for gluing. I'll trim a little of each side until it feels about right.
On one hand I hate to do it; on the other, the whole thing will likely be more stable long term, will be easy to man-handle. Besides, the challenges are what make things fun, right? right? Please? Anyone?
Last edited by Prashun Patel; 03-18-2015 at 6:29 PM.
Contributor
Well, better that it happened now. I was wondering how stable they were going to be when I ready in an early post that the slabs contained the pith. That's never good so I think it's actually a good thing that it happened while you can more easily deal with it. Personally, I'd rip the sapwood out of the middle, too, and leave it only at the outer edges. I know I might be in the minority in that regard - but that's my honest feedback. That allows you to glue up the top with full thickness at the joints and keeps the sapwood drama at the outer edges. But if you've just got to have that sapwood in the middle, how about leaving it ALL there, leave a gap between them, and join them from underneath? No bow ties, please. You could run big sliding dovetail cross members underneath to hold all the boards flat, and pin them near the center leaving whatever gap looks good. Sure, stuff will fall through unless you put a spline in. So use a spline if that's a problem.
John
 Posting Permissions

 Reply With Quote
