Hi All.
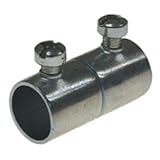
I've purchased several handless tools and I like the notion of being able to remove the tool from the handle. Although the Hosaluk inserts are nice they are pricey. I have plenty of scrap wood to make handles and I was wondering if I could simply use something like this as the coupling mechanism??
I can source these from HD or Lowes and are dirt cheap....not pretty, but cheapI was planning on turning handles that would use a traditional copper ferrule. Instead of the copper ferrule I would epoxy this in place and use a screw that would reach the tool shaft and lock it ion place
Thoughts??
TIA
George

 Reply With Quote