Results 1 to 15 of 15

Thread: Which tool for handle shaping?

  1. #1
    Join Date
    Jan 2014
    Location
    Loveland, CO
    Posts
    418

    Which tool for handle shaping?

    I've started working on my first woodworking project, a pair of mallets. My question is: which tool should I use to shape the handles for the mallets? Spokeshave? Drawknife? Rasp?

    I imagine this is a fairly basic question, but I'm just not sure. And any of those tools would need to be acquired, so I want to ensure I purchase what I need to do the job properly.

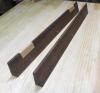
    In case it matters, I'm making one handle from walnut and the other from hard maple.

    Thanks!

  2. #2
    Join Date
    Dec 2003
    Location
    Hutchinson, MN
    Posts
    600
    Unless you have drawknife skills like Curt Buchanan, I'd start with a spokeshave and fine tune with a fine rasp.

  3. #3
    Join Date
    Nov 2009
    Location
    Delaplane, VA
    Posts
    117
    Eric,

    I'm in the middle of re-making a mallet handle at the moment out of walnut (I didn't like the shape of my first attempt). I started with a rectangular blank and cut the joinery for the head. Then I cut the larger contours (sweeping curves) with the band saw (you could use a coping saw), used a block plane to break the corners and a rasp to refine almost to the final shape. From there a little sanding and you're ready for finish.

    You could certainly use a spoke shave instead of a block plane, or even skip those and just go from coping saw to rasp. It all depends on the tools you have available or want an excuse to purchase. This project was my excuse to purchase an Auriou half-round rasp, and I have no regrets about that, it's magnificent.

    Unless you are making one big mallet / commander I think a drawknife would be too crude a tool, but I say that as one who has NOT mastered the drawknife.

    For mimimum set of tools if you have saws to break down the stock into a rectangular blank you could get by with just a good rasp from there. A coping saw makes life easier if there is significant wood to remove in the curves.

    I'm no expert but I hope that helps.
    Last edited by Dan Duperron; 04-14-2015 at 5:06 PM.
    -Dan D.

    Ray's rule for precision:

    Measure with a micrometer, mark with chalk, cut with an axe.

  4. #4
    Join Date
    Jan 2014
    Location
    Loveland, CO
    Posts
    418
    Dan and Bruce, thank you for the advice!

    I have the handle material already in a rectangular form, ready to shape into something more comfortable. It sounds like a half-round rasp would be a good addition to my kit, and I think I saw a couple of them at a flea market nearby. I don't think I'm removing enough material from the handle to really bother with the coping saw, though it may make the process a little bit quicker.

    I'll also keep my eyes peeled for a spokeshave. I assume a convex sole would be best in this application?

  5. #5
    Regular 8 -10 inch metal file can also work in a pinch

  6. #6
    Join Date
    Aug 2013
    Location
    Princeton, NJ
    Posts
    7,298
    Blog Entries
    7
    I've roughed out spokes and tapers with a wide paring chisel then refined with a spokeshave. Must be careful to avoid runaway splits however.
    Bumbling forward into the unknown.

  7. #7
    Join Date
    May 2013
    Location
    Johannesburg, South Africa
    Posts
    1,076
    Watch this short series from Paul Sellers. I recall he shapes the handle in the last one. No fancy equipment needed.

    Part 3.
    "If you have all your fingers, you can convert to Metric"

  8. #8
    Join Date
    Jan 2014
    Location
    Loveland, CO
    Posts
    418
    Thanks for the video! I'll have to watch it tonight.

    I can definitely attest to splitting wood. The walnut I'm working with has a serious habit of splintering, particularly if you're planing or paring against the grain. That stuff will just tear right out and leave chunks missing, if you're not careful.

    Is that typical of most larger-grained or porous woods?

  9. #9
    Join Date
    Aug 2009
    Location
    'over here' - Ireland
    Posts
    2,532
    Guess a lot depends on the complexity or not of the handle shape. My experience in working up 3D shapes (plugs for moulds for model aircraft) is that if you want very accurate cross sections is that it can be helpful to to work the shape up by degrees.

    As in lay it out in plan and side elevation (square section), and cut to those lines with a bandsaw. Then figure and mark out 4 planes at 45 deg or whatever angle works at each corner to just clip (a shade above) the required finished profile at a tangent - a spokeshave and block plane can work well to remove that. Consider using a bandsaw if there's a lot of material to come off and you're confident in your skills and safety - freehanding Maloof style is risky and not good practice. The flat ends on a mallet handle will make it much easier than other more complicated shapes. Next figure and mark the 8 planes on the new corners, again at tangents to the required profile and remove that material. Depending on the size of the piece it's either repeat again or then switch to either sanding blocks or a finely set block plane/spokeshave to start fairing/blending in the shape.

    It's perfectly possible to eliminate all the marking out and just start shaping by eye, but if the shape is more complex it can be hard to deliver an accurate profile/cross section for want of places to reference from...

  10. #10
    Join Date
    Jan 2005
    Location
    Milton, GA
    Posts
    3,213
    Blog Entries
    1
    Check out Glenn's tools at Wood Joy Tools. Glenn makes some of the best spokeshaves. The Livingston and No. 85 Razor can be adjusted for mouth opening and depth of cut, which makes them a couple of the most versatile spokeshaves available. Glenn also makes nice drawknives, bowsaws, layout tools.....A spokeshave like the Livingston or No. 85 is a great tool that can do lots of different jobs which makes them a great tool for a new woodworker. A spokeshave like the two mentioned are sort of between a draw knife and a plane. Learning to use one is not hard and is a good path to start learning hand tool skills that will apply to several other tools. These tools do not make the dust that other tools may make and pollute the air with.

  11. #11
    Join Date
    Jan 2014
    Location
    Loveland, CO
    Posts
    418
    Mike, the spokeshaves at WJT look very nice. Thank you for the recommendation! I'm not sure I can afford to spend that much, right now. But, I will certainly keep them in mind, as I acquire more tools and gain experience.

  12. #12
    Join Date
    Jan 2005
    Location
    Milton, GA
    Posts
    3,213
    Blog Entries
    1
    Eric, Glenn also offers a great deal on a kit for making a spokeshave. Most of the work is actually done, other than shaping the handle ;-)

    The other tool that I might suggest that is not too expensive is the Iwasaki "Milled Tooth" files, available from Lee Valley or Highland Woodworking. They are much more reasonably priced than the Italian or French hand made files and I actually prefer them for most work. These files remove wood in more of a shaving form vs saw dust. If you bought a couple of these you could make your own spokeshave... handle. The Iwasakis come in many different sizes and shapes. I think you will find that the fine or x-fine files will work as fast for you as the coarser versions. There are even bent shafts available now, great for making/refinishing tool handles.

  13. #13
    Join Date
    Jan 2014
    Location
    Loveland, CO
    Posts
    418
    That's actually humorous! I could buy a kit and shape a handle...so that I can then shape a handle. I was just thinking as I read your post... "Would I need a spokeshave so that I could finish the spokeshave??"

    I'll check out those files. They sound like they'd be very useful, so not a bad item to add to the tool chest (once I build one...). They seem very similar to rasps, but with a different style of cutting edge.

  14. #14
    Join Date
    Mar 2015
    Location
    SE Michigan
    Posts
    3,225
    Eric, I just created my first mallet as well. The handle was made from gluing up 3/4" walnut. I stuck it in a vise and just went at it with a rasp, a couple of files, and some sandpaper. Not perfect, but perfectly usable. I'd rasp a bit, then grab it to see how it felt, then rasp some more. I left the end a bit larger, and left the head side square. One bit of advice, go easy if you use a rasp like mine shown in the picture...it can leave some serious grooves.

    As someone said on here, "no need to fret, just get after it" or something like that. It was all scraps and cut offs from other projects, so what the heck. It was a fun and didn't cost a penny.
    Mallet.JPG

  15. #15
    Join Date
    Jan 2014
    Location
    Loveland, CO
    Posts
    418
    I snagged a Stanley 151 spokeshave from eBay. I figured it was the best tool for the job, so it was worth the small investment. Got it sharpened up and "got after it"!

    Last night I used the spokeshave to do most of the shaping, tapering to light cuts to smooth things over. Then I finished up with a metal file to eliminate the edges of the cuts and smooth everything out.

    It's not the prettiest mallet, but it's functional, solid, and feels pretty good in my hand. And I learned quite a bit in the process. Just a few of those things include:


    • My bench sucks. My vise sucks. But I can make do with them and still do halfway decent work.
    • Making a mallet isn't that hard. But, making a PRETTY mallet takes real skill and precision.
    • I've learned to spot reversing grain. (Found it in my walnut...drove me nuts and really liked to tear out chunks, if I wasn't careful.)
    • Use the right tool for the job. It will make everything easier.
    • Wedges... don't use wide wedges. They should be thin. As I pounded my wedges in, I heard a bit of cracking with one of them.
    • Tapered mortise... even though I only set my sliding bevel for a couple degrees, it was wider than necessary, causing the cracking I heard when driving the wedges. Use less taper. You don't need much.


    I also got some practice with sawing straight lines (not as easy as I expected!) and paring the shoulder of the handle with a chisel. All-in-all, it turned out to be a great first project, and I'm proud of it. Just need to wipe some oil into it and it'll be all done.


Posting Permissions

  • You may not post new threads
  • You may not post replies
  • You may not post attachments
  • You may not edit your posts
  •