Results 1 to 15 of 15

Thread: Got a New Plane Today

  1. #1
    Join Date
    Aug 2013
    Location
    Renton, WA
    Posts
    228

    Got a New Plane Today

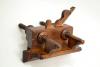
    Well it is not new but you know what I mean. These pictures are not the greatest but they will give you an idea. I have a question about the threads. One side seems to move easily and the other seems a little tight. It seems like they are dirty on the one side. Am I going to cause a huge problem if I try cleaning them with a little mineral spirits? One of the washers is cracked but repaired and seems to hold fine under the pressure of planing. Yea it is not a collectors item but a user for me. It has 7 blades and so far they work. I haven't had time to try them all.
    Attached Images Attached Images
    Last edited by Chuck Hart; 06-03-2015 at 11:32 PM.

  2. #2
    Join Date
    Jul 2014
    Location
    Edmond, Oklahoma
    Posts
    1,753
    Hi Chuck,

    The threads don't look like they need to be cleaned, from what I can tell from the pictures, but that doesn't say anything about the threads on the inside of the adjusting nuts. If you decide to clean them with a solvent, I would go with paint thinner instead of mineral spirits though.

    Paint thinner has a lower boiling range than does mineral spirits, and as such will evaporate more quickly from the threads. Make sure you keep it away from any finish on the plane. Paint thinner is not terribly aggressive toward many finishes, say compared to acetone or MEK, but it can soften and degrade finishes given a little time, so be careful with it.

    One thing to watch out for is that the wood will absorb some of the paint thinner, and can/might cause some swelling and softening the wood a bit temporarily, so don't try to test anything until the wood is completely dry, and I wouldn't be in a hurry to try it. It might also cause a bit of surface frizzing of the wood, so watch that. Wait plenty of time for it to dry. A careful smell test is a good way to detect trace amounts of the thinner still being present. I would wait a minimum of 24 hours to make sure it is dead dry. (That's why I recommend paint thinner instead of mineral spirits, it will dry faster and more completely.)

    The paint thinner is likely a slightly better solvent than is the minerals spirits also.

    One other potential concern has to do with the nature of the wood used for the threads and adjusting nuts. If these woods are highly resinous woods like teak, the wood may have been chosen because the oily resin can help lubricate the threads and nuts when the threads move against each other. A solvent like paint thinner or mineral spirits can strip the oily resin out of the surface of the threads and do more harm than good, in the long run.

    Stew
    Last edited by Stew Denton; 06-04-2015 at 12:53 AM.

  3. #3
    Join Date
    Jun 2013
    Location
    Neither here nor there
    Posts
    3,846
    Blog Entries
    6
    Very nice score! I say no solvents at all. You have some damaged threads in that closeup image. It looks like not just chipped but the threads are compressed where they narrow the gap in the groove. It might work itself out just screwing on and off a few times. Use a candle to lubricate it by rubbing on the threads.

    A solvent could loosen the finish and turn it gummy, making matters worse.

  4. #4
    Join Date
    Aug 2013
    Location
    Renton, WA
    Posts
    228
    Thanks Stew, paint thinner didn't occur to me. Getting the threads wet and swollen was my concern. Here is what the seller said about the wood "This plane was made by Barton in Rochester. It's a beech screw-arm plow with apple arms, nuts, and washers." I think the apple screw may be dirty on the inside I will take it apart and look. Everything else moves easily. I needed (wanted) a plow plane and just liked this one.

  5. #5
    Join Date
    Aug 2013
    Location
    Renton, WA
    Posts
    228
    Quote Originally Posted by Malcolm Schweizer View Post
    Very nice score! I say no solvents at all. You have some damaged threads in that closeup image. It looks like not just chipped but the threads are compressed where they narrow the gap in the groove. It might work itself out just screwing on and off a few times. Use a candle to lubricate it by rubbing on the threads.

    A solvent could loosen the finish and turn it gummy, making matters worse.
    The wax worked wonders. The more I thought about it the more I liked your idea and sure enough the washer just spins like new. Thanks for the good advice

  6. #6
    Check the nuts out carefully Chuck. It is common on old screw arm plow planes for the nuts, and to a lesser extent, the threaded arms to get out of round as the wood dries and ages. Additionally, the nuts can also shrink. Remember that they often didn't dry woods to the level we do today.
    Dave Anderson

    Chester, NH

  7. #7
    Join Date
    Aug 2010
    Location
    USA
    Posts
    5,582
    Hey Chuck,
    Do you have a picture looking at this plane from an end view? I am confused by the location of the fence with respect to the plane body and cutting edge

  8. #8
    Join Date
    Jul 2014
    Location
    Edmond, Oklahoma
    Posts
    1,753
    Hi Chuck,

    I am glad the wax that was suggested by Malcolm worked. I didn't say it earlier, but that plane is beautiful, I'm glad you like it, and I can see why you like it! Getting it to work better like you are doing makes it even better.


    I don't have a wooden plow plane, but have dug out my old Stanley 45, and hope to clean it up a bit, sharpen the irons and use it for a plow plane.

    At any rate, very cool plane.

    Stew
    Last edited by Stew Denton; 06-04-2015 at 8:17 PM.

  9. #9
    Join Date
    Aug 2013
    Location
    Renton, WA
    Posts
    228
    Quote Originally Posted by Pat Barry View Post
    Hey Chuck,
    Do you have a picture looking at this plane from an end view? I am confused by the location of the fence with respect to the plane body and cutting edge
    Sorry Pat no I don't. The blade rides on the metal fence with a groove to hold the blade straight you can see that in the first picture. The third picture shows the fence sitting lower than the rest of the plane.

    Chuck

  10. #10
    Join Date
    Aug 2013
    Location
    Renton, WA
    Posts
    228
    Stew,

    I have all the parts and pieces of a very old 45 but have never spent the time to put it together. I probably will end up selling it someday soon. This plane just caught my eye and I needed it. ...ah wanted it

  11. #11
    Join Date
    Aug 2013
    Location
    Renton, WA
    Posts
    228
    Quote Originally Posted by Dave Anderson NH View Post
    Check the nuts out carefully Chuck. It is common on old screw arm plow planes for the nuts, and to a lesser extent, the threaded arms to get out of round as the wood dries and ages. Additionally, the nuts can also shrink. Remember that they often didn't dry woods to the level we do today.

    Thanks Dave. It is a fairly old plane and I did check all the nuts and washers before I got the plane. One washer was cracked and repaired and you can see the chips in the screw arms. Everything screws off and on easily. I am going to let it sit for a week or so to acclimate to my shop then I am going to start using it carefully until I am confident it will work well. I didn't buy it to sit on a shelf if you know what I mean. I am going to have to learn how to get the fence aligned. The only way I know to get it straight is to count threads but I hope to get good with it. Like anything you have to learn its secrets. Thanks again Dave

  12. #12
    Join Date
    Jul 2014
    Location
    Edmond, Oklahoma
    Posts
    1,753
    Chuck,

    You might look on Youtube for videos for the Stanley 45. It will do a lot of stuff, not as well as the individual tools, but a lot of stuff. Until I have more of the dedicated tools my plan is to use my 45 for several things.

    Stew

  13. #13
    Quote Originally Posted by Chuck Hart View Post
    I am going to have to learn how to get the fence aligned. The only way I know to get it straight is to count threads but I hope to get good with it.
    Hey Chuck,

    I have a screw arm plow. I have never counted threads; I just measure with a combo square from the far side of the skate. Measure at the front and back of the plow and adjust until both measurements are the same. I think this is far more accurate than trying to count threads.

    IMO, people make way to much fuss about wanting a plow that always stays parallel. It isn't that hard to adjust a screw arm (or wedge arm) for parallel. I seriously doubt that the added weight and complexity of mechanisms that maintain parallelism are worth it.

    Your plow looks really nice. I have not seen that type of depth stop on a screw arm before, only on wedged or Yankee plows. I'm curious to know if there is a steel or brass foot pinned to wooden stem.

    Good luck with your plowing!
    Last edited by Steve Voigt; 06-08-2015 at 10:38 AM.
    "For me, chairs and chairmaking are a means to an end. My real goal is to spend my days in a quiet, dustless shop doing hand work on an object that is beautiful, useful and fun to make." --Peter Galbert

  14. #14
    Join Date
    Sep 2007
    Location
    Longview WA
    Posts
    27,501
    Blog Entries
    1
    Quote Originally Posted by Chuck Hart View Post
    I am going to have to learn how to get the fence aligned. The only way I know to get it straight is to count threads but I hope to get good with it. Like anything you have to learn its secrets.
    An easy way to set the fence on most planes is to use wooden gauges. It may need to have a notch or hole to clear the blade.

    Mine are made for two dimensions, 3/8" and 3/4 inch are on the same piece about 6" long. The 1/2" and 1" are on another piece. There is also a 7/16" X 7/8" gauge.

    There are a lot of other dimensioned strips of wood in my shop. They all are handy for such purposes.

    These cover most of my needs for setting plane fences and other set ups.

    On my last project they came in handy for lining up the KregŪ introductory one hole pocket screw set up.

    jtk
    "A pessimist sees the difficulty in every opportunity; an optimist sees the opportunity in every difficulty."
    - Sir Winston Churchill (1874-1965)

  15. #15
    Join Date
    Aug 2010
    Location
    USA
    Posts
    5,582
    Quote Originally Posted by Chuck Hart View Post
    Sorry Pat no I don't. The blade rides on the metal fence with a groove to hold the blade straight you can see that in the first picture. The third picture shows the fence sitting lower than the rest of the plane.

    Chuck
    I found a random image of a plow plane that looks very similar to yours with a quick google search:
    plowplane.jpg

Posting Permissions

  • You may not post new threads
  • You may not post replies
  • You may not post attachments
  • You may not edit your posts
  •