Results 1 to 11 of 11

Thread: Love & Hate: Jessem Doweling Jig

  1. #1
    Join Date
    Jan 2011
    Location
    Fort Worth, TX
    Posts
    290

    Love & Hate: Jessem Doweling Jig

    Bought the Jessem doweling jig (The newer model) with the 1/4", 3/8", 1/2" inserts. I do restoration work on pinball cabinets and there is always a torn off edge that needs repaired. As in this case, the head of the machine was ripped off, so I routered a nice straight line into the cab, used the jig, and replaced that piece perfectly flush. After a few more patches, like that round dowel i had to lathe and plug, some putty, and a complete repaint job, it turns back into a perfectly new machine.

    cabpatch.jpgcabfin.jpg

    Now onto my issues.

    First issue off the bat. That job above was 1/2" thick piece of wood, so i used 1/4" dowels. But oops, the jig wont let me even though there is a mark for 1/4" As you can see in circle red, the alignment tab on the jig was cnc'd too long. Customer service was quick and nice and expressed a new part to me. Weirdly they said they hadnt caught this before... WEIRD. So they sent me another one of those pieces where you can see fresh aluminum has been shaved off. No annodizing so i guess they werent kidding about not having any in stock that werent like that. Quality control errk. Shocked since Jessem produced such nice products.

    2015-08-05_22.06.47.jpg211736.jpg


    So now that i can put it on the 1/4" mark, I put it on the mark and tightened down. Hmm.. I notice a gap. When i looked closer its being caused by the male alignment plugs are not fully seating into the female holes. either the plugs are too big or the hole is too shallow. This causes the alignment top to teeter totter just slightly on those plugs. When i drilled my first hole I noticed the jig flexed, and it was caused by this. Called customer service back, and had to wait a week this time for a response cause it was sent to the engineer. They finally came back and said that was how it was designed. Hmm... I emailed back and said that was strange cause it flexed.. but got no response. All well.


    20150818_190055.jpg

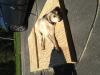
    Last issue I had in using the jig for my purposes, which granted is not the conventional usage of this jig, was that this newer version of the doweling jig has a curved inside plate where the clamp goes to secure the wood. As you can tell in the picture, the only clamp i could get to work was a tiny C Clamp. I really needed the clamp in the very corner, but since its curved, you can only clamp on the flat spot. Im guessing this was done to make the aluminum stronger, but now makes it very difficult to clamp the wood for my uses. Strangely enough the old jig doesnt have that curve issue. Or the alignment tab issue if i remember right.

    jessem3.jpg

    So while my first use of it was mostly a success it wasnt without some issues, and also the joint was very difficult to close with the dowels after glue. I had to use many clamps and wrench down those clamps which blew out one section of the wood to close the joints. Was it because of the teeter tottering jig? Maybe. was it cause the drill bit they sent was .002 smaller than 1/4" Maybe. Did my dowel that was measured .25 expand too quick when glue touched it.. maybe.

    Unfortunately after a 200$ purchase, Im not fully satisfied. Mostly happy with Customer Service. Would still recommend their products to people as they make great stuff, this one just has some issues and was shocked by the simple Quality Control issues that should have been tested and noticed before apparently many many went out the door.
    -------------------------------------
    Adrian Anguiano

    "For I know the plans I have for you," declares the LORD, "plans to prosper you and not to harm you, plans to give you hope and a future". Jeremiah 29:11

  2. #2
    Join Date
    Apr 2008
    Location
    River Falls WI
    Posts
    490
    I have this jig and haven't had this issue yet. My problem was on stock thickness. The first time I used it on 2x4, which did not match current stock. It was from the 60's. After that I made sure to measure the stock and the jig to calculate my settings. For the gap you had first, I would have used a shim of material to create the offset. You might look up Bill Huber's review of why he likes the other jig. Several people just do custom jigs for their projects
    In this case that might be the best route. Good luck moving forward. Dan

  3. #3
    Join Date
    Jan 2011
    Location
    Fort Worth, TX
    Posts
    290
    Having to use a shim because the product won't register on the mark it was designed to is a fail to me. I used Bill's jig which encouraged me to buy this, I was scared they would discontinue the other and no longer supply parts if something failed. But now I may get it.

    I thought of a custom jig but with so many dowels i was scared of anything besides a super accurate jig. And this worked better than others in my case since it registered off a face so I know if attaching to cabinet side the new piece no matter thickness I choose will be flush.

  4. #4
    Join Date
    Nov 2014
    Location
    West Granby CT
    Posts
    777
    I thought Bill loved this Jig?

  5. #5
    Join Date
    Jan 2011
    Location
    Fort Worth, TX
    Posts
    290
    He likes the older version. The paralign.

  6. #6
    Adrian,thanks for bringing this to our attention. I just received the master kit last week and was making some practice joints yesterday morning using the 3/8" kit and everything went great. I probably wouldn't have looked too close at the 1/4" kit until I was making a project from 1/2" stock. After reading your post this morning I see my jig has the same issues. I'll contact jessum this week. The teeter totter problem needs to be remedied or dowel alignment would be a problem I would think.

    Thanks again, Dave

  7. #7
    Join Date
    Jan 2011
    Location
    Fort Worth, TX
    Posts
    290
    David. It affects all kits on the 1/4" mark on the jig if yours has the problem.

  8. #8
    Yes, I understand but the 1/4" CL setting won't be used with a 3/8" or 1/2" bit or will it? The 1/2" would blow out and the 3/8" would only leave 1/16" wall thickness. This problem would most likely be found with a setup similar to yours using the 1/4" jig.

  9. #9
    Join Date
    Jan 2011
    Location
    Fort Worth, TX
    Posts
    290
    Quote Originally Posted by david derson View Post
    Yes, I understand but the 1/4" CL setting won't be used with a 3/8" or 1/2" bit or will it? The 1/2" would blow out and the 3/8" would only leave 1/16" wall thickness. This problem would most likely be found with a setup similar to yours using the 1/4" jig.
    Ahh true...

  10. #10
    My jig does not have these issues and works correctly at all settings. Your jig was not machined correctly. I suggest Jessem send you a new jig and have yours returned so they can sort out their problem.

    Should not be difficult to make a work around for clamping small pieces such as yours.

  11. #11
    OK. I e-mailed Jessum twice and got no response over a week so I called them last week and talked to Patty who said they had some problems with machining and offered to send me a new " reference/ clamping angle" which she assured me would fix the problem. I received the new part within the week and it looked just like Adrian's but mine locks down tight with no teeter totter and checks square to the main body of the jig. I haven't used it yet but I think it's good to go.

    I,d say Jessum's customer service is good if you deal with them by phone, forget about e-mail.

Posting Permissions

  • You may not post new threads
  • You may not post replies
  • You may not post attachments
  • You may not edit your posts
  •