


I just finished this small project in my house and figuredit was time someone made a new post in this carving forum, so here goes:
cor001.jpg
Weve been steadily refurbishing every part of our house,and this hallway was the last untouched part. The house isnt very wide, so the joists from a stairway infringed on the ceiling of this hallway. One was originally inside a wall, and the thicker one was made part of some strange, visible ceiling/ wall joint thing over the parallel stairway going downstairs. After doing some joiner-style carving on a box, I decided it would be a good way to make a decorative touch on these corbel-like spaces.
cor002.jpgcor003.jpg
If youre going to do this style of carving with a limited number of chisels and gouges, the first thing I recommend is that you make a radius board from the gouges you have. I did this by pressing the gouges into a scrap board at 90 degrees to the board and following the circumference around until it made a circle then running a sharp pencil in the cut so I could see it, followed by marking which chisel made the circle. With these circles, I then set my compass and developed the design on the first piece of wood, based on some sketches I had done. Apologies to Peter Follansbee who insists on not using a pencil, but I didnt want compass scratches all over my soft wood and the pieces are so small theres little room for error.
The wood I used was just BORG #2 white wood I chose a piece that had enough space between knots to get clean corbels and didnt have any sap pockets, center rings, warps or checks. It did take a bit of looking for the right board.
cor004.jpgcor005.jpg
Cutting this soft wood is easy, but you need to have very sharp tools, re-stropped often, to get clean cuts without soft grain crushing, especially in direct cross-grain cuts. I only used the mallet for v-tool work the rest was done with hand pressure. The v-tool should probably be used first to define straight lines, flowing curves,etc. doing it first protects the edges of the flowers and other tool cutcarvings from random cuts with the v-tool or snagging on your sleeve and chipping off (it happens). I did it both ways on the first piece, but did v-work first on subsequent ones.
cor006.jpg
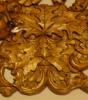
Most of this joiner-style carving relies on tool cuts for the outlines of the details. It isnt really carving as much as it is making simple cut shapes align into a design, then carving out around it to make a relief -a better name for this traditional decorative carving style might be tool mark carving.
cor007.jpgcor009.jpg
The flowers/ medallions were the most enjoyable part,figuring out how to combine v-tool and gouge marks to make different shapes. I studied a lot of antique furniture and P. Follansbeess designs online and also made up a few of my own before settling on a final series. If you look closely, youll see each corbel has one unique flower not shared on the others. This started when I had a chip-out on one while carving the second corbel, so I had to adapt to the different shape, then I thought it was interesting enough to keep doing it.
Cont'd

 Reply With Quote

