Results 1 to 11 of 11

Thread: Help me fix Grandma's Table

  1. #1
    Join Date
    Jan 2008
    Location
    Warren, MI
    Posts
    252

    Help me fix Grandma's Table

    Hi,
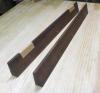
    My mom wants her mother's dining room table refinished so she can use it in her dining nook. It's old, and unfortunately spent a number of years baking in the Arizona desert. Many hours of work later, the top and leaves are glued back together and finished. I need help with the legs. They are laminated birch, and there are some cracks where glue has separated--but the cracks do not go thru, and are mostly solid. I think just from drying out. I have played a little with spraying some water on them--this seems to work at least temporarily to close up many of the cracks. Obviously need something more permanent. I don't think I really can get a lot of glue in there, and they don't really clamp shut. Don't think I can get a wood filler in there (and don't want to if I can avoid it). It seems I need something to just permanently swell the wood. Not sure what to use or do. Any refinisher's tricks out there?

    Legs.jpg
    "Any man who can drive safely while kissing a pretty girl is simply not giving the kiss the attention it deserves"-Albert Einstein

  2. #2
    Permanently swell the wood? I dunno ...... (I'll be interested to see other folks' opinions on this.)


    Probably the best bet really is to fill the cracks with epoxy, or a epoxy-type wood filler.

    Ideally it should be something that can slightly expand & contract with humidity, though since they are laminated legs, that may not be a huge problem. Hard to say.

    Such epoxies are expensive. I can't find my list of brands, but I know they are sold primarily to boat owners, so try one of those marine suppliers.

    Since these cracks are thin, a clear epoxy is better than trying to match the original color of the wood. (Note also that most "clear" and light amber epoxies darken considerably over time.)

    ---------------

    If you're Hell-bent on "permanently swelling the wood," then maybe some kind hardening oil?

    I'd worry about changing the color, though. Polymerized Tung Oil might be the best bet. Heat it up before applying, so it has the best chance of getting in deep. Maybe do the entire table with the stuff, so it all ends up looking the same at the end.
    Last edited by Allan Speers; 10-21-2015 at 9:58 PM.

  3. #3
    Join Date
    Jan 2008
    Location
    Warren, MI
    Posts
    252
    Well permanently swell the wood might not have been the best choice of words. The crack isnt wide enuf for wood filler, so i really just want some way to fill/close it up that wont be too obtrusive. I should mention its being finished in a fairly dark wlnut color, and its new home is in seattle where it has been for a year or two--plenty of moisture there so it should improve conditions for the wood.

    A thin epoxy might be just the ticket.
    "Any man who can drive safely while kissing a pretty girl is simply not giving the kiss the attention it deserves"-Albert Einstein

  4. #4
    Join Date
    Sep 2009
    Location
    Atlanta, GA
    Posts
    6,426
    Sanding dust from the legs, and medium-viscosity CA glue. Dust acts like a filler and color match.

    If the cracks are real thin, then thin CA - it will "wick" into the crack.

    You put the dust on it and go after it with sandpaper to work it in. I usually use activator also, but not required.
    When I started woodworking, I didn't know squat. I have progressed in 30 years - now I do know squat.

  5. #5
    Join Date
    Jan 2008
    Location
    Warren, MI
    Posts
    252
    Thanks Kent. Ill give this a try
    "Any man who can drive safely while kissing a pretty girl is simply not giving the kiss the attention it deserves"-Albert Einstein

  6. #6
    I have to disagree with Kent, (sorry, my brother!) and again warn to use only epoxy in a thin crack.

    The sawdust, once it's wetted by the glue, will be much darker than the exterior face of the legs and you will end up with a dark line that you can't easily get rid of.

  7. #7
    Join Date
    Sep 2009
    Location
    Atlanta, GA
    Posts
    6,426
    Quote Originally Posted by Allan Speers View Post
    I have to disagree with Kent, (sorry, my brother!) and again warn to use only epoxy in a thin crack.

    The sawdust, once it's wetted by the glue, will be much darker than the exterior face of the legs and you will end up with a dark line that you can't easily get rid of.
    My experience with this method has produced different results than has yours.
    When I started woodworking, I didn't know squat. I have progressed in 30 years - now I do know squat.

  8. #8
    Join Date
    Aug 2007
    Location
    Dickinson, Texas
    Posts
    7,655
    Blog Entries
    1
    I would consider making new legs. I don't have a lathe, but google "round replacement table legs". You may find something.

  9. #9
    Join Date
    Mar 2015
    Location
    SE Michigan
    Posts
    3,225
    If it's a really thin crack, you could try Kent's method, but using Watco. Wet the legs well with Watco, sand with 220 and work the slurry into the crack. Let dry a day or so, repeat with 320 grit, repeat with higher grits if necessary. After sanding the slurry, wipe excess off across the cack. This method does a great job of filling pores and may work well with thin cracks.

  10. #10
    Join Date
    Jan 2008
    Location
    Warren, MI
    Posts
    252
    Great ideas, tried most of them:

    -Turn new legs-not enough time, and the sentimental attachment of my mother pretty much rules that out--although I would readily agree fixing them isn't particularly the best solution.

    -Epoxy--watched several videos, the results are striking, but that's not the look I'm going for. Also, didn't have any, and not sure I really want to mess with tinting this time around.

    -Various glues: Titebond, Weldwood, and thick/thin CA, all with sanding dust, some without. Phil, I will probably try Watco now as well as I see your post, and I will be using it as a finish under poly.

    Results: Titebond shrinks too much, as does Weldwood, even with a second coat and packing in some dust. Too much water I think. Both CAs worked, but I think the thin does better in this case. My test piece is a piece of scrap with some handsaw kerfs for 'cracks'. I can easily see a different solution might work better in another situation, but the thin CA/sanding dust combo seems to be the ticket for me. Lowell, perhaps some irony here--I will be mounting the legs on a lathe to clean up the grooves and reshape repairs where chunks of wood have come out. To be honest, if it wasn't my mother asking, I would never have taken this on in the first place--I hate refinishing with a passion (second only to house painting....), and I doubt the table is financially worth it--however, my Mom is worth it, and maybe my sister too, since she will inherit this table.

    I filled the crack with sanding dust, then poured CA on it and while still wet, packed in some more sanding dust. When the CA dried, so did the sawdust, so it lightened back up again. after leveling the surface and sanding to 220, a coat of Watco makes the thin CA/sanding dust combo nearly disappear. It's the bottom "crack"

    smalltest.jpg
    "Any man who can drive safely while kissing a pretty girl is simply not giving the kiss the attention it deserves"-Albert Einstein

  11. #11
    Join Date
    Sep 2009
    Location
    Atlanta, GA
    Posts
    6,426
    Yeah - you hit on the bit I left out - I use this method on top of or in conjunction with finishing schedule - Clean up some Oh Dang errors, etc.

    Almost make the problem vanish - at least, to the eyes of anyone but me and you, for whom the blemish will shout loudly forever.

    Sounds like you solved the problem - that's all that matters. Good job.

    Plus - your test "cracks" seem to be much bigger than the actual ones - you might get the elusive unicorn: a perfectly invisible repair.
    When I started woodworking, I didn't know squat. I have progressed in 30 years - now I do know squat.

Posting Permissions

  • You may not post new threads
  • You may not post replies
  • You may not post attachments
  • You may not edit your posts
  •