Results 1 to 15 of 15

Thread: Wooden try plane

  1. #1
    Join Date
    Mar 2015
    Location
    Virginia
    Posts
    1,211

    Wooden try plane

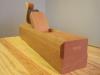
    I am very fortunate to be the new caretaker of a magnificent wooden try plane. There are no makers marks, but it has what looks like two generations of owners stamped on it. There are no cracks at all, and it really looks like somebody just pulled it out of a toolbox on the job site.

    IMG_0138.JPG

    IMG_0139.JPG

    I have a tremendous amount to learn about wooden planes, and am sure I will have lots of questions. Let's start with these.

    -The body seems to be in great shape. I have no idea what it is covered with, but whatever it is seems to have preserved it very nicely. It looks a bit like pine tar, but is not at all sticky. Is the best plan simply to leave it as is?

    -The tote is a tiny bit loose. I think I will just leave it and see if it tightens up as it acclimates. If it becomes a problem, were they generally just glued in? I do not see any signs of a mechanical fastener.

    IMG_0140.JPG

    The iron is a double iron made by Atkins. Both irons are really massive (compared to my Stanley irons), and tapered (both in width and thickness). Everything fits well, and I could not resist taking a few shavings even without sharpening it up. It is a little out of square, but there are no major issues that I can see.

    Any advice from the experts will be much appreciated!

  2. #2
    Join Date
    Sep 2007
    Location
    Longview WA
    Posts
    27,467
    Blog Entries
    1
    Nice looking plane. I am not sure what is all over the plane. I do know woodworkers of yesteryear would rub tallow and other things on their planes.

    My theory on this is, you can always remove the history of a tool tomorrow. There will never be a day when you can put it back.

    Maybe a wipe down with your favorite furniture polish would clean off any of the dirt particles and preserve the history.

    When you get it working, show us some shavings.

    jtk
    "A pessimist sees the difficulty in every opportunity; an optimist sees the opportunity in every difficulty."
    - Sir Winston Churchill (1874-1965)

  3. #3
    You can clean it with some mild soap and water, not too much, and a brush. Wax when finished cleaning. The dark color is normal.

    The tote is most probably glued in with hide glue. Anyone care to explain how to break the glue bond? Some hot water might do the trick. Use hide glue again to reattach it.

    Its a nice plane!

  4. #4
    Quote Originally Posted by Kees Heiden View Post
    You can clean it with some mild soap and water, not too much, and a brush. Wax when finished cleaning. The dark color is normal.

    The tote is most probably glued in with hide glue. Anyone care to explain how to break the glue bond? Some hot water might do the trick. Use hide glue again to reattach it.

    Its a nice plane!

    A hair dryer should do it.

    - but be careful to heat mostly just the tote, not the plane's body, so it doesn't crack.
    Last edited by Allan Speers; 01-31-2016 at 3:35 PM.

  5. #5
    Join Date
    Mar 2015
    Location
    Virginia
    Posts
    1,211
    Good thought. I thought about steaming, but thought I would think for a while longer before adding moisture to it. I'll give the hair dryer a try. What is the consensus on regluing it? I have Titebond, which is what I mostly use. Are the liquid hide glues (Old Brown glue for example) similar to the hot hide glues, or are they something else?

    I watched a video Paul Sellers did on restoring them. I don't think this one needs most of what he did, but the section at the end where he adjusts them was very helpful. Even without sharpening it yet, and my ham-handed attempts at adjustment, it can take a pretty nice shaving. I'll post a couple of pictures later.

  6. #6
    Looks like a nice plane, Nick. The tote is almost certainly glued with hide glue. Either heat or moisture will loosen hide glue, but a combination of the two is the most effective way. Steam from a kettle, for example.

    The problem is that unless you are experienced at hide glue repairs, you are almost certain to remove or affect the patina by applying steam. You might not like the appearance. So, I would leave it alone until it becomes so loose that you feel you can work it loose. At that point, you can gently clean up the mortise and tenon and reglue. Either hot hide glue or liquid hide glue (old brown or titebond brands) will work fine. I would not use regular titebond yellow glue; it will not stick to the old hide glue, and it will not be as easily repairable. Good luck!
    "For me, chairs and chairmaking are a means to an end. My real goal is to spend my days in a quiet, dustless shop doing hand work on an object that is beautiful, useful and fun to make." --Peter Galbert

  7. #7
    Join Date
    Mar 2015
    Location
    Virginia
    Posts
    1,211
    Quote Originally Posted by Steve Voigt View Post
    Looks like a nice plane, Nick. I would leave it alone until it becomes so loose that you feel you can work it loose.
    I am going to take your advice. I tried a little heat from a hair dryer last night, and it mostly made the tote tighten up, without getting anywhere near hot enough to affect the glue. This one is in good enough shape that less is more I think.

  8. #8
    Quote Originally Posted by Nicholas Lawrence View Post
    I am going to take your advice. I tried a little heat from a hair dryer last night, and it mostly made the tote tighten up, without getting anywhere near hot enough to affect the glue. This one is in good enough shape that less is more I think.
    Sounds good, Nick. I should add, it's been insanely dry here in VA lately--yesterday was the first time in 2 weeks I've had the humidifier off in my shop. Once we we get closer to spring, that handle will probably tighten up considerably and be good to go until next winter.
    "For me, chairs and chairmaking are a means to an end. My real goal is to spend my days in a quiet, dustless shop doing hand work on an object that is beautiful, useful and fun to make." --Peter Galbert

  9. #9
    If the heat didn't work, maybe you can get a little Gorilla glue in there with a hypo needle, & be vigilant to remove any excess that foams up. Could be wax or other finish in there, though, but it's worth a try.

  10. #10
    Join Date
    Oct 2006
    Location
    Washington, DC Metro Area
    Posts
    244
    Quote Originally Posted by Allan Speers View Post
    If the heat didn't work, maybe you can get a little Gorilla glue in there with a hypo needle, & be vigilant to remove any excess that foams up.
    I think it's best to avoid using modern repair materials on an antique tool. I feel the same way about antique furniture.
    Mark Maleski

  11. #11
    Join Date
    Jun 2008
    Location
    Charlotte, MI
    Posts
    1,524
    Quote Originally Posted by Mark Maleski View Post
    I think it's best to avoid using modern repair materials on an antique tool. I feel the same way about antique furniture.
    I agree with Mark. It will be fine until it works loose enough to easily remove the piece, at which point it can be properly repaired with hide glue.
    Your endgrain is like your bellybutton. Yes, I know you have it. No, I don't want to see it.

  12. #12
    Join Date
    Jan 2009
    Location
    Williamsburg,Va.
    Posts
    12,402
    DO NOT put WATER on that plane unless you want to wash off the old dried TALLOW(which is what the dark stuff is). Many years ago I had to use an old wooden brace in the rain. The rain completely washed off the old,dark patina. I did not like the looks of the brace after that happened. Looked too "fresh". And,once that happens,you can't put it back on as it takes many decades for the tallow to completely dry. Well,I suppose you might try wax based SHOE POLISH,but that's the only thing I can think of.

    To remove the handle once the old hide glue completely gives up the ghost,pry the handle BACKWARDS to remove it. The mortice that the handle is set into slants a few degrees forward,and it is impossible to pull the handle out when pushing the plane in the normal way when you're planing. Pretty neat little joint. You will know when the old glue has failed because there will be a little looseness in the handle. Then,pry it out backwards carefully. If you need to add a bit of water when the plane handle is partially pulled loose,you may,with a hypodermic needle,but keep the water off of the tallow. Wipe it off INSTANTLY if you get some on the tallow,or you will have a pink,fresh wood looking area around the handle's base.

  13. #13
    Join Date
    May 2009
    Location
    houston tx
    Posts
    652
    Quote Originally Posted by Allan Speers View Post
    If the heat didn't work, maybe you can get a little Gorilla glue in there with a hypo needle, & be vigilant to remove any excess that foams up. Could be wax or other finish in there, though, but it's worth a try.
    If it was me I wouldn't get gorilla glue within 10 feet of that plane. Maybe a little BLO in the gap to help the wood swell. a small amount of BLO won't cause permanent damage.

  14. #14
    Yes, you probably should be carefull with water. Sorry for mentioning that.

    Over on ukworkshop.co.uk in the handtool forum you can find a sticky with some restauration suggestions. One recipe is this one from AndyT:

    There are various recipes for the reviver. This one has equal proportions of boiled linseed oil, white vinegar and turps substitute, plus 1/4 that amount of meths, and a dash of ammonia. The proportions don't need to be exact and recipes vary quite a lot, some missing out the meths and ammonia.


  15. #15
    Join Date
    Mar 2015
    Location
    Virginia
    Posts
    1,211
    No worries Kees. I wiped it down with a rag with a little wax on it. No harm to the patina.

Posting Permissions

  • You may not post new threads
  • You may not post replies
  • You may not post attachments
  • You may not edit your posts
  •