Page 1 of 2 12 LastLast
Results 1 to 15 of 25

Thread: Project: Small "Girlie Things" Table :)

Hybrid View

Previous Post Previous Post   Next Post Next Post
  1. #1
    Join Date
    Mar 2003
    Location
    SE PA - Central Bucks County
    Posts
    65,933

    Project: Small "Girlie Things" Table :)

    Ok, in the last week I installed a nice wall-hung bookcase in the girls' room as well as raised the beds so under-bed storage bins could be used. I also installed new lighting so that each girl would have their own "local" source of light for reading as well as general room light and put in an Arc Fault breaker just for good measure. With the dresser moved over under the new shelving there is a nice space between the beds and lights that was calling out to me..."Build something to go here!" So I did. Consider this yet another "spontaneous project" whanged out from available materials, just as the shelving was.

    This table is relatively small at 16 1/2" deep by 37" wide and 28 1/2" tall...perfect for things that young girls do in front of a mirror. Just coincidently, there is already a mirror on the wall right above where the table will go! Sheesh! The legs are poplar milled to 1 3/4" square and the rest of the framing is scrap plywood. The top is black walnut off the property...a panel I had in the rack that was originally intended as the bottom interior "shelf" for an aborted sideboard project. It has a little bit of sap in it and is not particularly grain matched, but it really does look nice anyway.

    Construction was what "A-the-younger" (the younger of the two girls we are adopting) termed "Frast, Papa, Frast!"...pocket screws. Yes, this is a "wham, bang, thank you mam" project. I started it at 3pm and put the last color coat on the base at 9pm tonight. Over the next few days, I'll spray on a few coats of clear finish on the base and already-oiled top to complete the project.

    Pics:

    1. That space between the lights and beds is where this puppy is going to go
    2. All the components were cut, milled and made ready for assembly. Those poplar legs were a good testament as to how quickly the changeover between jointing and planing is on my MM machine as I actually did a few iterations to take one 4' long 1 13/16" thick board and turn it into four 28" long, 1 3/4" square (and smooth) legs. The rest of the material was just plywood scraps ripped to width and cut to length.
    3. Pocket screw construction was chosen because of the speed it offered
    4. Since I was mating 1 3/4" material with 3/4" material, I just used the bench and the WonderDogs to clamp the legs and front and back aprons
    5. Same for assembling the shorter end-aprons to the already-assembled front and back assembly
    Attached Images Attached Images
    Last edited by Jim Becker; 09-11-2005 at 10:40 PM.
    --

    The most expensive tool is the one you buy "cheaply" and often...

  2. #2
    Join Date
    Mar 2003
    Location
    SE PA - Central Bucks County
    Posts
    65,933
    More pics:


    1. Frame all assembled
    2. Frame with top ready for sanding and finishing
    3. Black walnut top oiled...wood is off our property as is the poplar in the legs
    4. Primer applied to the frame
    5. First color coat on the frame...the second one was applied about an hour later. Oh, I cheated on covering the pocket screw holes in the lower stretchers before putting on the color...'stuck some label stock over them. Yea, it's not fine furniture... ...but it was "Frast, papa. Frast!" And I always do what the women in my life tell me.
    I'll post a final picture once the unit is clear coated and "installed" in the room
    Attached Images Attached Images
    Last edited by Jim Becker; 09-11-2005 at 10:39 PM.
    --

    The most expensive tool is the one you buy "cheaply" and often...

  3. #3
    Room's lookin' good Jim. Great job on this project.

    Bob
    bob m

  4. #4
    Jim, isn't being a dad hard work? 
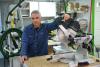
Great job on the proejcts. The walnut top is a nice touch to the painted frame. It's going to look great. But did you make it big enough? Come one, two girls can generate a lot of stuff! Good for you! Well done. And blessings on your home.

  5. #5
    Join Date
    Mar 2003
    Location
    SE PA - Central Bucks County
    Posts
    65,933
    Jason, one of the reasons for the new wall-hung bookcase and moving the dresser was to create a slightly larger "play" area between the beds, so I didn't want this table to be "too big". I suspect it will work out just fine we have so many other "surfaces" in other rooms to pile stuff on, too! The space isn't quite as large as it looks in that first picture in this thread...wide angle lense distortion does that. The room is only 9' x 13'. (18" thick stone walls at that level...) I'm considering this table somewhat of a "vanity" piece...as it were...
    --

    The most expensive tool is the one you buy "cheaply" and often...

  6. #6
    Join Date
    Dec 2003
    Location
    Laguna Beach , Ca.
    Posts
    7,201
    Jim,

    That is great! You are a great dad....family is what its all about!!! The room looks just wonderful and you are making the girls very happy!!!

    PS: Who takes the photos of you when your in the shop? Auto camera?
    "All great work starts with love .... then it is no longer work"

  7. #7
    Join Date
    Mar 2005
    Location
    Spokane, Washington
    Posts
    4,021
    Jim---The girls are going to love the table. You sure seem to be enjoying your new role.

    Dan
    Eternity is an awfully long time, especially toward the end.

    -Woody Allen-

    Critiques on works posted are always welcome

  8. #8
    Join Date
    Feb 2005
    Location
    Sterling CT
    Posts
    2,474
    nice table jim ... I like the walnut top and painted base. great combination of colors. sounds like life is good and getting better

    best wishes
    lou

  9. #9
    Join Date
    Feb 2003
    Location
    Chadds Ford, PA
    Posts
    583
    Hi Jim, The room really looks great. Nice job on the table.
    talk to you later,
    John

  10. #10

    Looking Good Jim,

    This Daddy thing is pretty cool, Isn't it!!
    Tony

  11. #11
    Join Date
    Sep 2003
    Location
    Stuart Florida
    Posts
    81
    Jim the table looks great. Did you use the plugs or bondo to cover the pocket screws?

  12. #12
    Join Date
    Mar 2003
    Location
    SE PA - Central Bucks County
    Posts
    65,933
    Quote Originally Posted by Mark Singer
    PS: Who takes the photos of you when your in the shop? Auto camera?
    Timer in the camera...

    Quote Originally Posted by Karl Laustrup
    If you can could you enlighten us as to the timetable for the adoption? I seem to recall in a previous thread some mention about having to travel to Russia this winter. Is that still a go?
    Our dossier is "over there" getting translated and then will be forwarded to the region that the girls live in. So at this point, we are waiting on a court date which will likely be in November...in western Siberia. Burrrr!!! But there are no guarantees with time frame...remember, a government is involved. It ain't done until it's done...

    Quote Originally Posted by Ralph Steffey
    Did you use the plugs or bondo to cover the pocket screws?
    Nope. Paper labels stuck on and painted over. I didn't have any plugs "in stock" nor any Bondo. The pockets are too deep to use spackle, at least for a "Frast" project...so I cheaped out. Honestly, these are down near the floor and on the inside. They will be hardly noticeable. And as I mentioned...it's not fine furniture...

    -----
    Oh, I forgot to mention that the frame was designed to be relatively in concert with the Ikea beds. They have plain surfaces with square edges and 2" thickness, generally speaking. The table frame echoes that with the 1 3/4" thick legs as well as the aprons and stretchers that are flush with the outside surfaces of the legs. In retrospect, I would have liked to make the stretchers look to be the same thickness as the legs. Actually, I would have liked eliminate them altogether. However, I felt they were necessary to provide a more rigid structure given where they will be living...kids can be tough on furniture....
    --

    The most expensive tool is the one you buy "cheaply" and often...

  13. #13
    Join Date
    Mar 2003
    Location
    SE PA - Central Bucks County
    Posts
    65,933

    Finished (quite literally) and "installed" :)

    Well, this project is done as I had time this weekend to shoot on the clear coats and get the table "installed" in the girls' room. I think they will like it...and it will be a surprise as we did not include a picture of it in our mailing to them this week. So here are some "wrap-up" pictures for this third and "final" (yea, right...) project for the room. They included the wall-hung shelving unit, the blocks to raise the beds to accomodate under-bed storage units and this vanity table.

    Pics:
    1. Here's where the vanity table will live between the beds
    2. Closer view of the table
    3. View of the shelf-wall where the paint color for the table base came from
    Attached Images Attached Images
    --

    The most expensive tool is the one you buy "cheaply" and often...

  14. #14
    Join Date
    Jan 2005
    Location
    Harrisburg, NC
    Posts
    2,255
    Good work Jim, it's the kind of stuff that makes you a good father.

    Richard

  15. #15
    Jim, your projects have really transformed that room into a very nice space for the kids. I am sure they will really enjoy the room. I hope things get put on the fast track and you get to make that trip soon! I remember when my wifes cousin and her husband went to the orphanages over in Siberia to get their daughter. A very long trip over nothing but ice! Anyway, nice job!

    Corey

Similar Threads

  1. Table Saw Sled with a Adj Fence (Small)
    By Pete Simmons in forum General Woodworking and Power Tools
    Replies: 4
    Last Post: 04-06-2005, 8:09 AM
  2. Contrator Table Saw Cabinet
    By Corey Hallagan in forum General Woodworking and Power Tools
    Replies: 10
    Last Post: 04-05-2005, 7:46 PM
  3. Oak Pedestal Table (PICS)
    By Ralph Barhorst in forum General Woodworking and Power Tools
    Replies: 9
    Last Post: 07-13-2004, 8:21 PM
  4. There MUST be a safer way to do this..router table and small pieces.
    By Tim Morton in forum General Woodworking and Power Tools
    Replies: 13
    Last Post: 06-09-2004, 11:00 AM
  5. Small table design help
    By Bert Johansen in forum General Woodworking and Power Tools
    Replies: 2
    Last Post: 06-07-2004, 4:47 PM

Posting Permissions

  • You may not post new threads
  • You may not post replies
  • You may not post attachments
  • You may not edit your posts
  •