Page 2 of 2 FirstFirst 12
Results 16 to 29 of 29

Thread: Build: 20'' wooden try plane

  1. #16
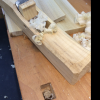
    Looks great! Is this your first traditional mortised plane? Either way, very nice job. The combination of plumb and pear is lovely; delicious, one might say!

    Two small comments. One, to echo George, hide glue would be a much better choice for the handle. Liquid hide glue is great for this purpose.

    Also, the handle looks a bit too vertical to me, but that is perhaps a matter of choice.

    Enjoy your new plane!
    "For me, chairs and chairmaking are a means to an end. My real goal is to spend my days in a quiet, dustless shop doing hand work on an object that is beautiful, useful and fun to make." --Peter Galbert

  2. #17
    Join Date
    Aug 2010
    Location
    USA
    Posts
    5,582
    Very nice work. I hope this plane works very nicely for you.

  3. #18
    Join Date
    Dec 2008
    Location
    Gibsons British Columbia Canada ( near Vancouver )
    Posts
    693
    Oskar:

    Very nice indeed - well executed.

    Dave B

  4. #19
    Join Date
    Nov 2015
    Location
    Freiburg, Germany
    Posts
    223
    thanks for the nice comments!

    Reinis: Yes, you're right, the tote is constructed around my hand, and there is no problem getting three fingers in.

    Steve: This is my third mortised plane, and the first 'full size' and traditional with handle. (the previous two figure in the build pics). You might be right about the angle, time will tell (and the height of the bench). For now it feels good but of course I haven't spend hours/days planing with it yet. How do you lay out your handles? Does it depend on the distance/angle to the mouth. Read somewhere that a first guesstimate would be to have the handle at a right angle to the line from the mouth to the middle of the handle. My handle ended up more vertical than this.

  5. #20
    Not Steve, but here is my take on it: When laying out a handle I look very hard at old English planes. For my tryplane and jointer I used an image from the book about planemaker John Green. I am not sure I can compose a handle that is as elegant but still as functional and comfortable as they could make them. For the distance from the handle to the mortise: As close to the blade as possible but with enough room to swing a hammer for adjusting the blade, even when it has been shortened over the years. That's a matter of holding up the handle to the plane and then looking what looks right.

  6. #21
    Join Date
    Nov 2015
    Location
    Freiburg, Germany
    Posts
    223
    Kees, thanks for chiming in. Just ordered a copy of that book. I don't have any reference plane, but from pictures I drew the same conclusion - close to the iron, but leaving room for the hammer.

  7. #22
    Join Date
    Apr 2007
    Location
    Mebane NC
    Posts
    1,019
    Nice plane and thanks for the detailed writeup.
    Paul

  8. #23
    Quote Originally Posted by Oskar Sedell View Post
    How do you lay out your handles? Does it depend on the distance/angle to the mouth. Read somewhere that a first guesstimate would be to have the handle at a right angle to the line from the mouth to the middle of the handle. My handle ended up more vertical than this.
    Oskar,
    I've never heard this formula before, but it looks approximately right. However, I would prefer a more direct measurement off of horizontal (the sole, the deck, the base of the handle, whatever). Normally, the "main" angle of the handle, analogous to the hang angle of a saw, is about 55°-60°. The handle is nearly vertical for the first inch or so at the bottom, then it transitions to the main angle.

    I agree with what Kees said about the location of the handle: as close as you can get to the blade and still have room to maneuver an adjusting mallet.

    I also agree with him about studying examples from old planes. It can be very helpful to find an old plane with good bones, even if it's not in great shape, even if it's barely usable, just to study the details. Planes like this can be picked up for $20 or so, and it's worth it if you plan to make some more planes.
    "For me, chairs and chairmaking are a means to an end. My real goal is to spend my days in a quiet, dustless shop doing hand work on an object that is beautiful, useful and fun to make." --Peter Galbert

  9. #24
    Join Date
    Feb 2011
    Location
    Carlsbad, CA
    Posts
    2,230
    Blog Entries
    2
    Very nice Oskar! The full width,, uniform thickness shavings you got tell a tale of excellent execution, building to tight tolerances . Very inspirational - thanks for posting! I've never had the confidence to try a through morticed plane., I'm more comfortable with laminated construction, but you've inspired me to consider trying (really just want to buy one from Steve Voigt I know will work).

    I look forward to seeing more of your posts.

    Best, Mike

  10. #25
    Join Date
    Nov 2015
    Location
    Freiburg, Germany
    Posts
    223
    Steve: when I measured the main angle yesterday I got it around 65 degrees. I'll try to get it down a bit for my next build (unless the handle I made works and feels great in the long run of course). Might get some of the pushing pressure down in the palm instead of up between the thumb and the index finger. I should also shop for an old plane with nice proportions and a cleanly made mortise.

    Mike: Thank you! Give it a shot. In worst case its an excellent mortising/paring exercise. Its not that hard to get a fine working plane in the end. Hope to see some posts about it in the future!

  11. #26
    Oskar: Has the plane become a user, or does it sit on the shelf ? Did you use it enough to get a feeling on how good/bad the iron holds its edge ? I have had a report from one user, that the edge is too brittle and chips easily.
    Best regards

    Lasse Hilbrandt

  12. #27
    Join Date
    Nov 2015
    Location
    Freiburg, Germany
    Posts
    223
    This plane, together with the Applewood jack I posted in Brians hand tool work thread are my main users (I donīt have any other Jack or Try planes). The iron is fantastic, and on larger boards or less sensitive projects I donīt even need a smoother plane. The plane body donīt move much at all, I have flattened the sole once since the build.

    Since this is one of my first planes, I wasnīt aware of the role of the wear in double iron planes. It is low in this plane, which makes it quite tight between the "triangles" and I had some problems with clogging. Mostly solved by filing a lower profile on the cap iron, and tweaking the shape of the wear and the ends of the fingers.

  13. #28
    Quote Originally Posted by Oskar Sedell View Post
    A

    An obvious observation: My plane blank is not very straight grained. I hope it will not move extensively. Next time I'll try to find wood with a better grain profile.

    I've learned a lot from this build and from reading/watching your projects. Thanks Lasse for providing the iron! And I'm thankful to all of your who shared your experiences from plane making, you know who you are.

    If you have questions or constructive criticism, please share your thoughts.

    keep your projects coming!

    Best regards,

    Oskar
    Pear wood is used for making drawing instruments like straight edges, triangles and squares and so on and so on because it's reliable but steamed pear gets used. I have a pear wood try plane similar sized to yours, not steamed and over the years it has not behaved so different from other wood planes, always requiring regular maintenance. I do find it a bit light in weight. The handle you made sure takes to oiling nicely.
    Last edited by ernest dubois; 03-11-2018 at 6:07 AM.

  14. #29
    Join Date
    Nov 2015
    Location
    Freiburg, Germany
    Posts
    223
    Thanks Ernest, I didnīt know that. Agreed, plum wood looks great oiled!

Posting Permissions

  • You may not post new threads
  • You may not post replies
  • You may not post attachments
  • You may not edit your posts
  •