Page 3 of 3 FirstFirst 123
Results 31 to 39 of 39

Thread: How to shoot plywood?

  1. #31
    Join Date
    Aug 2007
    Location
    Dickinson, Texas
    Posts
    7,655
    Blog Entries
    1
    I would clamp a straight edge to the plywood and cut it with a plywood blade in a small circular saw. If you score the cut line with a box cutter knife, you can get a clean cut. This technique works well on wooden door bottoms as well. It's not the place to neander. I've cut several mahogany veneer doors with this technique. It works on plywood as well.

    Some times it helps to make two cuts, the first one 1/32 or 1/16 proud of the line and then on the line. Just use a knife cut scoring line to saw to.

  2. #32
    Join Date
    Oct 2015
    Location
    Millersburg (Holmes County - Amish Country) Ohio
    Posts
    214
    I'm thinking of getting one of these: http://www.amazon.com/dp/B003TXSAHU/...I3TPQ3BSZKOKFR
    and one of these: http://www.amazon.com/Rockwell-RK344...=ATVPDKIKX0DER

    I have a very old heavy skill saw from about 20 some years ago, a beast and I cant cut a straight line If I had to.

  3. #33
    Join Date
    Mar 2004
    Location
    DuBois, PA
    Posts
    1,905
    Quote Originally Posted by Brian Sommers View Post
    I'm thinking of getting one of these: http://www.amazon.com/dp/B003TXSAHU/...I3TPQ3BSZKOKFR
    and one of these: http://www.amazon.com/Rockwell-RK344...=ATVPDKIKX0DER

    I have a very old heavy skill saw from about 20 some years ago, a beast and I cant cut a straight line If I had to.
    I have the straight edge and it works well. I don't have he saw and for me, it would not be a first choice (or second, third or fourth). I have a Milwaukee 7-1/4" that works well, but is heavy and I avoid it unless I have to use it (through the years hand saws have really ruled the roost). But for that stuff, such as plywood, MDF, etc, I have a Dewalt 18v circular saw that is simply great. My suggestion for a sheet good saw, is to look at a battery powered one.
    If the thunder don't get you, the lightning will.

  4. #34
    I've resisted posting these details because I didn't want to break Neander rules, but I'd just hate to think of someone buying manufactured jigs when it's so easy to get perfect results cheaply.

    Quote Originally Posted by Brian Sommers View Post
    Or you could make an absurdly cheap, ridiculously simple, and awesomely effective jig from scraps or cheap sheet goods. When I started out with power tools I felt deprived when I realized there was no way I could fit a table saw and its noise and mess into my little apartment and front porch, and just as discouraged when I considered spending precious $$ on manufactured jigs--until I discovered that this jig meant I didn't need any of it.

    Right away I was making straight, square, clean cuts using the jig, a DeWalt 18V trim saw, a Diablo 140 tooth OSB/plywood blade, and a 12" strip from the factory edge of a sheet of 1/4" tempered hardboard. Any stable material will work so long as the guide edge of the top piece is dead straight, which is why I used the Masonite's factory edge (after checking it with my best straight edge).

    To use it, line the jig's edge up with your cut line, make sure it's square to the edge of the workpiece with either a square or a batten attached to the bottom of one end, clamp the jig to the workpiece, and cut away. No measuring to add the width of the saw plate; in fact, you only need to make one mark for your cut and then square the jig to the mark, although it was easier to use two marks.

    Here's the main part of the wayneofthewoods.com plan, edited for brevity:

    Step 1 - Get a 12-inch wide piece of 1/4" to 1/2" plywood (1/4" to 1/2" ) that is the desired length of the type of cuts you will make, usually 4 or 8 feet.

    Step 2 - Obtain another 2-inch wide board or strip of plywood with one long edge that is dead straight. It must be thin enough so that the body of the saw will clear it when your circular saw rests up against it. This will be your guide strip.

    Step 3 - Fasten the guide strip onto the plywood. Leave an inch or two behind the guide to clamp the guide to the workpiece, and make sure the strip's straight edge is facing the side to be cut.
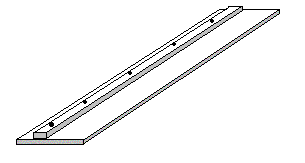

    Step 4 - Rip your plywood with the saw resting against the guide strip's straight edge.
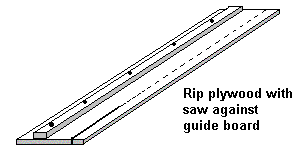

    My tips:
    * A coat or two of furniture wax on the surfaces the saw slides against will help its plate glide smoothly.
    * Smooth off any rough edges on the saw plate with fine sandpaper and wax it, too.
    * Stick some PSA backed sanding disks to the bottom of the jig to keep it from sliding around.

  5. #35
    Join Date
    Aug 2010
    Location
    USA
    Posts
    5,582
    Quote Originally Posted by Lenore Epstein View Post
    I've resisted posting these details because I didn't want to break Neander rules, but I'd just hate to think of someone buying manufactured jigs when it's so easy to get perfect results cheaply.


    Or you could make an absurdly cheap, ridiculously simple, and awesomely effective jig from scraps or cheap sheet goods. When I started out with power tools I felt deprived when I realized there was no way I could fit a table saw and its noise and mess into my little apartment and front porch, and just as discouraged when I considered spending precious $$ on manufactured jigs--until I discovered that this jig meant I didn't need any of it.

    Right away I was making straight, square, clean cuts using the jig, a DeWalt 18V trim saw, a Diablo 140 tooth OSB/plywood blade, and a 12" strip from the factory edge of a sheet of 1/4" tempered hardboard. Any stable material will work so long as the guide edge of the top piece is dead straight, which is why I used the Masonite's factory edge (after checking it with my best straight edge).

    To use it, line the jig's edge up with your cut line, make sure it's square to the edge of the workpiece with either a square or a batten attached to the bottom of one end, clamp the jig to the workpiece, and cut away. No measuring to add the width of the saw plate; in fact, you only need to make one mark for your cut and then square the jig to the mark, although it was easier to use two marks.

    Here's the main part of the wayneofthewoods.com plan, edited for brevity:

    Step 1 - Get a 12-inch wide piece of 1/4" to 1/2" plywood (1/4" to 1/2" ) that is the desired length of the type of cuts you will make, usually 4 or 8 feet.

    Step 2 - Obtain another 2-inch wide board or strip of plywood with one long edge that is dead straight. It must be thin enough so that the body of the saw will clear it when your circular saw rests up against it. This will be your guide strip.

    Step 3 - Fasten the guide strip onto the plywood. Leave an inch or two behind the guide to clamp the guide to the workpiece, and make sure the strip's straight edge is facing the side to be cut.


    Step 4 - Rip your plywood with the saw resting against the guide strip's straight edge.


    My tips:
    * A coat or two of furniture wax on the surfaces the saw slides against will help its plate glide smoothly.
    * Smooth off any rough edges on the saw plate with fine sandpaper and wax it, too.


    Yes, not neander but very effective. I made an 8 foot long one of these years ago and used it frequently for breaking down sheet goods with a circular saw. The one thing I did different was to make a straight edge out of both sides, one for cutting left of the blade, and one for right of the blade because sometimes it works best on one side or the other.
    Last edited by Pat Barry; 04-23-2016 at 10:49 AM.

  6. #36
    Join Date
    Dec 2015
    Location
    Dublin, CA
    Posts
    4,119
    Quote Originally Posted by Lenore Epstein View Post
    I've resisted posting these details because I didn't want to break Neander rules, but I'd just hate to think of someone buying manufactured jigs when it's so easy to get perfect results cheaply.


    Or you could make an absurdly cheap, ridiculously simple, and awesomely effective jig from scraps or cheap sheet goods. When I started out with power tools I felt deprived when I realized there was no way I could fit a table saw and its noise and mess into my little apartment and front porch, and just as discouraged when I considered spending precious $$ on manufactured jigs--until I discovered that this jig meant I didn't need any of it.

    Right away I was making straight, square, clean cuts using the jig, a DeWalt 18V trim saw, a Diablo 140 tooth OSB/plywood blade, and a 12" strip from the factory edge of a sheet of 1/4" tempered hardboard. Any stable material will work so long as the guide edge of the top piece is dead straight, which is why I used the Masonite's factory edge (after checking it with my best straight edge).

    To use it, line the jig's edge up with your cut line, make sure it's square to the edge of the workpiece with either a square or a batten attached to the bottom of one end, clamp the jig to the workpiece, and cut away. No measuring to add the width of the saw plate; in fact, you only need to make one mark for your cut and then square the jig to the mark, although it was easier to use two marks.

    Here's the main part of the wayneofthewoods.com plan, edited for brevity:

    Step 1 - Get a 12-inch wide piece of 1/4" to 1/2" plywood (1/4" to 1/2" ) that is the desired length of the type of cuts you will make, usually 4 or 8 feet.

    Step 2 - Obtain another 2-inch wide board or strip of plywood with one long edge that is dead straight. It must be thin enough so that the body of the saw will clear it when your circular saw rests up against it. This will be your guide strip.

    Step 3 - Fasten the guide strip onto the plywood. Leave an inch or two behind the guide to clamp the guide to the workpiece, and make sure the strip's straight edge is facing the side to be cut.


    Step 4 - Rip your plywood with the saw resting against the guide strip's straight edge.


    My tips:
    * A coat or two of furniture wax on the surfaces the saw slides against will help its plate glide smoothly.
    * Smooth off any rough edges on the saw plate with fine sandpaper and wax it, too.
    * Stick some PSA backed sanding disks to the bottom of the jig to keep it from sliding around.
    I use one of these for panels that are too large for the table saw. I used an aluminum extrusion for the guide track, though.

  7. #37
    Join Date
    Apr 2008
    Location
    Cambridge, MA
    Posts
    256
    I use a low angle block plane or jack and treat the board just as if it was end grain.
    I don't really care about dulling my tools, I know how to sharpen quickly.

    I read some years back that Freud had done research that indicated that that trimming cuts on a table saw are actually horrible for the carbide blades since there is not enough material being removed to effectively transport heat away from the tool. It significantly reduces the working life of the blade.
    "Aus so krummem Holze, als woraus der Mensch gemacht ist, kann nichts ganz Gerades gezimmert werden."

  8. #38
    Join Date
    Dec 2015
    Location
    Dublin, CA
    Posts
    4,119
    Quote Originally Posted by Niels Cosman View Post
    I read some years back that Freud had done research that indicated that that trimming cuts on a table saw are actually horrible for the carbide blades since there is not enough material being removed to effectively transport heat away from the tool. It significantly reduces the working life of the blade.
    I don't buy it. Dry wood isn't thermally conductive or massive enough to remove a significant amount of heat that way.

    The problem with trimming cuts is that the cutting forces are asymmetric across the blade, and that leads to all sorts of issues. It certainly hurts accuracy, and I can think of a couple ways that it might hurt heat/life.

  9. #39
    Quote Originally Posted by Patrick Chase View Post
    I don't buy it. Dry wood isn't thermally conductive or massive enough to remove a significant amount of heat that way.
    Folks on the router forums I used to haunt said that what reduced the heat was the ejection of sawdust; removing a sliver of material means there's less mass being thrown off, thus less heat removed from the wood surface.

    Not that this would apply to tablesaws...

Posting Permissions

  • You may not post new threads
  • You may not post replies
  • You may not post attachments
  • You may not edit your posts
  •