Results 1 to 11 of 11

Thread: Help with dye, shellac, poly trouble

  1. #1
    Join Date
    Sep 2014
    Location
    Chicago
    Posts
    87

    Help with dye, shellac, poly trouble

    This is my first water based dye proj and I've made some mistakes.
    My finish schedule:
    Charles Neil's pre dye conditioner,
    then i put down Lockwood water based dye,
    i padded on 2 coats of shellac,
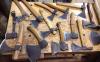
    now im wiping on Prashun's wipe on poly recipe.<br><br><img src="http://www.sawmillcreek.org/attachment.php?attachmentid=338701&amp;stc=1" attachmentid="338701" alt="" id="vbattach_338701" class="previewthumb"><br><br>Padding shellac was prob my first bad idea, and I'll come back to that.
    second mistake was using steel wool between poly coats. I thought that was ok and I've subsequently read that using steel wool is not correct.
    i got some steel wool fibers stuck in some places so I sanded them out with 320 grit and i cut though the dye.<br><br>At this point should I dye the bare spots let it dry then wipe on poly?
    Or do i have to start stripping finish?

    Question 2. If I wipe the proj with a damp cloth I'm still picking up some dye.
    i guess this is due to padding shellac which picked up some dye and then that also got picked up wiping on poly.
    will more costs of poly eventually seal the dye or do I need to remove finishes, sand and then go dye straight to poly coats since I do not have a sprayer and cannot spray shellac.

    thanks in advance for any advice or suggestions
    Attached Images Attached Images
    Don't forget the struggle Don't forget the streets

  2. #2
    First, I'm flattered you're calling it "Prashun's technique"; but, I'm a hobbyist and standing squarely behind the backs of (not even on the shoulders of) some finishing giants here.

    Padding the shellac over water-based dye is usually ok. Padding over alcohol-based dye is a little more tricky. In either case, the shellac doesn't seal the dye 100%. On a dark finish, you will notice the poly rag pulling up a little bit of the dye for one or two coats. But the dye should be sealed enough that you don't notice a deterioration of the surface.

    As for fixing your problem, don't yet throw the baby out with the bathwater. Dab your corners with a dye-soaked q-tip and see if you can color in the offenses. If that does not work, then (heresy alert) you can use an oil stain (as a glaze) or even a magic marker to hide the error.

    Last, one more thing to note about "my" poly technique: it is not intended to build up a thick finish. As soon as an appreciable film starts to develop, you may notice (as I do) that it is harder and harder to wipe on satin/semigloss poly without leaving streaks.
    Last edited by Prashun Patel; 06-06-2016 at 3:14 PM.

  3. #3
    Join Date
    Apr 2010
    Location
    Ft. Wayne, IN
    Posts
    1,453
    Starting with a pre-stain conditioner is a great first step. Typically I will spray on a 1/2lb cut of shellac (I make my own rather than buying premade) when working on blotch-prone woods. Speaking of sprayers... If you have a compressor, even a small pancake style, this gun, or a similar one, will work great. It's currently my preferred method for applying shellac in most situations, and it's quite inexpensive.

    http://www.amazon.com/Tool-Force-HVL...rch_detailpage

    After letting the shellac dry thoroughly, I brush on my dye. I use either Lockwood Metal Complex Dyes or General Finishes WB Dyes. I do have a small selection of Behlen Dyes, but rarely use them. Whether oil or alcohol based, the dye dries fast. I almost always then apply 2 light coats of shellac. I make my shellac with Everclear (about the purest alcohol available) then add a little 99% isopropyl alcohol because it has the slowest evaporation rate of any of the common alcohols and so lets the shellac flow out a bit more. I make my shellac in a 2lb cut, and I add just enough to thin it to approximately 1 1/2lb cut. Once again, I spray on the shellac. Wiping or brushing shellac over a dye, even a WB dye, can pull up a fair amount on the dye, enough to create light spots, streaks, and even bare spots. If you do not have a sprayer, brushing it on will work much better than padding. Allow the shellac to dry, then very lightly sand with 320 or 400. Just enough to remove any dust nibs, but not sand through to the dye. After that, you can apply the topcoat of your choice. Well except for oil/varnish blends. There is no way for the oil component to soak in. My current personal preference is Behlen Master Gel Finish. It's a relatively thick solvent based varnish that wipes on and back off easily, & dries fairly quickly so you can apply 2 coats in a day. And, it looks great!
    Oh... But don't use General Finishes Enduro-Var at this point. They say you aren't supposed to put it over anything but bare wood.
    "I've cut the dang thing three times and it's STILL too darn short"
    Name withheld to protect the guilty

    Stew Hagerty

  4. #4
    Join Date
    Sep 2014
    Location
    Chicago
    Posts
    87
    Sorry Prashun, in the future I will not identify it with your name. I understand your position.
    Last edited by Evan Ryan; 06-06-2016 at 3:11 PM.
    Don't forget the struggle Don't forget the streets

  5. #5
    Evan. I think you interpreted my embarrassment harshly. I was just expressing some humility. I'm frankly flattered that you read the post and are trying it!!!! Thanks for the validation!

    Sorry if I made you feel bad! Added some emoticons to lighten my last post.
    pp

  6. #6
    Join Date
    Dec 2010
    Location
    WNY
    Posts
    9,777
    Sort of a tangent, but I apply EnduroVar over Sealcoat shellac all the time, and have for over 5 years with no problems. I know GF says to put it on bare wood or only the lightest of coats of dewaxed shellac, but my experience proves to me it works.

    To the OP, I would eliminate the shellac step all together. The way to deal with water and/or alcohol soluble dyes is not to use an alcohol based sealer when using a hand process; rather, use an oil based one. Just start applying your poly directly over the dye, after it's well dry of course. Thin the first couple of coats, and don't sand until you have two coats on. If you just have to use a shellac sealer, for whatever reason, spray it with rattle can shellac - but don't sand until after at least one coat of poly.

    Oh yeah, if you are using a water based dye, you would be well advised to sand your work to at least 325 grit and then raise the grain with water and gently sand off the fuzz with 400 grit. Next time.

    John

  7. #7
    Join Date
    Sep 2011
    Location
    Kelowna, BC, Canada
    Posts
    179
    And further to J10's tangent - most water-soluble dyes are also soluble in alcohol. So, to be expected that padded shellac over that type of dye would pick it up.

    As John says, the shellac step in your finishing schedule is unnecessary. Counterproductive, in fact, unless you spray the shellac.

  8. #8
    Join Date
    Sep 2014
    Location
    Chicago
    Posts
    87
    Thanks for the advice everyone. I will eliminate shellac next time.
    After 2 coats of the poly Im still picking up dye with a damp cloth.
    Will more wipe on poly seal the dye at some point?
    Don't forget the struggle Don't forget the streets

  9. #9
    Join Date
    Mar 2003
    Location
    SE PA - Central Bucks County
    Posts
    65,953
    I use water soluble dye frequently in projects. I never use any kind of "pre stain conditioner"...sand well for surface prep and then put on the dye. Historically, I've applied the dye using a rag, but have been moving more and more to spraying it for larger projects for better consistency. Know that water soluble dye before you do anything else looks like, um...."stuff". I follow the dye with de-waxed shellac...brushed (smaller projects) or sprayed (most projects). I'll knock any grain raise "nubbies" off with 320 or 400 lightly skimmed by hand between the two coats of shellac I normally apply as a barrier and for color enhancement. (I only use water borne tops coats, so the amber effect of the shellac warms things up) I then apply my top coats, usually sprayed. That's my story and I'm stickin' to it!
    --

    The most expensive tool is the one you buy "cheaply" and often...

  10. #10
    Join Date
    May 2004
    Location
    N Illinois
    Posts
    4,602
    Try to avoid steel wool in the process...particles often remain ..messing up your regimen
    Jerry

  11. #11
    Join Date
    Apr 2016
    Location
    Tasmania
    Posts
    2,162
    Evan, Prashun is pretty well on the money here. All is not lost and a touch up of the offending corner will work.

    If you are worried about the touch up going too dark, touch up multiple times with a weakened solution of the colour so that you build the intensity until it looks OK. When staining in general, the trick is to look at the colour in the few seconds after you have applied it as that is the only time you have to get a good look at the colour before it is top coated. This applies to stains only, not to tinted coatings which are also often sold as stains.

    You are right to stop using steel wool. In 40+ years I have yet to come across a situation in polishing where it was any use. Every other alternative abrasive is better. I always have on hand two types of sandpaper - aluminium oxide for flat surfaces and silicon carbide for curved surfaces. I don't throw the silicon carbide paper out until it literally falls apart - the worn stuff gets used for de-nibbing the first coat of clear.

    You will continue to pick up colour for a couple of coats - that is normal. Make sure you observe the curing times for the poly and make allowance for inclement weather if applicable.

    Cheers
    Every construction obeys the laws of physics. Whether we like or understand the result is of no interest to the universe.

Posting Permissions

  • You may not post new threads
  • You may not post replies
  • You may not post attachments
  • You may not edit your posts
  •