Results 1 to 7 of 7

Thread: Dye staining curly or figured maple for 2 tone grain

  1. #1

    Dye staining curly or figured maple for 2 tone grain

    Hey yall, first post on the forum here with one of the most frustrating issues I've dealt with in my woodworking...

    I'm trying to recreate the two tone "grain pop" on some curly maple (or tiger maple as I've also seen it called) There are a couple methods I've seen, the one that looks the best to me is shown in the videos that come up in the first two search results on google for "finishing figured maple"

    Mark Stephens on woodworkers resource has a video that makes this look super simple and as with most things that look super simple and have a really cool result....I've found it to be anything but. He dyes the board using Behlen Solar Lux then sands it down. Does this twice then dyes once more and continues with whatever topcoat. The result leaves the curls in the wood darker than the rest . Wood whisperer had a similar finish however he mixes dye with shellac.

    Problem: I've tried both of these methods on a scrap piece I sanded down to 220 but I keep getting a result that just looks...dirty. I don't have another way to describe it. I'm using Behlen's American Walnut Solar-Lux dye stain. I've tried diluting it, mixing with shellac, pre wetting the wood with alcohol, but I keep getting this result where it looks like someone rubbed dirt into the wood then wiped it off or something.

    Any help is appreciated, the only thing left I can think of is that he uses antique maple dye and I'm using walnut but I wouldn't imagine the difference in results would be that drastic.

  2. #2
    Join Date
    May 2008
    Location
    E. Hanover, NJ
    Posts
    443
    Thomas, is what you're seeing after you dye, or after you have put on the topcoats after dye?

  3. #3
    Join Date
    Dec 2003
    Location
    SF Bay Area, CA
    Posts
    15,332
    How are you applying the dye? Wiping? Spraying? Personally, I've found great success SPRAYING the Solar-Lux onto maple but patchy/blotchy/yucky results trying to wipe/sponge/brush it on.
    Wood: a fickle medium....

    Did you know SMC is user supported? Please help.

  4. #4
    Join Date
    Mar 2003
    Location
    SE PA - Central Bucks County
    Posts
    65,943
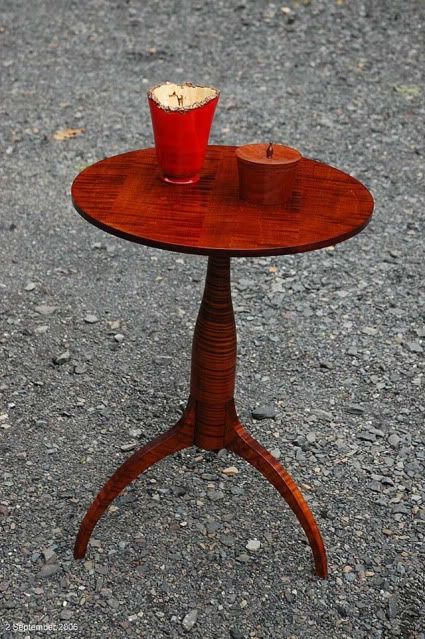
    Please be sure you're not sanding "too much" after applying the dye...220 may even be too coarse for the maple during the sanding between dye coats. The idea is to leave the color in the more absorbent part of the grain (which is very shallow on maple) and only remove it from the less absorbent alternate areas. While Chris mentions "blotching", it's less of a factor here because you are purposefully "blotching" the figure and then accentuating it by removing color from those alternate areas between the curls, striping or quilting that's inherent in the material you are using.

    I used the technique on this table years ago...
    --

    The most expensive tool is the one you buy "cheaply" and often...

  5. #5
    Join Date
    Apr 2013
    Location
    Kansas City
    Posts
    2,677
    When I do this, it does look unimpressive until I use another color dye on top of the sanded layer, like Jim's photo illustrates. The first dye should be sanded back so just the stripes are dark. I use Transtint in water although I don't think the Solar Lux is the problem. I use 320 or 400 to sand back.

  6. #6
    Join Date
    May 2008
    Location
    E. Hanover, NJ
    Posts
    443
    This is aniline dye, BLO and garnet shellac on curly maple.

    IMG_0031.jpg


    Just another way to enhance the curl is with BLO after dye.

    You must put a finish on over the dye to see what it will look like. Just the dye looks "dirty" as you stated.

  7. #7
    First thoughts fwiw- On Tiger maple I have experienced blotching using water based dyes to make it pop. When I follow with shellac it does look muddy. You might try sanding to 400 grit, wipe on mineral oil and while it is still wet (but not puddled) pad on shellac. (On walnut I use pumice with the shellac pad with more oil as a lubricant to fill the grain before spiriting the shellac to lay down the seal coat. if it starts to rope, stop and leave it alone for awhile. Might not need to use pumice on maple but you might try it on some scrap just to see.) Let this dry for a day and then wipe down with naphtha to remove the mineral oil from the surface. Then build the finish with shellac, lacquer, or oil. What you are looking for here is not contrast by darkening of the stripes, but rather chatoyance by allowing the light to reflect at different angles through the finish. If you haven't padded shellac, Mitch Kohanek has a pretty good you-tube on french polishing that demonstrates the basic technique.
    That which was given to me, I pass on to you.

Posting Permissions

  • You may not post new threads
  • You may not post replies
  • You may not post attachments
  • You may not edit your posts
  •