Page 13 of 18 FirstFirst ... 391011121314151617 ... LastLast
Results 181 to 195 of 265

Thread: 2nd Build (first) - CNC Router

  1. #181
    Join Date
    Jan 2012
    Location
    NW Louisiana
    Posts
    894
    Got some more wiring finished today, starting with one E-Stop and moving on to the proximity sensors. When I made the bracket for the E-Stop I drilled a hole where the center of the box would be so I could bring the wire in from the bottom to the inside of the box. Since I wanted to make certain nothing rubbed or cut the outer jacket I sized it for a grommet and while I had the cover off for wiring I thought I'd take a photo of that.


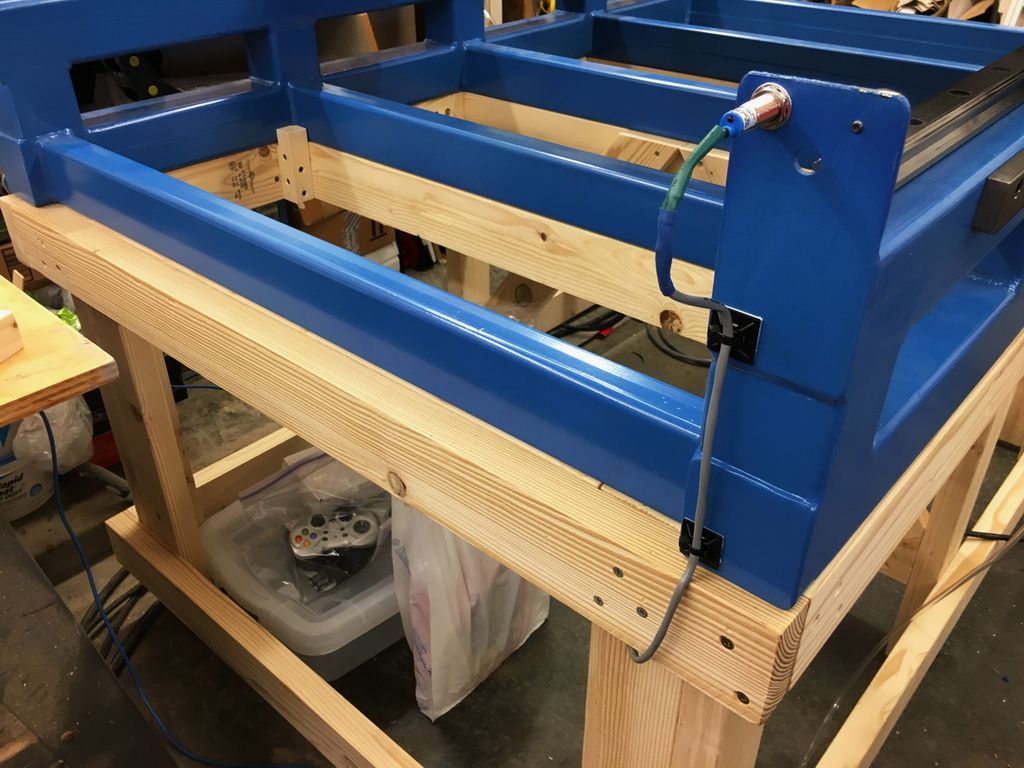
    Finished E-Stop, bracket, and Y- proximity sensor -
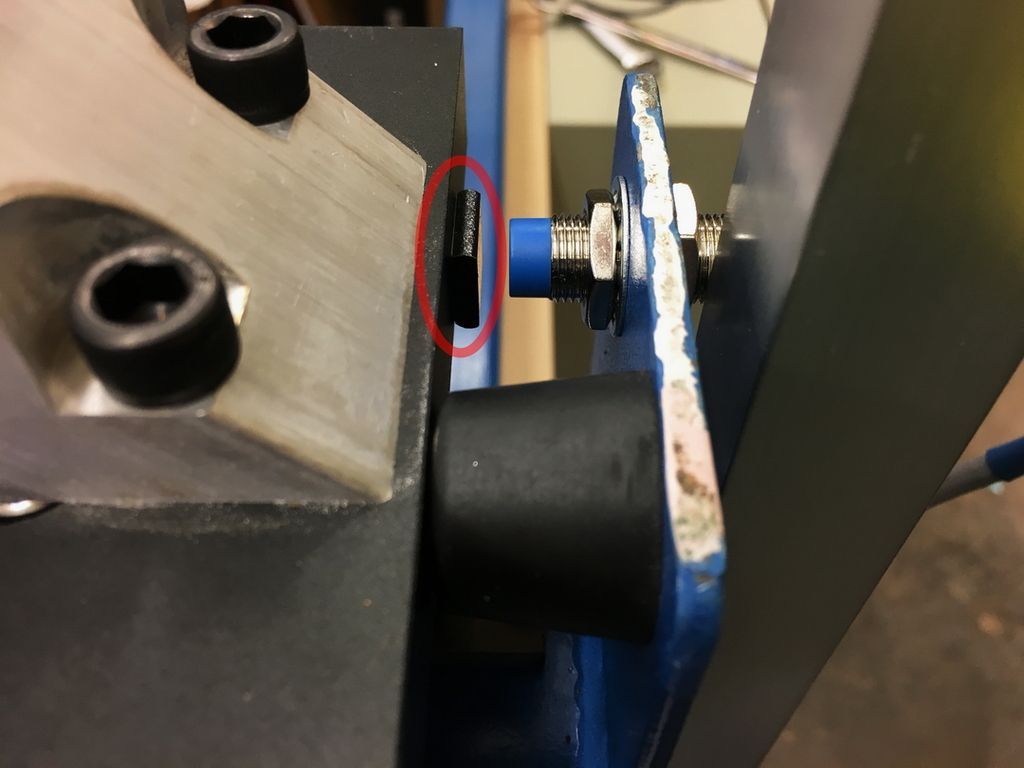

    Y+ proximity -


    Making certain nothing moves or rubs through the outer jacket on the cabling -
    David
    CurlyWoodShop on Etsy, David Falkner on YouTube, difalkner on Instagram

  2. #182
    Join Date
    Jan 2012
    Location
    NW Louisiana
    Posts
    894
    Busy day on sensors, including crushing one - ugh! The design locations for sensors on this frame/machine are less than desirable. I relocated the Y axis sensor positions and made some simple temporary brackets for the X axis sensors. However, the Z axis locations have the sensors pointing at the plastic end piece on the linear bearings. Now, if you have 8mm sensing distance proximity sensors then you might get away with this but mine are 4mm. And here's a little piece of info if you're shopping for sensors - the distances given are for steel. They're half the distance on aluminum.

    I had decided to cut some small pieces of cold rolled steel and attach to the aluminum so I could get my full sensing distance, including onto the plastic for the Z axis. I had set up the sensors for testing and the Z axis was nearly touching the plastic when it tripped but since I planned to add some steel it wasn't going to be an issue. Well, it wasn't until I accidentally jogged the Z axis up instead of down when it was about 1/2" away from the sensor - too far away to trip and just far enough away to fly into the sensor.

    Here's the result -


    The jog rate was only 25% but that was enough to crush the sensor. Luckily I had another sensor although replacing one isn't what I started out to do today. So after that I made the steel pads to double my sensing distance and these give me much greater results. Ultimately I believe the sensors should be alongside the traveling carriage or component instead of directly in the path. That's probably how I'll redesign the mounts once I get finished with the build but I won't tackle that right now.

    Steel pads and the new sensing distance -


    David
    CurlyWoodShop on Etsy, David Falkner on YouTube, difalkner on Instagram

  3. #183
    Join Date
    Jan 2012
    Location
    NW Louisiana
    Posts
    894
    The other task I completed today was to change out the spindle connector. I didn't care for the one that came with the spindle so I ordered an Amphenol and it arrived today. Getting the old connector off was a bear; finally had to take a punch and bust it up. The new connector went in without a hitch and is much more solid.

    Old connector (I planned to shrink the tubing but decided instead to replace the connector so the heat shrink is just sitting there) -


    New Amphenol connector -


    David
    CurlyWoodShop on Etsy, David Falkner on YouTube, difalkner on Instagram

  4. #184
    Join Date
    Jan 2012
    Location
    NW Louisiana
    Posts
    894
    Ha!! Look what I found under all the CNC electronics stuff - a table saw!!


    After I figured out how to turn it on and what it does I did a little woodworking; it's been a couple of months since that's happened in this woodshop. I made a shelf for the spindle water reservoir and added a much needed diagonal brace. I knew it was going to be needed but until I decided on the water reservoir size I couldn't put the brace in. As I expected it is now much, much stiffer in the Y direction. The tub for water reservoir is about 7.5 gallons capacity. The shelf is made with a couple of boards from the shipping pallet for the CNC frame.


    David
    CurlyWoodShop on Etsy, David Falkner on YouTube, difalkner on Instagram

  5. #185
    Join Date
    Jan 2012
    Location
    NW Louisiana
    Posts
    894
    It was time to run the water lines for the spindle and I needed to drop them through the cable tray down to the reservoir so I used a grommet to protect the lines. For about 5 seconds I considered running the lines over the edge but didn't like that.


    Tonight I mounted the radiator, fan, and box with connectors for the pump and fan. The fan is 120Vac and the submersible pump is 12Vdc. The fan will use the top 3-pin connector and the pump will use the bottom 5-pin connector. Neither one needs this many wires but I wanted them different so down the road I wouldn't accidentally plug them into the wrong spot - it won't always be this easy to see down there. I mounted the radiator right over the reservoir so that if a slow leak starts the lid will contain a small amount of water. Also, if I need to drain the lines all I have to do is remove the lid and the radiator is right over the reservoir.

    I'll connect the lines and wire the plugs tomorrow and then I can test the spindle fittings and lines.


    David
    CurlyWoodShop on Etsy, David Falkner on YouTube, difalkner on Instagram

  6. #186
    Join Date
    Jan 2012
    Location
    NW Louisiana
    Posts
    894
    Today I completed the water cooling system for lines and wiring and ran it for testing - all is good! However, not without some hiccups along the way. When I first tried to run the pump nothing happened. I know it works because I tested it, even did a video of me spraying water in the kitchen. So I started troubleshooting and quickly discovered that I had wired the relay inside the enclosure for 5V instead of 12V. That meant I had to do some rewiring with the enclosure on the stand and that's a whole lot more difficult than doing it on the bench.

    After finding a spot to grab 12V I ran the wire to the common side of the relay and with all the confidence in the world I fired it back up, expecting the pump to run. Nothing, nada, zilch... The pump plugs into a 5-pin connector and I had checked continuity after making the cable and soldering everything so I knew that was good. Finally, after about 20 L O N G minutes of searching for broken solder joints, wires, checking polarity, etc. I decided to check the plug on the pump again. For some reason I had soldered the two leads to pins 4 & 5 instead of pins 1 & 2 (like the receptacle). What a dummy! Now it didn't matter which two pins I used but you'd think it would be a good idea to use the same pins on the receptacle and plug - right?! Right! Sometimes I wish I was smart instead of just good looking... ok, at this point in my life I'll take either one. LOL!

    Anyway, here's the completed unit; the filter on the intake is for aquariums and it should stop anything 1/16" or larger. I intend to keep the lid on and monitor the water for sediment or trash so I'll add a better filter later if needed. The discharge hose is fastened to the lid so I can see water flowing out and I'll probably add a flow indicator later. The blue fittings on the pump are anodized aluminum, the capacity of the reservoir is 7.5 gallons, and the tubing is silicone with a continuous use temperature range: -60 ℃ ~ 200 ℃ - I expect to be operating the spindle well inside that range!


    David
    CurlyWoodShop on Etsy, David Falkner on YouTube, difalkner on Instagram

  7. #187
    Join Date
    Jan 2012
    Location
    NW Louisiana
    Posts
    894
    Here's a video testing the cooling system -

    David
    CurlyWoodShop on Etsy, David Falkner on YouTube, difalkner on Instagram

  8. #188
    Join Date
    Oct 2006
    Location
    Bloomington, IL
    Posts
    6,009
    Looks good. I installed one way hose connectors at the spindle in case I needed to remove it. They sell them at mcmastercarr.

    Love my amphenol ecomate spindle connector plug. Hope you like it too.
    Glad its my shop I am responsible for - I only have to make me happy.

  9. #189
    Join Date
    Jan 2012
    Location
    NW Louisiana
    Posts
    894
    Quote Originally Posted by Mike Heidrick View Post
    Looks good. I installed one way hose connectors at the spindle in case I needed to remove it. They sell them at mcmastercarr.

    Love my amphenol ecomate spindle connector plug. Hope you like it too.
    Mike, I really like the Amphenol plug and receptacle - thanks so much for the link!!

    Do you have a link to the connectors from McMaster Carr? These seem to be ok for now but I know there are better available.
    David
    CurlyWoodShop on Etsy, David Falkner on YouTube, difalkner on Instagram

  10. #190
    Join Date
    Jan 2012
    Location
    NW Louisiana
    Posts
    894
    While I didn't really do anything on the CNC today I did do something needed for the CNC; I built a mobile cart for the computer. I don't have room to have a dedicated spot for a computer and related peripherals so a mobile cart was my only real option. This is narrow enough to fit between the table saw and CNC and also narrow enough to go against the wall at the front end of the CNC but it is wide enough to be stable. I can't mount anything to the wall at the front of the CNC even though that spot appears to be available because the attic stairway folds down right there so it's really not usable space, at least not for anything mounted permanently.

    I made this with some of the boards from the CNC shipping pallet and some MDF I had sitting around. The only thing I bought for this project are the HF casters and outlet strip. Both the Ethernet and Modbus cables are 15' long so I have a fair amount of travel available.

    So here's my afternoon project (for me to start and finish a project in one day is close to miraculous!!) -


    David
    CurlyWoodShop on Etsy, David Falkner on YouTube, difalkner on Instagram

  11. #191
    Join Date
    Oct 2006
    Location
    Bloomington, IL
    Posts
    6,009
    http://www.mcmaster.com/#standard-qu...lings/=14n6s6n

    These are sold individually and you want ones with shut off. Mine are mounted about 10" above the spindle.

  12. #192
    Join Date
    May 2007
    Location
    Don't Mess With My Texas!
    Posts
    128
    David, my favorite thing to plug computers into is an uninterruptible power supply (UPS.)

    Looking good!
    Paul
    These words are my opinion, WYLION. Any resemblance to truth or fiction is accidental at best.
    "Truth lies dormant in our future history." ― Paul Lawrence LXXI


  13. #193
    Join Date
    Jan 2012
    Location
    NW Louisiana
    Posts
    894
    Quote Originally Posted by Mike Heidrick View Post
    http://www.mcmaster.com/#standard-qu...lings/=14n6s6n

    These are sold individually and you want ones with shut off. Mine are mounted about 10" above the spindle.
    Thanks, Mike! I may upgrade to these after I've run for a while.

    Quote Originally Posted by Paul Lawrence View Post
    David, my favorite thing to plug computers into is an uninterruptible power supply (UPS.)

    Looking good!
    I thought about a UPS, Paul, and may add one later. Everything in the house is on a UPS - computers, network closet, even the TV/DVR that we never use (we don't watch TV at all); seems like we have about 6 UPS's or so. But I figured if the power goes out or blinks the machine is going to stop anyway.
    David
    CurlyWoodShop on Etsy, David Falkner on YouTube, difalkner on Instagram

  14. #194
    Join Date
    Jan 2012
    Location
    NW Louisiana
    Posts
    894
    I took a break from the CNC build and went out to south Shreveport and helped Tim at Cut & Dry Sawmill cut 375 bd. ft. of Walnut, most of it for me. It took most of the morning but it was a blast and the smell of Walnut in the Fall air is just simply wonderful!! Tim has a solar kiln and he said the 4/4 will be finished drying around Thanksgiving and the 10/4 will be ready around Christmas.


    David
    CurlyWoodShop on Etsy, David Falkner on YouTube, difalkner on Instagram

  15. #195
    Join Date
    May 2007
    Location
    Don't Mess With My Texas!
    Posts
    128
    Quote Originally Posted by David Falkner View Post
    I thought about a UPS, Paul, and may add one later. Everything in the house is on a UPS - computers, network closet, even the TV/DVR that we never use (we don't watch TV at all); seems like we have about 6 UPS's or so. But I figured if the power goes out or blinks the machine is going to stop anyway.
    It isn't that so much as what happens with Windows when the power goes out. The UPS will make your Windows installation much more reliable. Keeping the CNC running is not the reason for the UPS.
    Paul
    These words are my opinion, WYLION. Any resemblance to truth or fiction is accidental at best.
    "Truth lies dormant in our future history." ― Paul Lawrence LXXI


Posting Permissions

  • You may not post new threads
  • You may not post replies
  • You may not post attachments
  • You may not edit your posts
  •