Page 1 of 2 12 LastLast
Results 1 to 15 of 16

Thread: Antique Maple Finish Matching??

  1. #1

    Antique Maple Finish Matching??

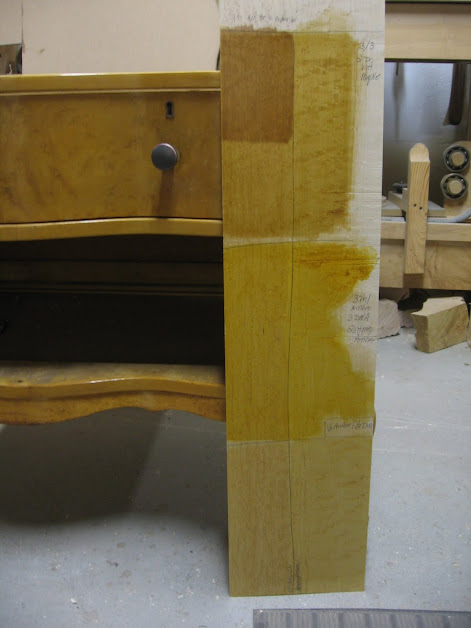
    I have built a figured maple bookcase with birdseye maple verneered panels. I am trying to match the finish to my daughters 100 year old dresser made from the same wood. I have watched video's, read articles, and researched forums to no avail. I have tried tung oil only, Brehlens fruitwood dye (trace coated, sanded completely, and then recoated), and shellac. I have mixed several different dyes in various ratios and reductions to try and achieve the antique yellow collor of the existing wood. Everything I try is either too light, too red, too dark, too much "pop", or just wrong. ANY SUGGESTIONS WILL HELP. Thanks.

  2. #2
    Join Date
    Dec 2010
    Location
    WNY
    Posts
    9,791
    Got a picture of what you are trying to match? And a couple others of your closest samples?

    At this point all I can say is it often takes a multi step process. But if you have made samples that are too light or too dark, but otherwise the right color, then you should be able to get there with persistence.

    John

  3. #3
    Here is a photo of the piece I am trying to match. IMG_0695.jpgIMG_0696.jpg

  4. #4
    Join Date
    Apr 2016
    Location
    Tasmania
    Posts
    2,162
    Dyes will always give a bright and clear colour. Age tends to "muddy" colours somewhat due to both the effects of age and the nature of the polishing materials used. Make up a pigment and dye mix, where the pigment is the base colour and the dye just modifies this base colour towards what you want. Keep the colour weak as you can stain twice if necessary. It will require a bit of experimentation. Cheers
    Every construction obeys the laws of physics. Whether we like or understand the result is of no interest to the universe.

  5. #5
    Join Date
    Mar 2003
    Location
    SE PA - Central Bucks County
    Posts
    65,983
    Please also keep in mind that your "fresh" maple will darken with time, too. So if you do get the color matched to the 100 year old piece...in a few years, your new piece may be darker than the original. Maple isn't going to change quite as dramatically as cherry does, but it will darken...just like most other species. (Walnut, however, gets lighter with oxidation)
    --

    The most expensive tool is the one you buy "cheaply" and often...

  6. #6
    Join Date
    Dec 2010
    Location
    WNY
    Posts
    9,791
    This is a different color, but I used a custom dye mix + a toner (the top set) to adjust the color of this new birdseye maple top to the rest of piece.


    John

  7. #7
    John. This looks very close to what I am trying to achieve. What was your refinish schedule and mixtures if you don't mind me asking.

  8. #8
    Join Date
    Dec 2010
    Location
    WNY
    Posts
    9,791
    I think it's a different color, but here's the recipe I used. Don't try this unless you can spray.

    Dye Mix: 3 ml DNA + 3 ml Amber Shellac + 2 drops Transtint Dark Vintage Maple dye. Spray two coats

    Toner Coat: 250 ml EnduroVar Semi-Gloss + 10 drops Transtint Medium Brown dye. Spray one coat

    Topcoat: EnduroVar Semi-Gloss. Spray 2 coats.

    John

  9. #9
    Thanks John. I actually own a Collision Center with two heated downdraft booths. However, automotive is much different then wood. So yes I can spray, however, I am new to spraying wood. I just wanted some idea of how you came up with the formula. Gives me some good ideas and a starting place. Thanks.
    Last edited by Mitchell Miracle; 11-27-2016 at 11:12 PM.

  10. #10
    Join Date
    Sep 2012
    Location
    Mnts.of Va.
    Posts
    615
    Mitchell,when you say "match",be more specific.Is this match for colour "only"?Or do you want to match chemistry(products used on original pce,laquer vs oil for instance)?

  11. #11
    Really just trying to match color. I just ordered 8 tints of Behlen's Solar Lux so that I can custom make colors. I am new to finishing furniture so I need to use a tried and true system. All suggestions are helpful at this point.

  12. #12
    Join Date
    Sep 2012
    Location
    Mnts.of Va.
    Posts
    615
    We do enough auto work,"to be dangerous".

    Auto's don't have flat panels and near as many square edges.And unless you've been doing "real" resto work,generally aren't shooting,inside-out.

    So,you'll do great on say a table top.Work on shooting edges,really work on overspray here.As with any spraying,make a travel plan and move the "dry spot" around.Insides,the same,where's the overspray going?Also work on mixing lessor amts,same as touch up,spot repairs on quantities of product.Temperature (metal,wood) is not just shop or booth....which you know..wood is the same.Check the actual temp of the pce.A lot of what ya'll are faced with temp wise with waterbournes are directly compared to shooting wood.

    A gravity jamb gun with the needle set on the larger end of what you're used to,1.6'sh,is the cat's behind on furniture,but not so much on cabinets.Jamb guns also flat out eat up mouldings.High transfer efficiency and the scale of typical moulds make them a VG match.

    Google piano finishes.Think buffing out a nice hot rod,same.Ive had vg luck with Presta polishes....even have used them on waterborne wood finishes.Some ways easier than autos because of less edge work,"usually"....get into some fluted columns and all bets are off,haha.Good luck,you're going to be grinning when you see how easy it is��

  13. #13
    Awsome response. Thanks. I am sure that it is a lot different than auto painting. Those of us in the business know that there is a difference from one job to the next. There is a reason a have a water borne mixing bank as well as solvent, four different urethane clears, and 6 (or more) $600 spray guns. I am looking forward to the experience but at the same time I am scared to death to mess up a piece of furniture that I spent 2 months building. With a car I can simply sand it down and try again. No such luck with furniture.
    Quote Originally Posted by Brian W Smith View Post
    We do enough auto work,"to be dangerous".

    Auto's don't have flat panels and near as many square edges.And unless you've been doing "real" resto work,generally aren't shooting,inside-out.

    So,you'll do great on say a table top.Work on shooting edges,really work on overspray here.As with any spraying,make a travel plan and move the "dry spot" around.Insides,the same,where's the overspray going?Also work on mixing lessor amts,same as touch up,spot repairs on quantities of product.Temperature (metal,wood) is not just shop or booth....which you know..wood is the same.Check the actual temp of the pce.A lot of what ya'll are faced with temp wise with waterbournes are directly compared to shooting wood.

    A gravity jamb gun with the needle set on the larger end of what you're used to,1.6'sh,is the cat's behind on furniture,but not so much on cabinets.Jamb guns also flat out eat up mouldings.High transfer efficiency and the scale of typical moulds make them a VG match.

    Google piano finishes.Think buffing out a nice hot rod,same.Ive had vg luck with Presta polishes....even have used them on waterborne wood finishes.Some ways easier than autos because of less edge work,"usually"....get into some fluted columns and all bets are off,haha.Good luck,you're going to be grinning when you see how easy it is😎

  14. #14
    Update. I have mixed too many variations to count but have come up with a color that I am happy with. I have several questions. I applied the die mix directly to the wood and it was pretty blotchy. So i tried a different approach. I used CAB Lacquer 3 to 1 with the dye mix to create a sealer/stain. Then I sprayed CAB Lacquer with no dye in it as a top coat. It is better but still looks uneven. Should I have first used a wood conditioner or straight Sealcoat, sanded that , then applied the dye only mixture, sanded that, then applied either a shellac or varnish top coat? Can I even mix dye with CAB Lacquer or did I break a rule? Any help is appreciated. PS....I am spraying not wiping.

  15. #15
    Well, I updated this but it did not post. So here we go. I mixed dyes together until I got an acceptable match. I sprayed the dye mix onto the maple then top coated with CAB lacquer. It was way too blotchy. So I tried mixing the dye with Cab Lacquer (3 to 1) and spraying it as sort of a seal coat. Then I applied a clear top coat of CAB Lacquer. Less blotchy but still not good enough. So my questions are these. First, I am not even sure you can mix dye with CAB Laquer. Did I break any rules? Second, should I use a wood conditioner or Sealcoat first to seal the pours, sand, then add the dye mix, sand, then topcoat with shellac or varnish. Any help is appreciated. Thanks.

Posting Permissions

  • You may not post new threads
  • You may not post replies
  • You may not post attachments
  • You may not edit your posts
  •