I use a Bowie knife in the place of a hatchet, it works fine on dried hardwoods, a lot faster then planing.
Sometimes you have to put down the pick axe and start with a stick of dynamite.


 Contributor
I use a Bowie knife in the place of a hatchet, it works fine on dried hardwoods, a lot faster then planing.
Sometimes you have to put down the pick axe and start with a stick of dynamite.
Bumbling forward into the unknown.

 Contributor
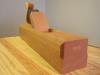
The Stanley N0.5
cambered jack.jpg
The cambered iron in the above picture is from the scrub-jack, I had it out for it's annual sharpening and tune up. It does have about an 8-9" radius
The iron in the #5c in this post was as bought. I merely sharpened the existing camber.
A Stanley No. 5 (smooth sole) I also have, has just the corners done.
A Millers Falls No. 14 has a smooother's straight edge iron.
The Windsor #33 has a 3" camber, as the plane is about a smallish #3 size.
I might stack the jacks up, to show & tell just how they are set up. Maybe when I can get back down to the shop.....
Edit: A stack of Jacks and a scrub..
IMAG0003.jpg
From the bottom up: Stanley #5-1/2, Corsair C-5, a pair of Stanley #5s, a Millers Falls #14, and the Windsor #33
IMAG0001.jpg
Same order of planes, showing the cambers, or lack of camber ( and a wee bit of rust) I got a bit closer to show the edges, had to take two pictures to get then all in..
IMAG0002.jpg
Scrub is a H-F model, with a 3" ( more or less) radius camber. Hope this clears things up.....unless one wants to see where each chipbreaker is.....
Last edited by steven c newman; 12-11-2016 at 12:51 AM.
[OP]
Member
Steve Voigt,
I read the older thread on cambering CB's again this AM. I did find a series of videos Paul Sidener linked to, The English Woodworker series on YouTube. He does three videos on cambers, shaping them, setting the CB's up, methods for adjusting the CB (tapping them into exact position sort of like Derek illustrates on his site)...The information in that video shaped my thinking on cambers and CB placement and I just could not remember where I had seen it. I am bookmarking it this time, so all I have to do next time is search through all my bookmarks...Richard's accent is heavy and my hearing is not the best so it takes a while to ferret out the ideas but it was/is helpful. So thanks for the redirect Steve.
Richard's idea is to set the CB an appropriate distance from the corners of the camber for the size shaving being taken. Makes sense to me, to set the distance relative to the edges/corners of the camber. Richard cambers all his blades like I do but does not typically use very large cambers like scrubs are typically set for. Often scrub blades, without CBs, do not take full advantage of the width of the blade as the camber is so dramatic. Certainly many people are successful with their scrubs but they do make sizable ridges that have to be removed. At this point in my developing skill set I find a point of diminishing returns with cambers that large, certainly the effort it takes to push them through the wood can be an issue.
I promise to wait at least a week before making another post on cambers and chip breakers
Last edited by Mike Holbrook; 12-11-2016 at 8:20 AM.
 Member
Mike,Originally Posted by Mike Holbrook

There's nothing wrong with posting about this stuff, as long as we all understand that the purpose of posting is to jawbone, socialize, argue, procrastinate--but not to actually solve any woodworking problems. Because you won't find answers to these types of questions by starting yet another thread or buying yet another video, book, or monthly subscription. The place you'll find the answers is in your shop.
The video by Richard Maguire is good because its message can be summarized on a fortune cookie: set the corners of the cap iron at the edge of the blade. It's not the only way to solve this problem, but it's a good one, because it's dirt simple. Similarly, everything that needs to be written about the topic of this thread, cambering your (BD) irons, can be summarized on a postcard: camber the jack iron about a sixteenth, the try iron about a 64th, and the smoother iron as little as needed to avoid plane tracks. That's it.
Of course, the devil is in the details, and actually doing these things is more complicated, but they don't need to be put into words (and in many cases can't be); they just need to be learned with hands and eyes, and lots of practice.
"For me, chairs and chairmaking are a means to an end. My real goal is to spend my days in a quiet, dustless shop doing hand work on an object that is beautiful, useful and fun to make." --Peter Galbert
 Member
Steve,
I think that is known as cutting to the chase. Now if I can get this tired old body off the floor and stop laughing I will head to the shop and finish truing a couple of boards with a Jack, Try, and Smoother.
ken
 Member
To my way of thinking, in my shop cambered blades are all about rapid stock removal. My scrub plane has a pretty extreme camber and I'd be lucky to peel off shavings as wide as my thumb and those would be about a 1/16" thick and require plenty of horsepower in anything from poplar to the harder woods, hard maple on up would be pretty much impossible cherry and walnut doable. I don't want tearout at this stage as it can be horrendous so I pay attention to where it occurs and change my attack. All of my benchplanes are sharpened flat with faintly eased corners, I've never found an advantage to having them any different.
 Contributor
One of the details often overlooked in these long jawboning sessions is we all work different species of wood.
The soft western firs or alder often found in my shop will need a different 'angle of attack' compared to maple, cherry, walnut, Southern Yellow Pine or just about any of the other woods commonly used by others.
There is no 'one size fits all' approach imo.
jtk
"A pessimist sees the difficulty in every opportunity; an optimist sees the opportunity in every difficulty."
- Sir Winston Churchill (1874-1965)
 Member
Try picking up a smaller plane and setting it up with an aggressive camber. Use it with a sharp blade with the chipbreaker pulled way back, or nonexistent. Set it for a fairly shallow cut at first then as the work progresses and you get the feel of it deepen the cut until either the amount of push required starts to go up markedly or the amount of tearout starts to go up markedly. Back off from there a bit. Unless you are using this to make the whole board thinner (better done by resawing) don't work the entire board. Use straight edges and winding sticks to identify the high spots and work them down. When you get close, perhaps 3/4 of the board has scrub plane tool marks switch to a longer plane with much less camber.
The small plane set up as a scrub will have a narrower sole, better matching the narrower bit of heavily cambered blade projecting at the center of the mouth. The short sole is a better match for what is essentially a local small area process, hogging off high points. The lighter body is a better match for a planing operation requiring a bit of muscle.
Stanley and others made a dedicated scrub, #40 I think. It has a narrow, short sole and no chipbreaker. It goes for silly collector prices on ebay. The harbor freight #3 size plane will work fine for the purpose with an aggressive camber ground to the cutter. I'd recommend against making a scrub out of a good quality #3. They make really nice smoothers.
Member
The purpose of a close-set cap iron is to prevent tearout during medium and fine cuts, which are typically on the order of 5 mils deep (a bit more for jointing and possibly much less for smoothing). Significant camber in the sense of a circular edge profile is counterproductive in those applications as it causes you to take a cut that's either deeper or narrower than ideal.
In other words, the planes on which I use camber either lack a cap iron (scrubs) or have it set well back (jacks configured for roughing).
I do curve the edges of my smoothers' irons by several mils to preven tracking, by applying pressure over each corner during honing (I'll never call that "relief" again after our last go-round here). In those cases I typically set the cap iron extremely close to the blade corners. Note that if the corners are retracted into the sole such that they won't cut, then there's no reason why you couldn't set the cap iron *below* the corners. I've seen several people do that.
 Member
Cambering the cap iron. What an innovative idea. You could even try honing a really sharp edge on the said cap iron and adopt a totally new practice of retracting the actual blade instead of the cap iron. Mr Yamamoto, or whatever his name was that produced that video over 10yrs ago on a closely set cap iron would be most interested in hearing the results..
Last edited by Stewie Simpson; 12-12-2016 at 5:34 AM.
Member
The threaded view says you're replying to my post here, but I never suggested cambering the cap iron. It's generally a good idea to read before you reply...
Contributor
It only seems logical if you didn't mention cambering the cap iron he must be replying to someone who did or the idea in general.
It has been my experience the software running this site has as much to do with such confusions as the participants.
jtk
"A pessimist sees the difficulty in every opportunity; an optimist sees the opportunity in every difficulty."
- Sir Winston Churchill (1874-1965)
[OP]
Member
Steve remarks
"The video by Richard Maguire is good because its message can be summarized on a fortune cookie: set the corners of the cap iron at the edge of the blade. It's not the only way to solve this problem, but it's a good one, because it's dirt simple. Similarly, everything that needs to be written about the topic of this thread, cambering your (BD) irons, can be summarized on a postcard: camber the jack iron about a sixteenth, the try iron about a 64th, and the smoother iron as little as needed to avoid plane tracks. That's it."
I appreciate your condensing this information and I understand your frustration at discussing it rather than working it out in the shop. Still it seems to have taken this many posts and this length of discussion to get down to how much camber is reasonable to use for the kind of work I am doing. Like Jim mentions above we all use different woods and have unique situations. I may be unique among posters here, as I am not looking for a dead flat surface on a large percentage of my work. I actually want to see tool marks as I feel they are part of hand made work and they are consistent with the rougher style furniture I want to build to go in a "rustic" log home.
In regard to the videos I was talking about by Richard (The English Woodworker), he does three separate videos, just on setting chip breakers (CBs). The point I got from Richard's videos was the distance the camber extends past the corners of CB needs to be adjusted in very small increments that correspond to the thickness of shaving one is taking.
Bridger, I tried to relate my remarks to two specific planes that I have been working with recently, #5 1/2 & #4 Veritas Custom planes. I tried to relate those planes two specific sizes of two species of wood. I have a plane set up as a scrub but I was trying to relate discussion to specific work to get more specific about how to set up planes for that work.
If we are not here to get better at using hand tools for specific work I am wondering what the point of the forum is? Do some feel this forum should only be used to post pictures of work in progress and finished work? I am not trying to be sarcastic I am genuinely interested in what people think. I can understand the point that endless discussion without any production of work might be considered pointless but I can also see how people with less experience might be reluctant to post their work here as they might feel the bar is often quite high.
Contributor
Mike,
Add camber to the blade until it acts how you would like it to act (clean deep cuts, clean shallow cuts, etc).
It depends on so much including the wood you cut and your ability or want to push the plane with a given resistance.
I think these things should be discussed, but I think comments like Steve's bring it back to earth and make the point that these things are subjective and often times a lot is made of a little.
Personally I'd like to see topics explored outside of sharpening and cap iron setting.
Last edited by Brian Holcombe; 12-12-2016 at 2:41 PM.
Bumbling forward into the unknown.
Contributor
Like maybe cutting box joints?
 Posting Permissions

 Reply With Quote