
-
Thank you....keeps me out of the local Taverns...
OK, last drawer needs worked on. Sides I had,....were way too thick, almost 4/4"
Decided to cut new sides. At least they will match the thickness of the drawer's front
IMG_1563 (640x480).jpg
Different crosscut saw, today. I like to rotate them through...two sides were cut to almost the right length, needed to clean up/square the ends..
IMG_1565 (640x480).jpg
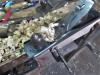
small jointer for the rough edges...
IMG_1564 (640x480).jpg
And a larger jointer for the edges of the drawer's front.
IMG_1567 (640x480).jpg
Stanley No. 6c, type 10...looks like this will be a two-parter....
IMG_1569 (640x480).jpg
Welcome to my world....new light seems to help out.
IMG_1570 (640x480).jpg
Laid out for more saw work...
IMG_1571 (640x480).jpg
Helps when I rub the saw's plate with a candle...
IMG_1574 (640x480).jpg
Laid out a few chisels, and a mallet. Chop 1/2 way down then flip the board over, and finish the chops.
Hmm, out of picture space? Ok, Part 2, coming right up...stay tuned
-
Ok, Pins were done on both ends of the drawer front..
IMG_1575 (640x480).jpg
Used these, AND a sharp pencil, to lay out the tails. Bandsaw to cut the waste side of the lines..and a little extra in-between..
IMG_1576 (640x480).jpg
The less I have to chop out, the better. As with the pins, I chop 1/2 way from each face...and clean up..
IMG_1577 (640x480).jpg
About time for dry fits?
IMG_1578 (640x480).jpg
Didn't want to dry it all the way in.....
IMG_1579 (640x480).jpg
Joints are tight, there is nothing else holding this up, but those joints. Late lunch, and then I'll see about putting this 92 yr old to work..
IMG_1580 (640x480).jpg
Need grooves to house the bottom. Since this is the last of the drawers, I can switch the 45 over to do a couple 3/4" dados...
Busy afternoon, maybe more later? Stay tuned....
-
Well, couldn't sit around and do nothing, all evening, so...
IMG_1582 (640x480).jpg
Made some grooves....dug out The Box..
IMG_1585 (640x480).jpg
Changed out the #12 cutter, for an 18-1/2 cutter....set the spurs
IMG_1586 (640x480).jpg
PITA to do...Rigged up a way to hold the drawer sides in place
IMG_1589 (640x480).jpg
Before I started to make a dado...I ran the spurs back towards me, to score the wood, then followed up with a backsaw to prevent any blowouts..
IMG_1591 (640x480).jpg
Then repeat for the other side. Resaw to make the back..
IMG_1594 (640x480).jpg
Also needed shortened a bit. Got the plywood cut for the bottom....took a few tries. Bevel the edges so it will slip into the grooves better..
IMG_1596 (640x480).jpg
Once everything fit together, a glue up was done... Added a few screws to hold the bottom to the back, until the glue dries. couple screws through the sides and into the back.
IMG_1597 (640x480).jpg
Gatorades and that fan helped. batteries for the drills were going dead. I think I'll stop for the night...
Need the walnut strips applied tomorrow, and the two knobs. Then a LOT of sanding to prep for Amber Shellac....hopefully this weekend?
Stay tuned....
-
Drawer taken out of the clamps. Screws from the sides into the back of the drawer were pulled back out, a counter sink was made, then the screws were run back in.
Corners were flattened with a #4c
IMG_1601 (640x480).jpg
The recess for the walnut strips was made. Walnut cut to fit and glued and pinned in place..
IMG_1607 (640x480).jpg
I leveled the strip with the front of the drawer, AFTER using a nailset to drive the pins in.
Part of the tool list for these drawers, was a rasp....and NOT just any rasp..
IMG_1608 (640x480).jpg
Name stamped on it? Johnson. Hmmm
Anyway, got the knobs installed. Then a test fit..
IMG_1609 (640x480).jpg
I think this will do....as a PIP?
Need to sand this all done to 220 grit.....then dust it off, before I start brushing on the Amber Shellac
IMG_1610 (640x480).jpg
I think the "Build" part is about done....will be back after the finishing is done...thanks for following along.
IMG_1612 (640x480).jpg
Fun little project...
-
And now a question:
Bullseye Amber Shellac will be used......do I thin it down to brush on? DNA to thin? Been almost 30 years since I've used shellac....
Hope I didn't bore anyone...
-
Case and the drawers have all been sanded down to 150 grit....hand planed as needed, glass-scrapered as needed. Will try to get to 220 grit. tomorrow....
Priced a quart of Bullseye amber shellac.....$14 or so, plus a new brush. Maybe this weekend?
-
I usually thin it. Pretty much eyeball it, since it is a pretty forgiving finish. I like it thinner to start for the first couple of coats.
-
Top of the chest and the fronts of the drawers are now sanded to 220 grit..
IMG_1617 (640x480).jpg
Had a few areas that needed a bit more than sandpaper
IMG_1614 (640x480).jpg
Millers Falls #56B. A few high spots.....
IMG_1615 (640x480).jpg
Along with this little plane, I used a piece of glass to do a bit of scraper work. Had rough rough spots the sander couldn't reach..
Just a looksee, I wanted to see HOW the BLO would have worked..
IMG_1613 (640x480).jpg
Meh..I'll still use the Amber Shellac, as planned.
Need to move this heavy thing upstairs, away from the dusty shop. Might take a couple people to move it...
-
Still waiting on finishing supplies to arrive....one check is late, and it is the one paying for the stuff. Two retirement checks,, always late when you need them.
1 qt. Bullseye Amber Shellac
1 can (SMALL one) of DNA to thin the shellac
1 tub to mix the two in.
Good brush or two...
Rest of the items I need are already in-house.
Will report when things get a "coating" if anyone wants to see....
-
Update! Checks are here....may be able to get this little project done.....
May start a new thread..once I figure out what to do with all of these "extras"
poplar.jpg
Poplar 3/4" thick. There is also some 1/2" x 12" x 8' upstairs...(box project?)
cherry.jpg
Have some Cherry...mostly a Flame Cherry..
flame cherry.jpg
3/4" stuff.....(Drawer fronts?)
maple.jpg
Most of the Maple in stock..some Curly, some not....have a couple larger pieces upstairs....
scrap pile.jpg
Haven't dug through the scrap pile....at least it doesn't move on it's own. Secondary wood?
Have a bit of Walnut on hand. A 3/4" x 4" x 7' and these little pieces..
walnut.jpg
That have a fancy grain to them..
fancy.jpg
maybe "accent" for other woods? Single Brain Cell Sketch Up is working on a plan....waiting to see WHAT it comes up with...
-
Loaded up with wood! Love it.
-
First coat or two of amber shellac.
.end view.jpg
Side view....
top.jpg
Top view...and...
IMG_1642 (596x640).jpg
From the front.....will be adding a few more coats Wednesday , I hope. 50/50 amber shellac-DNA....
-
Beautiful work! Walnut accents look great.
-
Happy and Safe Turning, Don
Woodturners make the world go ROUND!
-
Thank you!
waiting to see how this second coat turns out....before deciding on whether to add a coat of clear gloss varnish...
IMG_1643 (477x640).jpg
Maybe?
IMG_1645 (355x640).jpg
Couple of spots need fixed, first...
IMG_1644 (626x640).jpg
Maybe go without the DNA next coat?
 Posting Permissions
- You may not post new threads
- You may not post replies
- You may not post attachments
- You may not edit your posts
-
Forum Rules


 Reply With Quote

