Found a No. 8 today. Big honkin' plane!
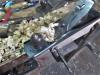
I am worried the lever cap Is too damaged to use. Please see pictures.
Everything else is in decent working condition.
IMG_20171010_141710.jpgIMG_20171010_141641.jpg


 [OP]
Member
[OP]
Member
Found a No. 8 today. Big honkin' plane!
I am worried the lever cap Is too damaged to use. Please see pictures.
Everything else is in decent working condition.
IMG_20171010_141710.jpgIMG_20171010_141641.jpg
Last edited by Jaze Derr; 10-10-2017 at 5:41 PM.
I wear my mind on my sleeve; I have a history of losing my shirt! -BNL
A woman's work is never done-but power tools help!
 Contributor
Nah...just grind it back until even across the edge....then back to work.
Old-timers used to use that edge, to loosen the bolt between the chipbreaker and the iron.
Should still be plenty of contact area, even after the grinder.
 Contributor
Which is the reason so many of them are found chipped up like yours.Old-timers used to use that edge, to loosen the bolt between the chipbreaker and the iron.
Grind it or not, it should work fine.
jtk
"A pessimist sees the difficulty in every opportunity; an optimist sees the opportunity in every difficulty."
- Sir Winston Churchill (1874-1965)
Member
If you grind it back, don't leave a sharp corner on the top (the part facing up when it's installed); round that off, so chips can flow over it.
And, yeah: when you get that No. 8 working, and you use it for a day, or even an afternoon, you'll notice every muscle in your shoulders and arms; but you will also really enjoy admiring the surface you leave behind.
Last edited by Bill Houghton; 10-11-2017 at 10:32 AM.
[OP]
Member
Thank you all! I'm very encouraged. The lever cap was the only issue aside from rust and lost japanning.
I wear my mind on my sleeve; I have a history of losing my shirt! -BNL
A woman's work is never done-but power tools help!
Member
Lost japanning is not a big functional deal, except for rust resistance; but any good metal-compatible paint will help with that (I notice you're on the coast. We nearly are, and share your wet winters. A dry shop helps). My No. 8 is entirely free of japanning and works just fine.
I use vinegar for rust: soak the plane parts in white vinegar for 24 hours, use a brush (brass bristles are nice - see your hardware store's paint supplies aisle) to scrub off the now loose rust, neutralize the vinegar with a baking soda solution or remove it with lots of running water, then spray liberally with WD-40 to "neutralize" the water. Let it sit a bit, then dry off. If you're going to paint, consider Ospho or a similar phosphatizing compound on the areas to be painted.
Other folks like Evaporust, citric acid (similar to the vinegar), or electrolysis. I like vinegar for the simplicity and ready accessibility in the grocery store.
Do feel free to post a picture of the completed plane here.
Contributor
Howdy Jaze,
Here is a post you might find to be of help with putting that aircraft carrier of planes back to work:
http://www.sawmillcreek.org/showthre...ker-to-Jointer
jtk
"A pessimist sees the difficulty in every opportunity; an optimist sees the opportunity in every difficulty."
- Sir Winston Churchill (1874-1965)
[OP]
Member
I dated the plane yesterday, and was rather shocked to discover it's a type 5, circa 1885-88. I'm not interested in collecting, and it's not really in collectible shape, to be honest. Going to put the old man back to work, and maybe later I'll make him pretty.
I wear my mind on my sleeve; I have a history of losing my shirt! -BNL
A woman's work is never done-but power tools help!
Member
Old men are rarely pretty...(insert smiley face).Originally Posted by Jaze Derr

Contributor
Yep, once one of my old rehabs gets put together and running well there is no desire to take it apart and clean it up again for a paint job.
jtk
"A pessimist sees the difficulty in every opportunity; an optimist sees the opportunity in every difficulty."
- Sir Winston Churchill (1874-1965)
Member
I came across a very serviceable Type 4-5 hybrid No. 5 Stanley at an estate sale that appears to be original in all respects except that the iron is a replacement as it has a trademark from 1903. There was also an early 1900's Sargent VBM No. 5 with it and I was told that both planes likely had the same original owner. I was curious as to why after 20 years of using a Stanley the owner would switch brands. Turns out the Stanley Type 5 was their last plane with a right hand thread for the blade height adjustment nut. Since the owner couldn't buy a new Stanley that worked like his old one, he switched to a Sargent which was using expired Stanley patents and thus also had a right hand adjustment knob. Since I don't want have to remember which way to turn the knob to raise or lower the blade, I'll be selling both of them as I have several other No. 5's with the now standard left hand thread.
Member
My #8 is a type 6, and I love it. One nice thing about the large planes in older types is the castings tend to be thin, so the weight is not so terrible to deal with. There is a huge difference in casting thickness between my #8 and my type 17 (or thereabouts) #7. It wouldn't surprise me if the 7 was a touch heavier than the 8, but I haven't measured.
The wrong-way adjuster wheel has never bothered me.
 Posting Permissions

 Reply With Quote