Results 1 to 11 of 11

Thread: Pirate Chest Build

  1. #1
    Join Date
    Feb 2011
    Location
    Carlsbad, CA
    Posts
    2,230
    Blog Entries
    2

    Pirate Chest Build

    This is a build of a small walnut chest 21” long x 14” high x 14” wide, with a coopered convex curved top. My band saw motor stopped working (I think it’s the capacitor?), so this is 100% Neander build. I wasn’t planning on posting so my apologies for not taking pictures of some the earlier parts of the build.

    I have some left over walnut from a previous project and decided to build this chest to use up the scraps. I’ve built this design a couple times before in larger sizes. The carcass construction is sort of complicated (more on that later), and so I’m hoping the repetition will help me improve the execution this time around.

    I start with the curved chest top because final dimensions are always different than the plan. Once it’s assembled it’s easier for me to build the rest of the carcass to fit the chest top.

    I like including curves to my work but I’m terrible at executing them – they always take more time and effort with a higher probability of train wreck results. However when they work out I think they look kind of cool. I don’t know how to do curved laminations so to make the convex lid I used 1 ½”h Wide x 1” thick staves. Even though the chest is small, used 1 inch thick stock for the top because my experience is planing the top and bottom surface of the lid into a smooth, fair curve removes more stock than I usually anticipate.

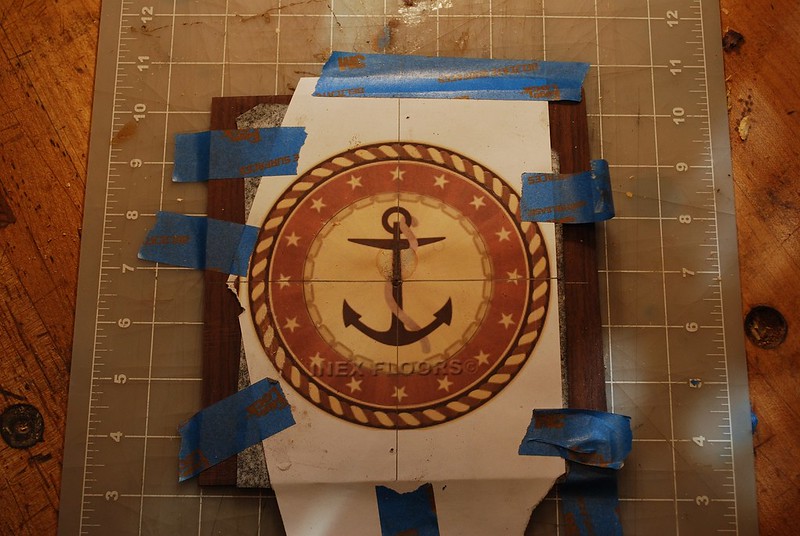
    First step is to make a template for the curve (this is an 18” radius) and build a jig for both the convex and concave curves to hold the top during glue up and shaping. I tried to glue up curved panels like this without the jig and it never works out – impossible to get clamping pressure without pieces flying everywhere. I put spaces on the bottom of the jig so that you can get clamps to hold the staves against the curved template during glue up.

    1 by Mike Allen, on Flickr


    I beveled the edges of the staves at approximately 5° with the jointer plane. This is just a rough approximation because the final matching bevel angles for adjacent staves are planed by eye once you have them sitting on the jig and can see how they fit.

    Here’s some pictures of the glue up and initials shaping of the top and bottom surfaces of lid. For the concave underside of the lid the biggest round molding plane you have is super helpful, however lots of the shaping work is done with a gooseneck (curved) card scraper and sandpaper.

    4 by Mike Allen, on Flickr

    2 by Mike Allen, on Flickr

    3 by Mike Allen, on Flickr

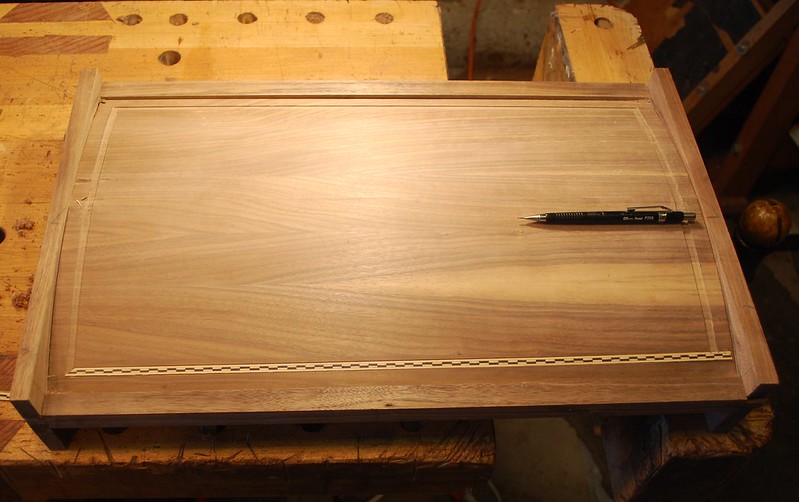
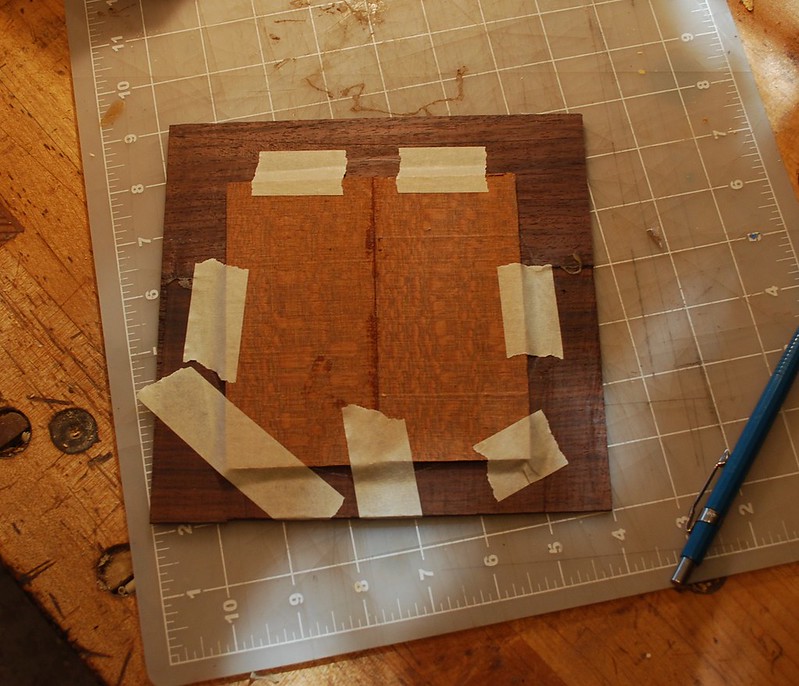
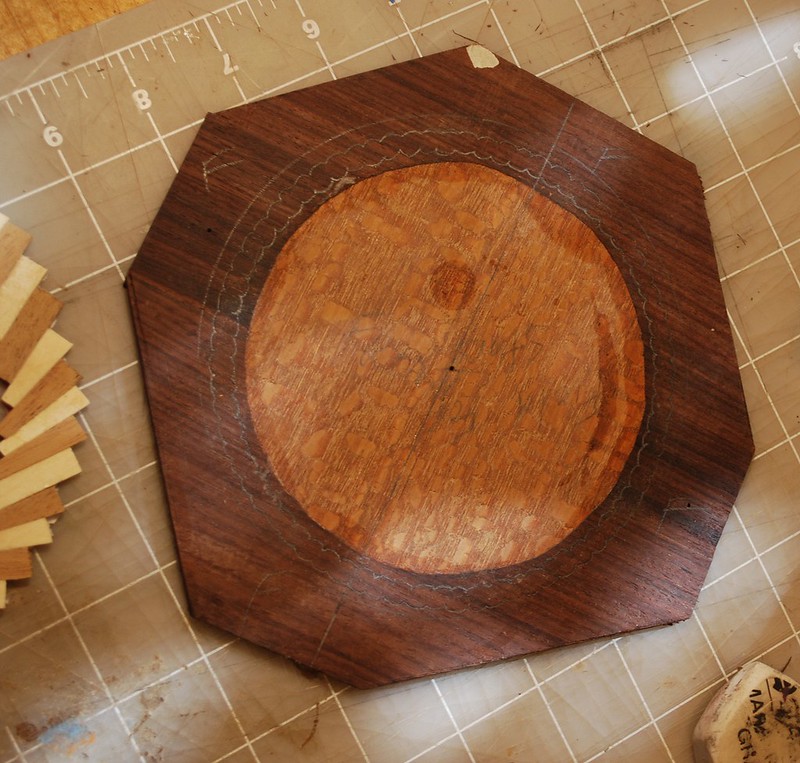
    Once the lid is surface, I use a marking gauge and paring chisel to establish a quarter-inch Tennon on all 4 edges that will capture the lid that sort of a “curved panel” in the dovetailed, surrounding frame. Once the rabbit is established, use a rabbit plane to all golf most of the waste. For the curved edges I also establish a small rabbit on the underside of the lid. Because the lid is not uniform thickness and goodness knows the curves probably not uniform either, I would use the panel to Mark out the corresponding curved groove in the frame. Because it’s hard for me to get this groove to precisely match the curved edges of the lid, the rabbits on top and bottom help cover up a poor fit.

    5 by Mike Allen, on Flickr

    6 by Mike Allen, on Flickr

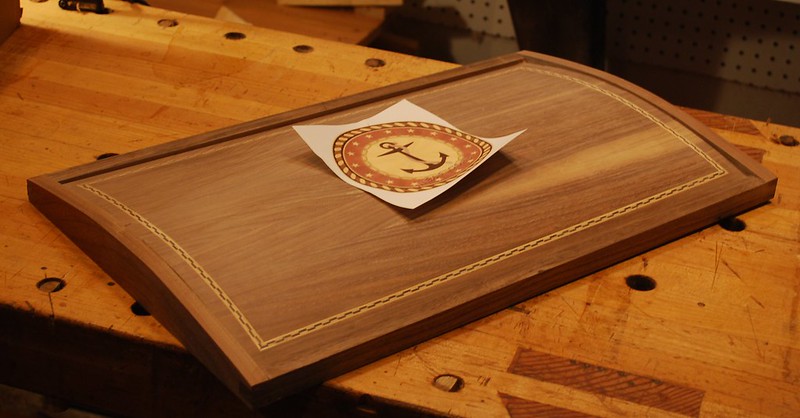
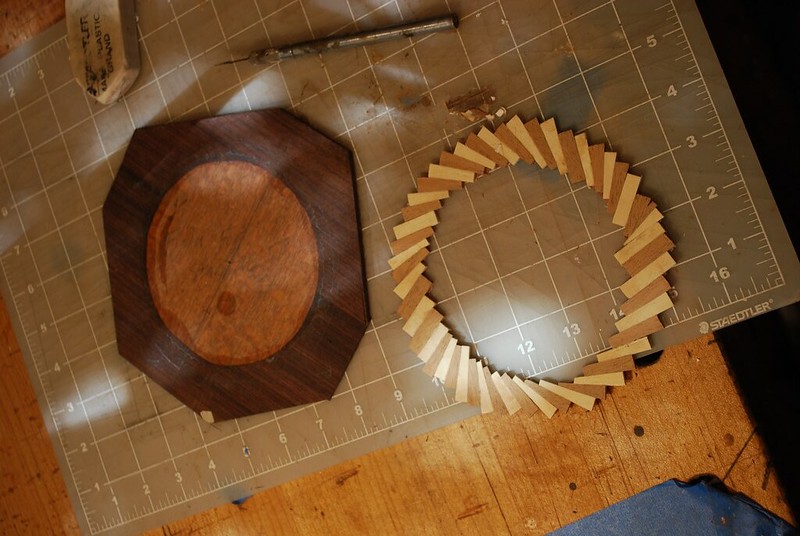
    Here are the curved parts of the frame dry fit to the lid. I was able to re-saw stock with a curving grain pattern that I hope will help fit the look to the construction. I left these pieces overly wide so that I can rip off the bottom portion to use for the corresponding top rail of the carcass and get a nice grain match. The dry fit also helps me layout the curves on the frame so that they terminate at the same height as front/back rails. While shaping the curve, I somehow cracked the PM-11 blade of my spoke shave right at the alignment holes with the depth adjusters. Note to self: next time don’t tighten blade capture screw so much!

    7 by Mike Allen, on Flickr

    7 by Mike Allen, on Flickr


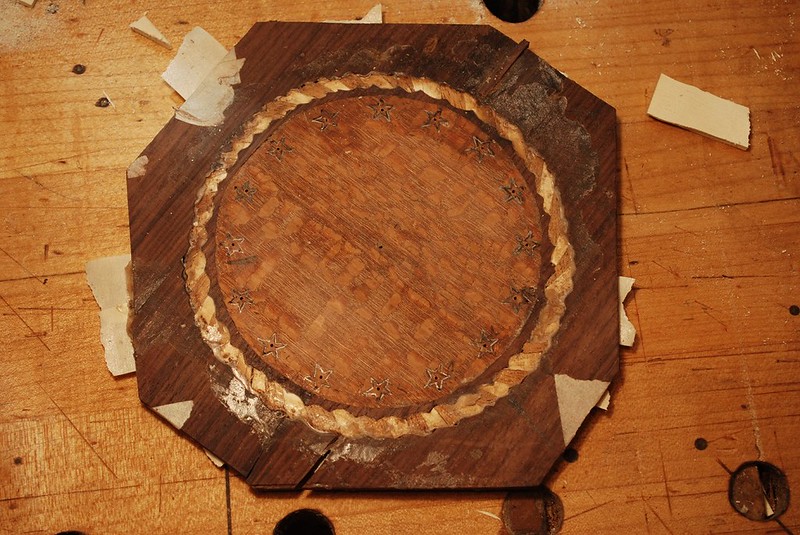
    Front and rear pieces of the frame are dovetailed to the ends. I leave height of the frame slightly proud of the curved panel in hopes of adding some extra strength/protection for the fragile panel

    8 by Mike Allen, on Flickr

    Here is planing the bottom edges of the chest lid that will make to the carcass flat.

    9.5 by Mike Allen, on Flickr

  2. #2
    Join Date
    Feb 2011
    Location
    Carlsbad, CA
    Posts
    2,230
    Blog Entries
    2
    Before assembly I used a fenced router to plow a groove for banding. I always make a test groove to ensure the banding fits correctly before plowing the groove in the actual work piece. That’s because I’ve screwed this up before and it’s almost impossible to shim in tiny pieces of banding to fill in a groove that’s too wide.

    10 by Mike Allen, on Flickr

    I’m going to attempt to inlay a nautical design in the chest lid. Here are the assembled inlay tools. I like to use 1/8 of an inch thick, shop sawn solid stock for inlay because it gives me more thickness to work with during final surfacing. I have used veneer before but always have problems with planing/standing completely through it during the last step in the process – ugh I hate when that happens! Really the only “special” tools I use for inlay are super small fret saw blades (I get mine from Lee Valley I think there 0/8 size – but I’m not really sure) and super small drill bits to make the starter hole when initially threading the fret saw blade through the stock.

    12 by Mike Allen, on Flickr

    13 by Mike Allen, on Flickr

    14 by Mike Allen, on Flickr

    Here the design template is taped to the “field” veneer and the design is traced with graphite paper and stylus onto the work piece. Be sure to drill reference holes through the design template and fields stock so that you can always realign the design template in the same place for subsequent steps.

    15 (2) by Mike Allen, on Flickr

    Next the lighter colored’s veneer for the field that will contain the stars is taped to the underside of the field and sawn through on the birds mouth at ~ 8° bevel angle.. For a theoretically round piece like this, be sure to make reference marks to indicate how the inlay piece fits to the field. Nothing worse than doing all the work of sawing out the piece and then trying to force it in where it doesn’t fit because it’s misaligned! Also helpful to drill a reference hole completely through the center of the field so you can use dividers to redraw a clean circle for subsequent pieces/steps.

    16 by Mike Allen, on Flickr

  3. #3
    Join Date
    Feb 2011
    Location
    Carlsbad, CA
    Posts
    2,230
    Blog Entries
    2
    17 by Mike Allen, on Flickr


    Another mistake I make all the time is making the size of the inlay blank too small. When you tape up the piece going to be inlaid into the field you’re working on the backside so can’t exactly see if the piece is completely aligned with the hole you’re going to cut out for it when working from the top/front side of the field veneer where you’ve traced the design. Consequently it’s always better to make the inlay blank larger than necessary so you can be sure it will overlap with the hole your cutting for it.

    Here’s an example: picture of glued up alternating dark/light stock that hopefully will be the rope that surrounds the outside of the design. The pictures here are my 2nd attempt because the first time I made these pieces too small. I thought I had them taped up overlapping with the design but when I sawed the rope out, I was very “disappointed” to learn my inlay piece did not completely overlap and I had huge voids- arggggh- I especially hate when that happens!

    18 by Mike Allen, on Flickr

    Here’s a result of my 2nd attempt at the rope inlay. I initially tried to glue rope inlay misaligned with the field which is why the field is cracked. Ultimately I hope I got in the right alignment – won’t know until everything is done and I plane the show surface flat.

    19 by Mike Allen, on Flickr

    Finally here’s the glue up inlay piece of Holly for the stars. Tiny pieces like this are always a huge PITA- hard enough to saw out small pieces like these quarter-inch stars, however the kiss of death is having the sawn star fall on the bench and then having to figure out how it fits in the overall design. That’s why there so much tape.

    20 by Mike Allen, on Flickr


    Sorry for the digression into inlay, I know it’s not everyone’s cup of tea. It’s not really mine either – I’m looking forward to getting back to the nuts and bolts joinery of building the carcass.

    Thanks for looking. All the best, Mike

  4. #4
    Join Date
    Mar 2015
    Location
    SE Michigan
    Posts
    3,225
    Thanks for sharing Mike. Appreciate the step-by-step...I always pick up a few techniques...especially the unwritten one for patience and willingness to start over when things go a little south. Look forward to seeing the rest of this build.

    Not that you need reminding, but if you plan to put this pirates chest on your front porch to hold candy for Halloween...you only have a few days left, my friend.

  5. #5
    Join Date
    Aug 2012
    Location
    Missouri
    Posts
    2,152
    Having recently finished a stave lid chest myself I'm enjoying watching your build. The inlay work is looking good.
    Jim

  6. #6
    That build is going really well. Please keep us updated.

    P.S. I would guess you could return that spoke shave blade as defective.

  7. #7
    Join Date
    Sep 2008
    Location
    N. Idaho
    Posts
    1,621
    That top is a beauty Mike!

    Curious, how much flex is in the 1/8th veneer? There not much it needs to bend, but are worried about gaps opening when you’re done? Also curious about how you plan to make the recess in the curved top to receive the inlay?

    As always, thanks for posting!

  8. #8
    Join Date
    Jun 2013
    Location
    Neither here nor there
    Posts
    3,841
    Blog Entries
    6
    Arrrr matey, that tharrrr be a nice treasarrrr Chest. You be quite an arrrrrtist.

    That's well done and will be very nice. The rope inlay is looking good. I do a lot of intricate inlays in my work and I would struggle with that one as well.

    I happen to have a bit o' pirate in me. I live just a few blocks from Blackbeard's Castle. Here's me, Cap'n Mal, with me notorious sidekick.

    IMG_2335.JPG

  9. #9
    Join Date
    Aug 2013
    Location
    Princeton, NJ
    Posts
    7,298
    Blog Entries
    7
    Beautiful work Mike! You've really mastered these coopered tops.
    Bumbling forward into the unknown.

  10. #10
    Join Date
    Apr 2008
    Location
    Provo, UT
    Posts
    390
    Keep it coming. I aways learn so much reading these threads. Great job Mike!

  11. #11
    Join Date
    Feb 2011
    Location
    Carlsbad, CA
    Posts
    2,230
    Blog Entries
    2
    Quote Originally Posted by Malcolm Schweizer View Post
    Arrrr matey, that tharrrr be a nice treasarrrr Chest. You be quite an arrrrrtist.

    That's well done and will be very nice. The rope inlay is looking good. I do a lot of intricate inlays in my work and I would struggle with that one as well.

    I happen to have a bit o' pirate in me. I live just a few blocks from Blackbeard's Castle. Here's me, Cap'n Mal, with me notorious sidekick.


    Malcolm, I can plainly see why you and your side kick must surely instill fear in the hearts of any sailor in your latitudes!! Although you my friend are clearly posing for the next Pussers rum advert, it's clear you're adorable side kick is obviously the brains of your partnership!!!

    Cheers, Mike


    IMG_2335.JPG

    Malcolm, I can plainly see why you and your side kick must surely instill fear in the hearts of any sailor in your latitudes!! Although you my friend are clearly posing for the next Pussers rum advert, it's clear you're adorable side kick is obviously the brains of your partnership!!!

    Cheers, Mike

Posting Permissions

  • You may not post new threads
  • You may not post replies
  • You may not post attachments
  • You may not edit your posts
  •