Page 1 of 2 12 LastLast
Results 1 to 15 of 18

Thread: hall cabinet

  1. #1
    Join Date
    Sep 2003
    Location
    Plano, TX
    Posts
    2,036

    hall cabinet

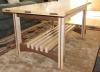
    Finally got a digital camera, albeit only a basic 5 mp one. Here are pictures of a hall cabinet I completed earlier this summer. The frame is Mahogany, the pannels are maple and the veneer is Olive Ash. The mahogany has a MinWax red Mahogany stain while the pannels have golden oak Danish oil, no stain on the veneer. Everything is then topped of with wipe on poly 5 + coats. Let's see if I can figure out how to attache pictures now.
    The means by which an end is reached must exemplify the value of the end itself.

  2. #2
    Join Date
    Feb 2003
    Location
    Just outside of Spring Green, Wisconsin
    Posts
    9,442
    Zahid, would love to see the pics! A few things to keep in mind when trying to do so: Make sure your image size is under 107KB in size for jpg format. Try to keep the width of the picture to about 650 pixels. Once you "upload" with the attachment manager, do NOT try to preview the pictures! For whatever reason, that pretty much aborts the entire picture attaching routine.
    Cheers,
    John K. Miliunas

    Cannot find REALITY.SYS. Universe halted.
    60 grit is a turning tool, ain't it?
    SMC is totally supported by volunteers and your generosity! Please help if you can!
    Looking for something for nothing? Check here!

  3. #3
    Join Date
    Sep 2003
    Location
    Plano, TX
    Posts
    2,036
    Here we go.

    table-front-smc.JPG

    table-top-smc.JPG

    The top was my first attempt at hand rubbing a finish. I used a 600 grit sand paper and soaked the veneer with tungoil and rubbed for 30 mins each day for about 6 days. Didn't need much oil after day 1, I guess the veneer must have been saturated by then. BTW the venner was glued using epoxy and cauls, no vac bags. The two vertical strips you see at the end of the veneer is another one of my "fixes", the ends didn't match up quite perfect. so I routed a 1/4" groove and inserted a strip of mahogany.
    Last edited by Zahid Naqvi; 11-25-2005 at 4:30 PM.
    The means by which an end is reached must exemplify the value of the end itself.

  4. #4
    Join Date
    Jun 2005
    Location
    Brentwood & Altamont, TN
    Posts
    2,334
    Zahid,

    Materfully done! I really like the olive burl. How idid you attach the veneer to the substrate?

  5. #5
    Join Date
    Sep 2003
    Location
    Plano, TX
    Posts
    2,036
    Quote Originally Posted by Chris Barton
    Zahid,

    Materfully done! I really like the olive burl. How idid you attach the veneer to the substrate?
    Sorry didn't see your reply until after I had edited my message above. The backing is MDF, and the edging is attached to it by a tongue and groove, tongue on MDF and groove on mahogany). I used epoxy on a fellow woodworkers recommendation.
    The means by which an end is reached must exemplify the value of the end itself.

  6. #6
    Join Date
    Jun 2005
    Location
    Kissimmee, Florida
    Posts
    205
    Right on! beautiful design and followthrough.
    Roger

  7. #7
    Absolutely gorgeous piece, beautiful veneer, and good job covering up the mistake. I just assumed the mahogany strips were part of the design.

  8. #8
    Join Date
    Dec 2003
    Location
    Laguna Beach , Ca.
    Posts
    7,201
    Zahid,
    That is really great! It is a simplified version of a traditional design and it really works! Execution...wonderful workmanship!
    "All great work starts with love .... then it is no longer work"

  9. #9
    Join Date
    Sep 2004
    Location
    Pacific, Mo.
    Posts
    2,835
    Zahid the top is absolutely awe inspiring. And the walnut inserts show a masterful way to repair a flaw. Adds much to the top. Good Work!!!

  10. #10
    Beautiful work Zahid. The top is gorgeous, and the mahogany strips show creative problem-solving at its best.

    - Vaughn

  11. #11
    Join Date
    Jun 2005
    Location
    Meridian Id
    Posts
    528
    That is a truely nice piece of furniture, well done.

  12. #12
    Zahid, looks great. The veneer work turned out just right. Thanks for showing it off.

  13. #13
    Join Date
    Dec 2004
    Location
    NW Indiana
    Posts
    1,050
    Zahid, All I can say is Most Excellent!

  14. #14
    Join Date
    Mar 2005
    Location
    Spokane, Washington
    Posts
    4,021
    Zahid---Hats off to you!!! I love everything about this piece. I too had assumed the "fix" was a design element. Fabulous!!!

    Dan
    Eternity is an awfully long time, especially toward the end.

    -Woody Allen-

    Critiques on works posted are always welcome

  15. #15
    Join Date
    Jan 2005
    Location
    Goodland, Kansas
    Posts
    22,605
    Zahid that is absolutely beautiful. Nice workmanship. Love the veneer. Great job.
    Bernie

    Never put off until tomorrow what you can do the day after tomorrow.

    To succeed in life, you need three things: a wishbone, a backbone and a funnybone.


Similar Threads

  1. Project: Bench Cabinet for Adjust-A-Bench
    By Jim Becker in forum General Woodworking and Power Tools
    Replies: 19
    Last Post: 05-14-2006, 7:45 PM
  2. cabinet saw candidates: need to thin out the pack
    By David Dixson in forum General Woodworking and Power Tools
    Replies: 33
    Last Post: 04-06-2005, 8:22 AM
  3. LOML requests free standing kitchen cabinet
    By Bart Leetch in forum General Woodworking and Power Tools
    Replies: 8
    Last Post: 01-14-2004, 3:39 PM
  4. LOML requests a free standing kitchen cabinet
    By Bart Leetch in forum Design Forum
    Replies: 1
    Last Post: 01-14-2004, 2:25 PM
  5. CD Cabinet FINALLY Finshed-Delivered! *PICS*
    By Dennis Peacock in forum General Woodworking and Power Tools
    Replies: 39
    Last Post: 12-03-2003, 10:30 PM

Posting Permissions

  • You may not post new threads
  • You may not post replies
  • You may not post attachments
  • You may not edit your posts
  •