While I am a hybrid woodworker, I found that doing a couple of projects totally by hand really accelerated my learning curve in sharpening, tool set up, and "reading" the wood.
Well done!


 Contributor
While I am a hybrid woodworker, I found that doing a couple of projects totally by hand really accelerated my learning curve in sharpening, tool set up, and "reading" the wood.
Well done!
Member
Thanks. That makes me feel good that someone other than my family said it looked decent. I tried my best as it was for my dad for his Masonic things, many passed down for generations.Originally Posted by Andrew Pitonyak

"The key to a long life is when you start to die, don't"
Contributor
Nice work; I know exactly the feeling of accomplishment you are experiencing. Enjoy every second of it and keep doing it - it gets better and better!
[OP]
Contributor
Mark,
I agree. I have used power tools of all sorts most of my life. Over the past year or so, I have gone down the hand tool rabbit hole. I enjoy it much more. It is slower and much more methodical, but I enjoy methodical--most days anyway. I am also error prone and hand tools generally allow me to see my mistakes and correct them as they are happening instead of after. This is not always the case though (see my update below for evidence.)
Tim
[OP]
Contributor
A comedy of errors...and a long read
I managed to get some time at the bench today and the results were interesting. When I left off, I had a bunch decent looking, snug dovetail joints that needed a little refinement. I wanted some sort of "decorative" accoutrement for the front and back of the chest, and I needed some rabbets on the inside to attach the bottom, and a bottom.)
The day began on a positive note. I had my order of operations in hand (layout 3/4" through rabbets on the front and back and 3/4" stopped rabbets on the sides. All would be 1 1/2 inches from the bottom, and ~7/16 deep.) Then layout the curved "swoop" on the front and back pieces, cut rabbets on all pieces, AND then cut curved swoops on the front and back.
I dutifully laid out everything (I did not take picture of the layout, but I was quite happy with the knife lines and pencil marks). So pleased that I immediately grabbed the coping saw and proceeded to cut the swoops on the front and back pieces! Yeesh! Mindless does not begin to describe the lunacy of that move. After cutting, rounding out the swoops with a spokeshave that was giving me a fit of trouble, and making them match with a rasp, I was left a subtle curve that began 1" from each corner on the front and back. It was subtle and uncomplicated, but I like that. I was pleased with the results.
It was only AFTER I grabbed the rabbet/filister plane that I realized my error. I no longer had a reference edge! What was I thinkin? Obviously, I was not thinking--not actively thinking anyway. I put the tools down, left the mangled carcass pieces sitting on the bench, ate a late lunch, and stewed for a bit. Fast forward a couple hours later and I came up with an inelegant solution.
I clamped a piece of red oak to the edge of my bench and then fastened the back half of carcass to the bench with holdfasts. (I wish I had taken a picture, but I think I was trying to forget it ever happened. The workaround forced me to go against the grain into a knot or use my left hand. I am a natural lefty but right hand dominant due to the "tireless" efforts of the Sisters at Annunciation Catholic School, but I digress. It was also at this point that I decided I did not want to use through rabbets on the front and back and stopped rabbets on the sides. I decided (not sure of my thought process here) to use through grooves on the front/back and stopped grooves on the ends. I put the Record 078 away and grabbed the Record 044 plough. Problem? What problem? I do not have a 3/4 plough plane blade. No worries, I have a 1/2 and 1/4. How difficult could it be? HARD. Pushing even a sharp 1/2" plough iron against the grain into a large knot was not a pleasurable experience. About half way through the first groove, I put the venerable plough away and grabbed a 3/4" chisel and router plane.
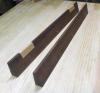
I spent about 30 minutes hacking away with the plough plane with little progress before I put it away. It took less than 20 minutes to hog out the waste with a chisel and then tune the groove with the router plane. Below is a not good pic of the resulting groove:
box progess-1.jpg
Finally progress! I followed the same process with the other long piece. Before long, I had two pieces with decent grooves and an understated swooping curve running the length of both. I can live with that, but all the backtracking and changing plans midstream took a lot of time.
Once I had the front and back like I wanted, I proceeded to make the stopped grooves for the end pieces. This went smoothly using the same process outlined above.
box progress-3.jpgbox progress-4.jpg
Four grooves, two curves, and an embarrassing amount of time later, we are now down to making the the bottom. I have some ~3/4 SYP left over from something so I determined in advance that I would use this as the bottom of the chest. To allow for some wood movement and because I wanted some practice, I decided that the bottom would be individual pieces joined together using tongue and groove and then slid into the grooves in sections. Tongues are cut with the 050 and grooves with the 044. (I could have done the entire operation with the 050, but that would entail numerous blade and setting changes. Once I had tongue cutter dialed in, I decided to leave it set. Plus, I enjoy using the 044.)
box progress-5.jpg
Does the bottom fit? Not quite as well as I desired. I need to do a little fitting work. (Pic next time)
At the end of day, this is what I am left with
box progress-6.jpgbox progress-9.jpg
Oh and this...A crack in the back pin board (top right corner). Man I hope glue and clamps will close that up!
box progress-7.jpg
[OP]
Contributor
Quick update...
Back at it again today for a brief period. I disassembled the carcass this morning to attempt to repair the cracked pin that I noticed yesterday. I guess time will tell if the repair holds.
I also realized that had not extended the stopped grooves on the end far enough to allow the bottom to seat properly. I needed to extend the grooves about a 1/4" on both ends on both pieces. Fairly straight forward process.
Chest Progress 1.jpgProgress-2.jpg
It is not going to win any awards, but it do to allow the bottom to slide in like I want.
With the grooves extended, I decided to make the bottom. The bottom is 3/4 SYP joined using tongue and groove joints. All individual pieces were cut and then match planed. This went quickly without any unexpected developments.
progress 3.jpgprogress 4.jpg
There we have it. A rectangular box that remains surprisingly square. Despite yesterday's travails, I have a box with a bottom. The cracked pin repair seems to be holding. Next time it comes apart will be to glue the dovetails.
Contributor
I really appreciate the detail, the failures, the successes. Might keep me from similar mistakes.
[OP]
Contributor
Quick update for those interested...
I have not had a lot of bench time the last 10 days or so, but I did manage make some progress on the chest.
After gluing up the carcass last weekend, I finally made some time to clean up the dovetails this afternoon. I think they turned out ok. They are not perfect, but not too bad for a first attempt either. There are couple baseline gaps and little bit of space between a couple pins and tails. I'll take it though.
cleaned Dts-1.jpg cleaned DTs-2.jpgClean DTs-3.jpg
Just for fun, I added some aromatic cedar tonight. I like the look and smell. I am sure both will fade with time.
Cedar bottom.jpg
Next step is the top. Originally, I planned to use some maple that has been sitting under my bench for months; however, I decided to use some of the cherry that I lucked into last weekend. I just am waiting for it to acclimate before I start working it.
 Friend of the Creek
Thanks for sharing the update, Tim. You should feel very good about those dovetails. Multiple dovetails for panels (vs just a few for a drawer, for example) exponentially increases the challenge.
Look forward to the next update.
 Posting Permissions

 Reply With Quote