Page 1 of 4 1234 LastLast
Results 1 to 15 of 47

Thread: Jointer Fences for Hand Planes

  1. #1
    Join Date
    Apr 2008
    Location
    Dayton Ohio
    Posts
    964

    Jointer Fences for Hand Planes

    The first question when thinking about fences for jointer planes is: "Do you need one?". Well to be fair the answer could be definitely no, definitely yes, or maybe. Starting with the definitely no perspective, you can, with practice, use your fingers to shoot a board and then check it with a square, making adjustments as needed. You can also make a long shooting board and use your bench as a fence. In certain cases you can match plane two boards and they will match up regardless of the angle. These all work for a 90 degree angle. In the definitely yes group are people who have a lot of the same angle to do and wish to speed things up a little by not having to check for the accuracy of the angle. Then there is the maybe group. People whose eyes are starting to fail and the hands/arms are giving out. Thats when a fence can act like a crutch and help accomplish the task. So the following are examples of different fences and some details about them. Note: If the fence is not square to the plane by a little bit, you can sometimes tilt the blade (with lateral adjuster if it has one). You can also add beveled boards to most fixed fences for non-90 degree angles.

    When installing a fence on a plane, keep it towards the nose end of the plane. It need to register before it cuts. Also, some fences may have interference with where your knob and tote are. They typically work best on longer planes in the 22" or longer sizes. In my pictures below you will see either #5 or #7 sized planes.

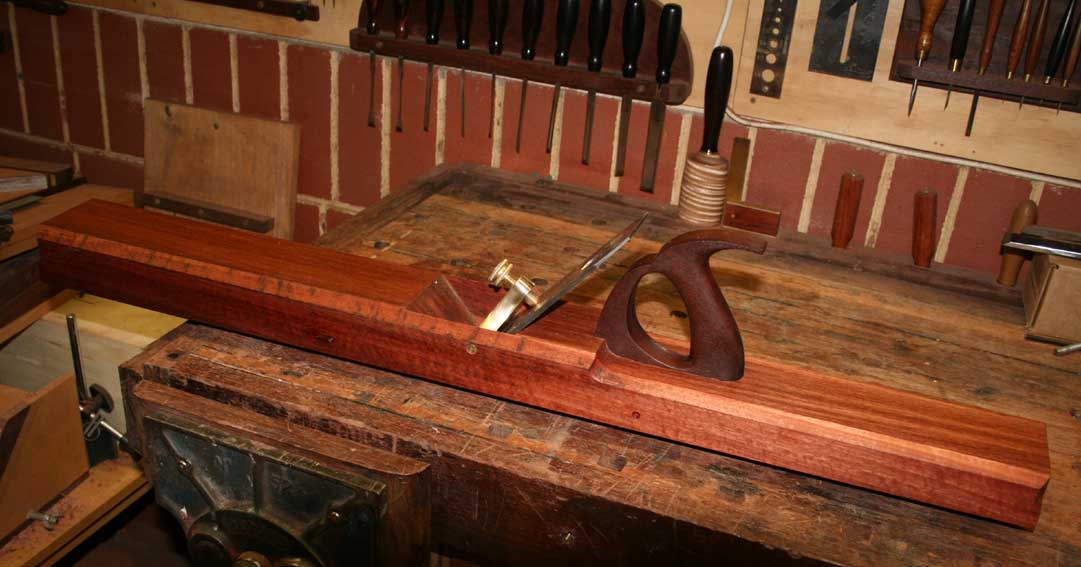
    Starting with a simple one made out of plywood, I wanted to try a few things. First, I made it as long as my #7 Stanley. Its basically made of two 1/2" thick pieces of plywood glued together. The first piece is clamped to the side of the plane. It was shaped a little on the top for hand clearance. As is, it won't work well this way. Yes the board is 90 degrees to the bottom, but, the blade is inset from the side. So another plywood strip was added to the inside of the outer board. Again, it won't work this way well either. You see that extra board goes over the blade and needs a small clearance notch. Now it will work. This fence is 22" long by 2 1/2" wide. It weights 1lb 12oz. Trying it out on a 3/4" thick board it worked fine but felt a little off. Looking closer I realized that the plane was not centered on the board. So I added another 1/2" plywood filler strip with screws to make it removable. It feels much better now being centered. Removing the strip it centers well on a 1 1/2" board. If interested I can post pictures of the build.

    01 Wood.jpg

    Looking at manufactured fences, starting with the earliest. Levi Alexander patented his design July 16, 1872 (#129,508). It was designed to be screwed to the side of wooden planes. It allowed a range of 45, 90, and 135 degrees. It also offered the ability to offset the fence about an inch inward. If desired, you can make some clamping blocks to mount to a metal plane. There are no holes for mounting a wooden face. The face measures 9 1/4" long by 2" high. It weights 1lb 11oz. It is unmarked but some examples indicate a label was stuck on and may have had gold pinstriping on the black jappaned fence. (This one has been nickel plated).

    02 Alexander.jpg

    The Alexander fence at some time was being manufactured by Langdon (of miter box fame). They were located on the Millers Falls property and sales were also handled by M-F. In 1904 Langdon introduced a replacement for the Alexander with one they called the "Perfection Jointer Gauge". This one was designed for metal planes and featured two cam locks to hold the fence to the plane. It is usually only marked on the adjust knob. It is 9 1/8" long by 2" high. Weights 1lb 14oz. (This one has been nickel plated).

    03 Langdon Perfection.jpg

    Millers Falls eventually bought Langdon and modified the fence slightly. They added their name to the fence along with the 88 model number. They also added a very handy side knob. It was manufactured until 1944. Its the same size as the Perfection but weights 1lb 15oz. (This one has been nickel plated).

    04 Millers Falls 88.jpg

    Stanley brought out their model 386 in 1913 that was patented by A.F. Schade on Apr 1, 1913 (#1,057,582). It uses two clamps to hold the fence to the side of the plane but also have two additional top screws pulling the fence up tight to the bottom of the plane. Most fences can be mounted to wooden planes by removing the clamps but this model would also require some notches to clear the additional screws. This fence is clearly marked on the fence with the Stanley 386 and patent date. Normally this fence was totally nickel plated from the factory. It has a handy side knob and screw holes for filler strips. It is 11" long by 2 1/4" high. It weighs 1lb 14oz.

    05 Stanley 386.jpg

    Stearns introduced several models. Not sure when they started selling these but they were in a 1924 catalog. The number 6 (not shown, is similar to the Perfection in size. The clamping was done either with the cam type or screws pointing down on the side edge of the plane. The one shown here is the number 7. It has three clamping points and was designed for wooden planes as well as the metal ones. It is 7" long by 1 3/4" high. It weights 1lb 2oz. (This one has been nickel plated).

    06 Stearns 7.jpg

    Not shown are the current ones from Lee Valley. They are made from cast aluminum. They have different models with some only for their planes. They do have a version that is only 90 degrees and magnets. The adjustable designed for other manufacturers should work fine.

    One other not shown is by St. James Bay. Theirs is a cast bronze similar to the Stearns with top mounted clamping screws.

    My preference would be the Stanley 386 and then the original Alexander. The Millers Falls is also good. The only ones I would recommend against are the real short ones (like the Stearns #7). The short ones just don't register as well.

  2. #2
    I can't imagine someone skilled with a jointer plane wanting a fence. It is much more accurate to learn to plane than to depend on a fence to make an edge square to the face. In addition, when edge joining, we joint the edges before truing the faces, so a fence is useless.

  3. #3
    Join Date
    Apr 2008
    Location
    Dayton Ohio
    Posts
    964
    Quote Originally Posted by Warren Mickley View Post
    I can't imagine someone skilled with a jointer plane wanting a fence. It is much more accurate to learn to plane than to depend on a fence to make an edge square to the face. In addition, when edge joining, we joint the edges before truing the faces, so a fence is useless.
    So you are in the definitely no camp. That's fine. No need to shame those who like them.

  4. #4
    Join Date
    Jun 2003
    Location
    Wenatchee, WA
    Posts
    446
    Quote Originally Posted by Warren Mickley View Post
    In addition, when edge joining, we joint the edges before truing the faces, so a fence is useless.
    Okay... I'll expose my newness/ignorance yet again: everything I've learned (books/videos/fumbling on my own at the bench) in the relatively short time I've been fiddling with hand tools usually starts with getting at least one side relatively flat, or at least free of cup/twist if not perfectly 'flat', *then* squaring the edge to that face. Is that wrong?

    Not saying I'm a proponent of using the various fence attachments - although I've found using the bench as a sort of fence to be kind of handy for thin stock.

  5. #5
    Join Date
    Apr 2008
    Location
    Dayton Ohio
    Posts
    964
    Quote Originally Posted by Monte Milanuk View Post
    Okay... I'll expose my newness/ignorance yet again: everything I've learned (books/videos/fumbling on my own at the bench) in the relatively short time I've been fiddling with hand tools usually starts with getting at least one side relatively flat, or at least free of cup/twist if not perfectly 'flat', *then* squaring the edge to that face. Is that wrong?

    Not saying I'm a proponent of using the various fence attachments - although I've found using the bench as a sort of fence to be kind of handy for thin stock.
    Hey, whatever works for you. As long as your making something, anything. Experience will add and subtract from your approach. For instance, if you insist on squaring the edge to a non flat surface are you really square? I would hate to square the face to the edge of a wide board. I personally prefer to flatten the board and then square the edges. To each his own. One thing not discussed is what if it's not a 90 degree angle you want? For instance, if you are making a hexagonal box. Thats where an adjustable fence comes in handy. Most will do it on a table saw (with a fence). Or make a special shooting board. Hard to do freehand. Not that it can't be done, its just harder.

  6. #6
    Join Date
    Jun 2003
    Location
    Wenatchee, WA
    Posts
    446
    Eric,

    I probably could/should have phrased that better; I'm not necessarily a proponent of using the various fence attachments, but I'm not firmly set against them either. I just haven't needed them - yet. That very well may change when I encounter some situation like you describe.

    Monte

  7. #7
    Generally if we have a board we want to true up we flatten a face side first and then flatten and square an edge to that face. This is because it is a lot easier to square the edge to the face than square a face to an edge.

    When we are making an edge joint it is easier to make the joint first rather than truing faces. Otherwise you have to flatten the face of each board, make the joint and then flatten a face again. Once the board is all glued up, then flatten a face.

  8. #8
    Join Date
    Jun 2010
    Location
    twomiles from the "peak of Ohio
    Posts
    12,185
    The crazy thing about these fences.....You can set them to a certain bevel angle....PLANE the bevel into the edges of as many boards as you need done....and the bevel will be the same on each and every board. This is what these fence were good at, more than just jointing the edge of a board.....and that is why they were designed to be able to plane at about any angle you needed.

    Otherwise, just run your knuckles along UNDER the plane as a fence, with your left thumb hooked over the edge of the plane's base...just watch out for any splinters..

    Yeah, that was the reason these fences were made and SOLD over the decades....NOT to help Joint a board's edge....
    A Planer? I'm the Planer, and this is what I use

  9. #9
    Join Date
    Jun 2003
    Location
    Wenatchee, WA
    Posts
    446
    Warren,

    Gotcha. I'd seen various forms of that; just seemed like most did a *little* flattening to get the twist out before edge jointing.

    Monte
    Last edited by Monte Milanuk; 07-30-2023 at 8:08 PM.

  10. #10
    Join Date
    Apr 2017
    Location
    Clarks Summit PA
    Posts
    1,747
    Quote Originally Posted by Warren Mickley View Post
    Generally if we have a board we want to true up we flatten a face side first and then flatten and square an edge to that face. This is because it is a lot easier to square the edge to the face than square a face to an edge.

    When we are making an edge joint it is easier to make the joint first rather than truing faces. Otherwise you have to flatten the face of each board, make the joint and then flatten a face again. Once the board is all glued up, then flatten a face.
    This is not used much because most of us are not full Neanders like you Warren. I am going to try this approach for edge joining 2 cherry boards for a table top that are 6 feet long, 18 inches wide and 2 inches thick. The edges must be without wind. The faces of the board are not flat. Therefore a jointer fence would ruin my edge joint. Now the next question...if the edge joints look really good when one board is stacked on top of the other board, can I do a rub joint with hide glue without clamps?

  11. #11
    Join Date
    Nov 2009
    Location
    Peoria, IL
    Posts
    4,532
    I'm in the need one camp,, and I have a couple. What if I want a 22 1/2 degree edge on an 80" board for the face frame of a corner cabinet. No way can I do that by eye over the entire length.

  12. #12
    Join Date
    Feb 2004
    Location
    Perth, Australia
    Posts
    9,497
    In 2011, I was gifted a 3" wide blade and cap iron. There was no option but to build a 36 1/2" long Cooper's Jointer ..


    To give you some idea of its size, here it is alongside a Stanley #7 jointer plane ...


    It was a bit of a handful to joint boards in the usual way (but it could) ...


    And so I built a fence for squaring. The intention was not to use it this way (although it could) ...


    But, rather, to use is as a cooper would ...


    Add on the fence, and it became a Neanderthal non-powered jointer


    I use this plane to flatten my bench every now-and-then. Makes for quick work.

    Regards from Perth

    Derek

  13. #13
    Join Date
    Jan 2007
    Location
    Michiana
    Posts
    3,079
    I rather like the idea of a fence. I've added an auxiliary fence to my plow plane and skewed rabbet to keep things square. The addition makes a difference.. Having one on a jointer plane might be a nice addition too. As it is now I use my #7 and get it as close to square as I can, then follow up with a LV Edge Plane to true up anything off kilter.
    Sharp solves all manner of problems.

  14. #14
    Join Date
    Jun 2010
    Location
    twomiles from the "peak of Ohio
    Posts
    12,185
    NOT useless, unless one hasn't a clue as to what the fences are used for....

    They come with an angle finder scale...Why? NOT to set up a 90 degree edge....but IF one needs to do a LOT of beveled edges on LONG boards....you simply set the angle needed, lock the lock....and you can plane all day long at that angle..

    The fences are NOT designed to flatten ANY board, ever...they are however a tool to use whenever an edge needs to be at a consistent bevel along it's entire length.

    Say for instance: A table's top needs to have a bevel along the underside along all the edges...and all at the same angle...Set the fence to that angle, to where the fence rides on the edges of the top, and the plane's iron cuts a bevel....quite easy to set up and use.. yes, most fences were made to both tilt in either direction...at least the better made ones were.

    Can not use a plane to flatten a twisted board, when the fence restricts you to just the edges,,,,and cannot reach into the center of that board because the fence will stop you.

    While a fence is nice to help a jointer plane a square edge....it is not quite balanced right....and the plane tends to wobble along.

    When I use a larger Jointer plane for a square, glue ready edge.....my index finger is riding along the face of the board, and my left thumb is hooked over the side of the plane. I can feel IF there is any wobble going on...at no time do I touch the front knob. To bring the plane back to "Start", I simply lift up on the tote, and pull back riding just on the end of the toe.

    Set the fence to around 10-15 degrees, run the fence along the edge of a board...with the plane's iron making the cut on the face side of the board....and you can raise a panel fairly fast...depending on the size of the panel....you can fence a #4 on up to the large Door Panels...

    Yep, those that say a fence is "useless"....usually have no clue in HOW to use them.
    A Planer? I'm the Planer, and this is what I use

  15. #15
    Join Date
    Feb 2007
    Location
    Connecticut Shoreline
    Posts
    339
    I had one for awhile, it worked okay. Kinda like training wheels on a bike. I stopped using after awhile, for the following reasons:

    1. I did develop the skills Warren mentions. It just takes a few times, maybe a dozen or so. YMMV

    2. For jointing panels I use the technique where you plane two boards face to face (like when book-matching) then joint the edges that'll be glued up together. When you open the "book" the resulting angles of each joint offsets each other and you wind up with a perfect planer panel, even if each joint is off a bit. So instead of 90-90 you get say 91-89. You do have to keep them all in order, particularly if you are making up a panel with more than two boards. There's a name for this technique that escapes me ATM.

    3. These days I often take my last pass on my workbench with the board on two strips of lath running parallel to the joint, then use my jointer plane on its side. Basically like a big shooting board. As long as the iron is square to the side of the plane and the top of the bench is flat, a 90-degree angle will result.

    Note: I do keep a long wooden jointer (try plane really) with no camber at all to the iron, just for shooting edges. I had it made for me by Clark and WIlliams a long time ago, and it's a thing of beauty.

    DC

Posting Permissions

  • You may not post new threads
  • You may not post replies
  • You may not post attachments
  • You may not edit your posts
  •